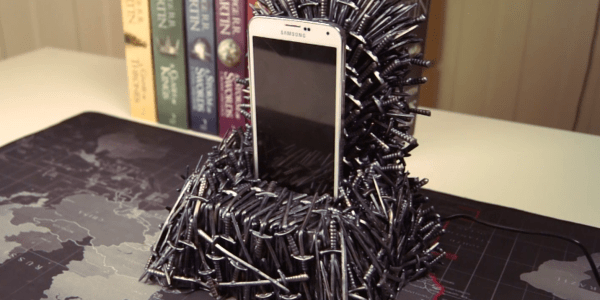
The Ultimate 1:1 BB-8 Build Guide

BB-8 is not only a cute little droid but also presents dandy of a challenge for hackers ’round the globe to try and recreate in the garage. Nonfunctional models are a dime a dozen and the novelty has long worn off the Sphero toy. This brings us to a legit full-scale BB-8, seen in action in the video after the break.

Lucky for us, [Ed Zarick] has written up a blog post that’s as impressive as the build itself. [Ed] has drawn some inspiration and shared knowledge from several online groups focused around recreating the BB-8. He also provides some thorough Solidworks assemblies that look painfully detailed.

Continue reading “The Ultimate 1:1 BB-8 Build Guide”

Upgrading And Desoldering A Fake CPU

[quarterturn] had an old Apple Powerbook 520c sitting around in his junk bin. For the time, it was a great computer but in a more modern light, it could use an upgrade. It can’t run BSD, either: you need an FPU for that, and the 520 used the low-cost, FPU-less version of the 68040 as its main processor. You can buy versions of the 68040 with FPUs direct from China, which means turning this old Powerbook into a BSD powerhouse is just a matter of desoldering and upgrading the CPU. That’s exactly what [quarterturn] did, with an unexpected but not surprising setback.

The motherboard for the Powerbook 500 series was cleverly designed, with daughter cards for the CPU itself and RAM upgrades. After pulling the CPU daughter card from his laptop, [quarterturn] faced his nemesis: a 180-pin QFP 68LC040. Removing the CPU was handled relatively easily by liberal application of ChipQuik. A few quick hits with solder braid and some flux cleaned everything up, and the daughter card was ready for a new CPU.

The new FPU-equipped CPU arrived from China, and after some very careful inspection, soldering, and testing, [quarterturn] had a new CPU for his Powerbook. Once the Powerbook was back up and running, there was a slight problem. The chip was fake. Even though the new CPU was labeled as a 68040, it didn’t have an FPU. People will counterfeit anything, including processors from the early 90s. This means no FPU, no BSD, and [quarterturn] is effectively back to square one.

That doesn’t mean this exercise was a complete loss. [quarterturn] did learn a few things from this experience. You can, in fact, desolder a dense QFP with ChipQuik, and you can solder the same chip with a regular soldering iron. Networking across 20 years of the Macintosh operating system is a mess, and caveat emptor doesn’t translate into Mandarin.

Icestudio: An Open Source Graphical FPGA Tool

If you’ve ever worked with FPGAs, you’ve dealt with the massive IDEs provided by the vendors. Xilinx’s ISE takes about 6 gigabytes, and Altera’s Quartus clocks in at over 10 gigs. That’s a lot of downloading proprietary software just to make an LED blink.

[Jesús Arroyo]’s Icestudio is a new, graphical tool that lets you generate Verilog code from block diagrams and run it on the Lattice Semi iCEstick development board. A drag and drop interface lets you connect IOs, logic gates, dividers, and other elements. Once your block diagram is ready, a single button press downloads the code to the iCEstick.

Under the hood, Icestudio uses IceStorm, which we’ve discussed on HaD in the past, including this great talk by [Clifford], Icestorm’s lead. For the GUI, Icestudio uses nw.js, which spits out JSON based on the block diagram. This JSON is converted into a Verilog file and a PCF file. The Verilog is used to create the logic on the FPGA, and the PCF is used to define the pin configuration for the device. Clicking on selected modules reveals the generated Verilog if you want to know what’s actually going on.

It’s experimental, but this looks like a neat way to get started on FPGAs without learning a new language or downloading many gigs of toolchains. We’re hoping Icestudio continues to grow into a useful tool for education and FPGA development. A demo follows after the break.

[Thanks to Nils for the tip!]

Continue reading “Icestudio: An Open Source Graphical FPGA Tool”

ARM Unveils New, High Efficency CPU

ARM has announced their latest IP core the Cortex A32. This 32-bit chip brings the benefits of the ARMv8-A architecture to low-power devices, ostensibly ones that will be the backbone of the Internet of Things.

For the last few years, the state of ARM CPUs has been firmly planted in the world of ARMv7 instructions. These chips, the Cortex A5, A7, A9, A15, and A17 are divided into ‘good, better, best’ segments, with the A7 pulling its weight as the processor in the Raspberry Pi 2, and a dual-core A15 finding its way into the latest BeagleBoard. While these CPUs are very capable, they don’t support the latest ARM architecture, ARMv8. For the last few years, the only ARM processors with the v8 architecture fell into the ‘better’ and ‘best’ segments. Although the A53, A57, and A72 chips are very capable, there hasn’t been a low power ARMv8 chip until this announcement.

So what does this announcement mean for the next generation of the Internet of Things, single board computers, and the wearable electronics of tomorrow? Absolutely nothing. Only the processor IP was released, and it will take at least a year for this core to make it into a chip. It will be 18 to 24 months until you can find this core in a consumer device. On the other hand, when these devices do appear, they will be significantly faster than current devices with a Cortex A5 and A7.

Anti-Cogging Algorithm Brings Out The Best In Your Hobby Brushless Motors

Cheap, brushless motors may be the workhorses behind our RC planes and quadcopters these days, but we’ve never seen them  in any application that requires low-speed precision. Why? Sadly, cheap brushless motors simply aren’t mechanically well-constructed enough to offer precise position control because they exhibit cogging torque, an unexpected motor characteristic that causes slight variations in the output torque that depend rotor position. Undaunted, [Matthew Piccoli] and the folks at UPenn’s ModLab have developed two approaches to compensate and minimize torque-ripple, essentially giving a cheap BLDC Motor comparable performance to it’s pricier cousins. What’s more, they’ve proven their algorithm works in hardware by building a doodling direct-drive robotic arm from brushless motors that can trace trajectories.

Cogging torque is a function of position. [Matthew’s] algorithm works by measuring the applied voltage (or current) needed to servo the rotor to each measurable encoder position in a full revolution. Cogging torque is directional, so this “motor fingerprint” needs to be taken in both directions. With these measured voltages (or currents) logged for all measurable positions, compensating for the cogging torque is just a matter of subtracting off that measured value at any given position while driving the motor. [Matthew] has graciously taken the trouble of detailing the subtleties in his paper (PDF), where he’s actually developed an additional acceleration-based method.

Hobby BLDC motors abound these days, and you might even have a few spares tucked away on the shelf. This algorithm, when applied on the motor controller electronics, can give us the chance to revisit those projects that mandate precise motor control with high torque–something we could only dream about if we could afford a few Maxon motors. If you’re new to BLDC Motor Control theory, check out a few projects of the past to get yourself up-and-running.

Continue reading “Anti-Cogging Algorithm Brings Out The Best In Your Hobby Brushless Motors”

Breaking SimpliSafe Security Systems With Software Defined Radio

The SimpliSafe home security system is two basic components, a keyboard and a base station. Sensors such as smoke detectors, switches, and motion sensors can be added to this system, all without a wired installation. Yes, this security system is completely wireless. Yes, you can still buy a software defined radio for ten dollars. Yes, the device has both “simple” and “safe” in its name. We all know where this is going, right?

Last week, [Andrew Zonenberg] at IOActive published a security vulnerability for the SimpliSafe wireless home security system. As you would expect from an off-the-shelf, wireless, DIY security system, the keypad and base station use standard 433 MHz and 315 MHz ISM band transmitters and receivers. [Dr. Zonenberg]’s attack on the system didn’t use SDR; instead, test points on the transmitters were tapped and messages between the keypad and base station were received in cleartext. When the correct PIN is entered in the keypad, the base station replies with a ‘PIN entered’ packet. Replaying this packet with a 433 MHz transmitter will disable the security system.

[Michael Ossmann] took this one step further with a software defined radio. [Ossmann] used a HackRF One to monitor the transmissions from the keypad and turned to a cheap USB SDR dongle to capture packets. Replaying keypad transmissions were easy, but with a little bit more work new attacks can be found. The system can be commanded to enter test mode even when the system is armed bypassing notifications to the owner.

It’s a hilarious failure of wireless security, especially given the fact that this exploit can be performed by anyone with $100 in equipment. With a little more effort, an attacker can execute a PIN replay from a mile away. Sadly, failures of security of this magnitude are becoming increasingly common. There will assuredly be more attacks of this kind in the future, at least until hardware manufacturers start taking the security (of their security products) seriously.

A Slew Of Open-Source Synthesizers

Hackaday reader [Jan Ostman] has been making microcontroller-based DIY synthesizers for quite a while now. Recently, he’s opened up the source for a lot of them so that you can play along at home. All of these virtual-analog synths and soundmakers can be realized on an Arduino or AVR ATmega328 if you happen to have one lying around.

Extra parts like a keyboard, some pushbuttons, or some potentiometer knobs to twiddle won’t hurt if you’d like to make something more permanent or more obviously playable, like [Jan] does. On the other hand, if you’d just like to get your feet wet, I’ve tweaked his code to be more immediately plug-and-play. The code is straightforward enough that it’s a good learning platform. So let’s take a quick tour through three drum machines and a string synth, each of which you can build on a breadboard in just a few minutes.

To install on an Arduino UNO, fetch the zip file from this GitHub repository, and move each subfolder to your Arduino sketch directory. You’re ready to play along.

Continue reading “A Slew Of Open-Source Synthesizers”