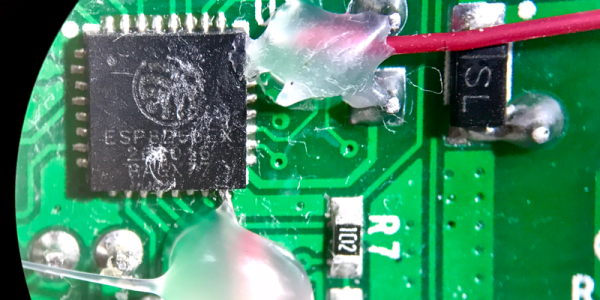
Economies of scale and mass production bring us tons of stuff for not much money. And sometimes, that stuff is hackable. Case in point: the $5 Sonoff WiFi Smart Switch has an ESP8266 inside but the firmware isn’t very flexible. The device is equipped with the bare minimum 1 MB of SPI flash memory. Even worse, it doesn’t have the I2C ports extra pins exposed so that you can’t just connect up your own sensors and make them much more than just a switch. But that’s why we have soldering irons, right?
Safe Cracking Is [Nate’s] Latest R&D Project
We love taking on new and awesome builds, but finding that second part (the “awesome”) of each project is usually the challenge. Looks like [Nathan Seidle] is making awesome the focus of the R&D push he’s driving at Sparkfun. They just put up this safe cracking project which includes a little gamification.
The origin story of the safe itself is excellent. [Nate’s] wife picked it up on Craig’s List cheap since the previous owner had forgotten the combination. We’ve seen enough reddit/imgur threads to not care at all what’s inside of it, but we’re all about cracking the code.
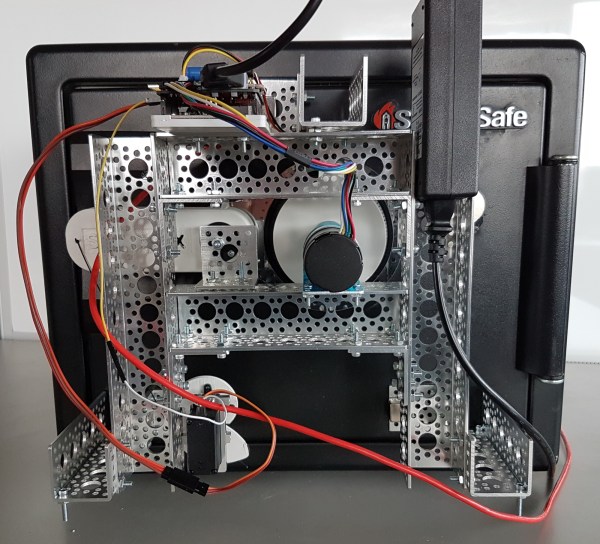
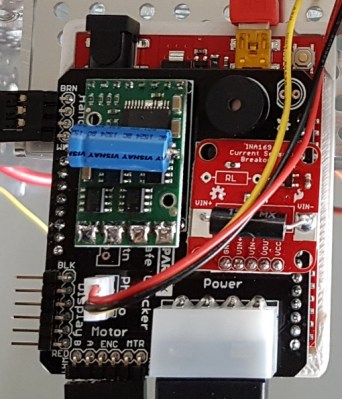 The SparkX (the new rapid prototyping endeavor at Sparkfun) approach was to design an Arduino safe cracking shield. It has a motor driver for spinning the dial and can drive a servo that pulls the lever to open the door. There is a piezo buzzer to indicate success, and the board as a display header labeled but not in use, presumably to show the combination currently under test. We say “presumably” because they’re not publishing all the details until after it’s cracked, a process that will be live streamed starting Wednesday. This will keep us guessing on the use of that INA169 current sensor that plugs into the safecracking shield. There is what appears to be a reflectance sensor above the dial to keep precise track of the spinning dial.
Electrically this is what we’d expect, but mechanically we’re in love with the build. The dial and lever both have 3D printed adapters to interface with the rest of the system. The overall framework is built out of aluminum channel which is affixed to the safe with rare earth magnets — a very slick application of this gear.
The gamification of the project has to do with a pair of $100 giveaways they’re doing for the closest guess on how long it’ll take to crack (we hope it’s a fairly fast cracker) and what the actual combination may be. For now, we want to hear from you on two things. First, what is the role of that current sensor in the circuit? Second, is there a good trick for optimizing a brute force approach like this? We’ve seen mechanical peculiarities of Master locks exploited for fast cracking. But for this, we’re more interested in hearing any mathematical tricks to test likely combinations first. Sound off in the comments below
Casting Machine Bases In Composite Epoxy
When you’re building a machine that needs to be accurate, you need to give it a nice solid base. A good base can lend strength to the machine to ensure its motions are accurate, as well as aid in damping vibrations that would impede performance. The problem is, it can be difficult to find a material that is both stiff and strong, and also a good damper of vibrations. Steel? Very stiff, very strong, terrible damper. Rubber? Great damper, strength leaves something to be desired. [Adam Bender] wanted to something strong that also damped vibrations, so developed a composite epoxy machine base.
[Adam] first takes us through the theory, referring to a graph of common materials showing loss coefficient plotted against stiffness. Once the theory is understood, [Adam] sets out to create a composite material with the best of both worlds – combining an aluminium base for stiffness and strength, with epoxy composite as a damper. It’s here where [Adam] begins experimenting, mixing the epoxy with sand, gravel, iron oxide and dyes, trying to find a mixture that casts easily with a good surface finish and minimum porosity.
With a mixture chosen, it’s then a matter of assembling the final mould, coating with release agent, and pouring in the mixture. The final result is impressive and a testament to [Adam]’s experimental process.
We’ve seen similar builds before — like this precision CNC built with epoxy granite — but detail in the documentation here is phenomenal.
Cheap Smarthome Gadget(s) Hacked Into Zigbee Sniffer
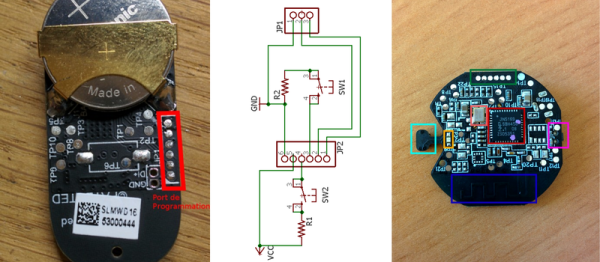
French hacker [akila] is building up a home automation system. In particular, he’s been working with the “SmartHome” series of gadgets made by Chinese smartphone giant, Xiaomi. First, he started off by reverse-engineering their very nicely made temperature and humidity sensor. (Original in French, hit the translate button in the lower right.) With that under his belt, he opened up the PIR motion sensor unit to discover that it has the same debugging pinouts and the same processor. Almost too easy.
For a challenge, [akila] decided it was time to implement something useful in one of these gadgets: a ZigBee sniffer so that he can tell what’s going on in the rest of his home network. He built a USB/serial programming cable to work with the NXP JN5169’s bootloader, downloaded the SDK, and rolled up his sleeves to get to work.
While trolling through the SDK, he found some interesting firmware called “JennicSniffer”. Well, that was easy. There’s a demo version of a protocol analyzer that he used. It would be cool to get this working with Wireshark, but that’s a project for another day. [Akila] got far enough with the demo analyzer to discover that the packets sent by the various devices in the home network are encrypted. That’s good news for the security-conscious out there and stands as the next open item on [akila]’s to-do list.
We don’t see as many ZigBee hacks as we’d expect, but they’ve definitely got a solid niche in home automation because of commercial offerings like Philips Hue and Wink. And of course, there’s the XBee line of wireless communications modules. We just wrote up a ZigBee hack that aims to work with the Hue system, though, so maybe times are changing?
[Joe Grand’s] Toothbrush Plays Music That Doesn’t Suck
It’s not too exciting that [Joe Grand] has a toothbrush that plays music inside your head. That’s actually a trick that the manufacturer pulled off. It’s that [Joe] gave his toothbrush an SD card slot for music that doesn’t suck.
The victim donor hardware for this project is a toothbrush meant for kids called Tooth Tunes. They’ve been around for years, but unless you’re a kid (or a parent of one) you’ve never heard of them. That’s because they generally play the saccharine sounds of Hannah Montana and the Jonas Brothers which make adults choose cavities over dental health. However, we’re inclined to brush the enamel right off of our teeth if we can listen to The Amp Hour, Embedded FM, or the Spark Gap while doing so. Yes, we’re advocating for a bone-conducting, podcasting toothbrush.
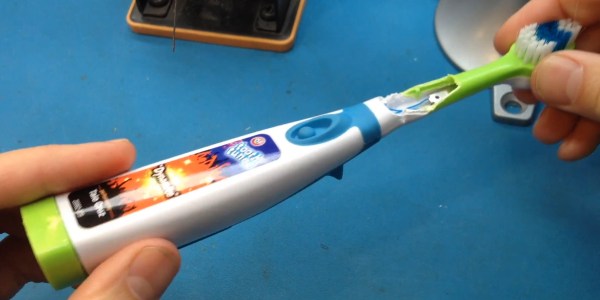
[Joe’s] hack starts by cracking open the neck of the brush to cut the wires going to a transducer behind the brushes (his first attempt is ugly but the final process is clean and minimal). This allows him to pull out the guts from the sealed battery compartment in the handle. In true [Grand] fashion he rolled a replacement PCB that fits in the original footprint, adding an SD card and replacing the original microcontroller with an ATtiny85. He goes the extra mile of making this hack a polished work by also designing in an On/Off controller (MAX16054) which delivers the tiny standby current needed to prevent the batteries from going flat in the medicine cabinet.
Check out his video showcasing the hack below. You don’t get an audio demo because you have to press the thing against the bones in your skull to hear it. The OEM meant for this to press against your teeth, but now we want to play with them for our own hacks. Baseball cap headphones via bone conduction? Maybe.
Update: [Joe] wrote in to tell us he published a demonstration of the audio. It uses a metal box as a sounding chamber in place of the bones in our head.
Continue reading “[Joe Grand’s] Toothbrush Plays Music That Doesn’t Suck”
Getting Sparks From Water With Lord Kelvin’s Thunderstorm
In the comments to our recent article about Wimshurst machines, we saw that some hackers had never heard of them, reminding us that we all have different backgrounds and much to share. Well here’s one I’m guessing even fewer will have heard of. It’s never even shown up in a single Hackaday article, something that was also pointed out in a comment to that Wimshurst article. It is the Lord Kelvin’s Water Dropper aka Lord Kelvin’s Thunderstorm, invented in the 1860s by William Thomson, 1st Baron Kelvin, the same fellow for whom the Kelvin temperature scale is named. It’s a device that produces a high voltage and sparks from falling drops of water.
Continue reading “Getting Sparks From Water With Lord Kelvin’s Thunderstorm”
MRRF 17: A Working MakerBot Cupcake
The Midwest RepRap Festival is the best place to go if you want to see the latest in desktop 3D printing. This weekend, we saw full-color 3D printers, a printer with an infinite build volume, new extruders, a fantastic development in the pursuit of Open Source filament, and a whole bunch of D-bots. If you want the bleeding edge in 3D printing, you’re going to Goshen, Indiana.
Of course, it wasn’t always like this. In 2009, MakerBot released the Cupcake, a tiny printer that ushered in the era of democratized 3D printing. The Cupcake was a primitive machine, but it existed, it was open source, and it was cheap – under $500 if you bought it at the right time. This was the printer that brought customized plastic parts to the masses, and even today no hackerspace is complete without an unused Cupcake or Thing-O-Matic sitting in the corner.
The MakerBot Cupcake has not aged well. This should be expected for a technology that is advancing as quickly as 3D printing, but today it’s rare to see a working first generation MakerBot. Not only was the Cupcake limited by the technology available to hackers in 2009, there are some pretty poor design choices in these printers. There’s a reason that old plywood MakerBot in your hackerspace isn’t used anymore – it’s probably broken.
This year at MRRF, [Ryan Branch] of River City Labs brought out his space’s MakerBot Cupcake, serial number 1515 of 2,625 total Cupcakes ever made. He got his Cupcake to print a test cube. If you’re at all familiar with the Cupcake, yes, this is a hack. It’s a miracle these things ever worked in the first place.

