A Flex Sensor For A Glove Controller Using An LDR

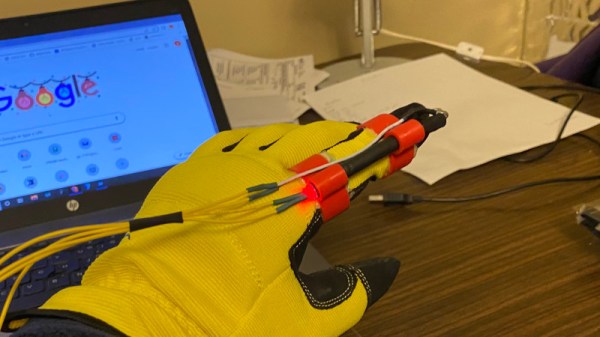
When most of us think of glove controllers, the first which comes to mind is Nintendo’s PowerGlove, which promised much more than it delivered. But the idea persists, and from time to time we see them here at Hackaday. [Gord Payne] has one with an elegant sensor solution, it detects finger movement using a light dependent resistor.

The cleverest designs are those which are the simplest, and this one eschews complex mechanisms and exotic parts for a simple piece of flexible tube. At one end is an LED and at the other the LDR, and when attached to a glove it provides a finger sensor without the fuss. The amount of light reaching the LDR from the LED decreases as the pipe is bent, and with a simple divider circuit a voltage can be read by an Arduino. You can see it in action in the video below the break, where the glove flexing controls a servo.

Perhaps this might revitalize a bit of interest in glove controllers, something we probably don’t see too many of. Those Nintendo PowerGloves do still crop up from time to time though.

Continue reading “A Flex Sensor For A Glove Controller Using An LDR”

Microsoft Returns To The Altair

The Altair 8800 arguably launched Microsoft. Now [Dave Glover] from Microsoft offers an emulated and potentially cloud-based Altair emulation with CP/M and Microsoft Basic. You can see a video of the project below. One thing that makes it a bit odd compared to other Altair clones we’ve seen is that the emulator runs in a Docker environment and is fully cloud-enabled. You can interact with it via a PCB front panel, or a terminal running in a web browser.

The core emulator is MIT-licensed and seems like it would run nearly everywhere. We were a little surprised there wasn’t an instance in the Azure cloud that you could spin up to test drive. Surely a few hundred Altairs running at once wouldn’t even make a dent in a modern CPU.

Continue reading “Microsoft Returns To The Altair”

Homebrew Telephone Exchange Keeps The Family In Touch, In The House And Beyond

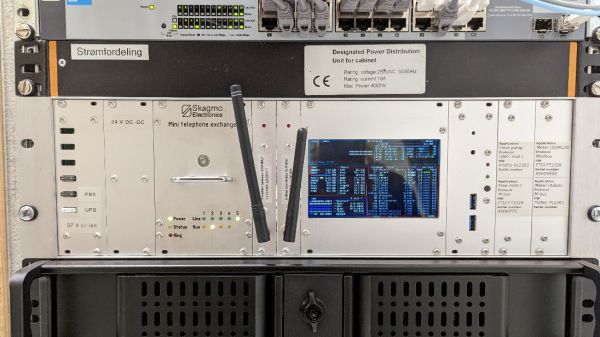
It doesn’t happen often, but every once in a while we stumble upon someone who has taken obsolete but really cool phone-switching equipment and built a private switched telephone in their garage or basement using it. This private analog phone exchange is not one of those, but it’s still a super cool build that’s probably about as ambitious as getting an old step-by-step or crossbar switch running.

Right up front, we’ll stipulate that there’s absolutely no practical reason to do something like this. And hacker [Jon Petter Skagmo] admits that this is very much a “because I can” project. The idea is to support a bunch of old landline phones distributed around the house, and beyond, in a sort of glorified intercom system. The private exchange is entirely scratch-built, with a PIC32 acting as the heart of the system, performing such tasks as DTMF decoding, generating ring voltage, and even providing a CAN bus interface to his home automation system.

The main board supports five line interface daughterboards, which connect each phone to the switch via an RJ11 jack. The interface does the work of detecting when a phone goes off-hook, and does the actual connection between any two phones. A separate, special interface card provides an auto-patch capability using an RDA1846S RF transceiver module; with it, [Jon Petter] can connect to any phone in the system from a UHF handy-talkie. Check out the video below for more on that — it’s pretty neat!

We just love everything about this overengineered project — it’s clearly a labor of love, and the fit and finish really reflect that. And even though it’s not strictly old school, POTS projects like this always put us in the mood to watch the “Speedy Cutover” video one more time.

Continue reading “Homebrew Telephone Exchange Keeps The Family In Touch, In The House And Beyond”

DIY Fiber Laser Adds Metal Cutting To The Mix

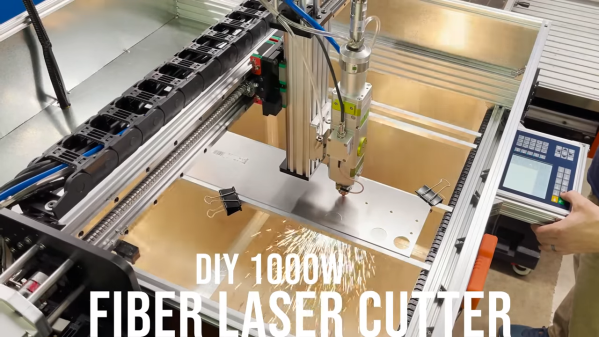
Sadly, the usual CO2-powered suspects in the DIY laser cutter market are woefully incapable of cutting metal. Sure, they’ll cut the heck out of plywood and acrylic, and most will do a decent job at engraving metal. But cutting through a sheet of steel or aluminum requires a step up to much more powerful fiber laser cutters. True, the costs of such machines can be daunting, but not daunting enough for [Travis Mitchell], who has undertaken a DIY fiber laser cutter build that really caught our eye.

Right off the bat, a couple of things are worth noting here. First — and this should be obvious from the fountains of white-hot sparks in the video below — laser cutters are dangerous, and you should really know what you’re doing before tackling such a build. Second, just because [Travis] was able to cut costs considerably compared to a commercial fiber laser cutter doesn’t mean this build was cheap in absolute terms — he reports dropping about $15,000 so far, with considerable ongoing costs to operate the thing.
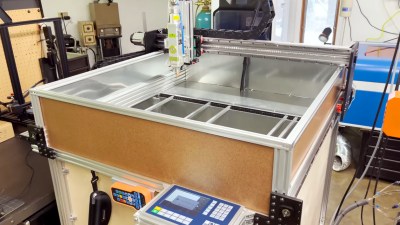
That said, there doesn’t appear to be anything about this build that anyone with some experience building CNC machines wouldn’t be able to tackle. The CNC side of this is pretty straightforward, although we note that the gantry, servos, and controller seem especially robust.

The laser itself is an off-the-shelf machine, a Raycus RFL-C1000 fiber laser and head that packs a 1,000-Watt punch. There’s also the required cooling system for the laser, and of course there’s an exhaust system to get rid of the nasty fumes.

All that stuff requires a considerable investment, but we were surprised to learn how much the consumables cost. [Travis] opted for bottled gas for the cutter’s gas assist system — low-pressure oxygen for carbon steel and high-pressure nitrogen for everything else. Refills are really pricey, in part because of the purity required, but since the proper compressor for the job is out of the budget for now, the tanks will have to do. And really, the thing cuts like a dream. Check out the cutting speed and precision in the video below.

This is but the first in a series of videos that will detail the build, and if [Travis] thought this would whet our appetites for more, he was right. We really haven’t seen many DIY fiber laser builds, but we have seen a teardown of a 200-kW fiber laser that might tickle your fancy.

Continue reading “DIY Fiber Laser Adds Metal Cutting To The Mix”

A Medieval Gothic Monastery Built Using CAD / CAM

Just because you’re a monk doesn’t mean you can’t use CAD. The Carmelite monks of Wyoming are building a grandiose Gothic Monastery, and it’s awe inspiring how they are managing to build it.

The Carmelite monks needed a new, larger monastery to house their growing numbers, and found a parcel of land near Meeteetse Creek in Wyoming. The design of their new Gothic monastery was outsourced to an architectural firm. Gothic architecture is characterised by key architectural elements such as pointed arches, large stained glass windows, rib vaults, flying buttresses, pinnacles and spires, elaborate entry portals, and ornate decoration.

After some research, the monks settled on using Kansas Silverdale limestone for the monastery. Cutting and carving the elaborate stone pieces required for such a project, within time and cost constraints, could only be achieved using CNC machines. Hand carving was ruled out as it was a very slow process, would cost a whole lot more, and it wouldn’t be easy to find the artisans for the job. So when it came to shortlisting vendors for the vast amount of stone cutting and carving required for construction, the monks found themselves alarmed at how prohibitively expensive it would turn out to be.

Continue reading “A Medieval Gothic Monastery Built Using CAD / CAM”

Fixing An HP 54542C With An FPGA And VGA Display

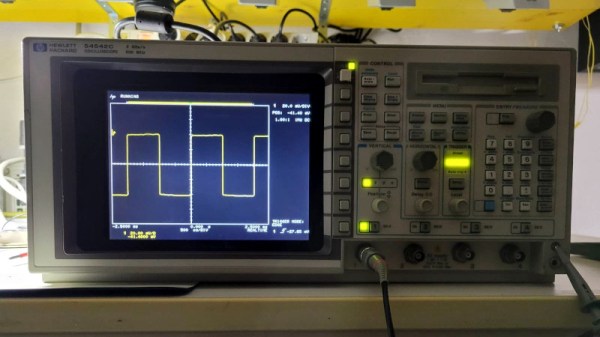
Although the HP 54542C oscilloscope and its siblings are getting on in years, they’re still very useful today. Unfortunately, as some of the first oscilloscopes to switch from a CRT display to an LCD they are starting to suffer from degradation. This has led to otherwise perfectly functional examples being discarded or sold for cheap, when all they need is just an LCD swap. This is what happened to [Alexander Huemer] with an eBay-bought 54542C.

Although this was supposed to be a fully working unit, upon receiving it, the display just showed a bright white instead of the more oscilloscope-like picture. A short while later [Alexander] was left with a refund, an apology from the seller and an HP 54542C scope with a very dead LCD. This was when he stumbled over a similar repair by [Adil Malik], right here on Hackaday. The fix? Replace the LCD with an FPGA and VGA-input capable LCD.

While this may seem counter intuitive, the problem with LCD replacements is the lack of standardization. Finding an 8″, 640×480, 60 Hz color LCD with a compatible interface as the one found in this HP scope usually gets you salvaged LCDs from HP scopes, which as [Alexander] discovered can run up to $350 and beyond for second-hand ones. But it turns out that similar 8″ LCDs are found everywhere for use as portable displays, all they need is a VGA input.

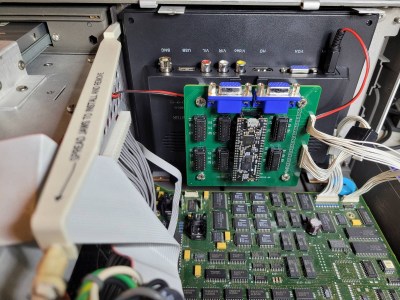
Taking [Adil]’s project as the inspiration, [Alexander] used an UPduino v3.1 with ICE40UP5K FPGA as the core LCD-to-VGA translation component, creating a custom PCB for the voltage level translations and connectors. One cool aspect of the whole system is that it is fully reversible, with all of the original wiring on the scope and new LCD side left intact. One niggle was that the scope’s image was upside-down, but this was fixed by putting the new LCD upside-down as well.

After swapping the original cooling fan with a better one, this old HP 545452C is now [Alexander]’s daily scope.

Maxing Out Your MacIntosh With A 4 MB Memory Stick Kit

One fun aspect of retrocomputing is that you get to max out all aspects of these systems without having to take out a bank loan, as tended to be the case when these systems were new. Less fun is that decades after systems like the Apple MacIntosh SE/30 were last sold, the 30-pin SIMMs that form the expandable RAM for these systems has become rather scarce. This has led many to make their own SIMM PCBs, including [Kay Koba] with a PCB for 4 MB SIMMs along with information on which memory and parity ICs are suitable for these SIMMs.

For systems like the MacIntosh SE/30 with 8 30-pin memory slots, the maximum capacity is 128 MB, but this comes with many gotchas due to its ROM being ’32-bit dirty’. While this can be circumvented by swapping in a ROM from a later MacIntosh variant, the less invasive way is to enable the MODE32 system extension and install eight 4 MB SIMMs for a total of 32 MB RAM. RAM chips for such 30-pin SIMMs can be scavenged from the far more common 72-pin SIMMs, along with any old new stock one may come across.

These 4 MB SIMM PCBs are offered for sale by [Kay] with optionally the SMD components (capacitors, resistors and LED) included in the package. The original PCB card edge design is credited to work by [Zane Kaminski] whose GitHub profile also leads to e.g. this 30-pin SIMM project.

Have you modded your MacIntosh or other retro system yet to the maximum RAM and storage limits?