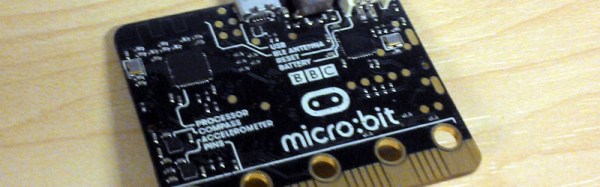
The little board that has at times seemed so plagued with delays as to become the Duke Nukem Forever of small computers has finally shipped. A million or so British seventh-grade schoolchildren and their teachers will today start receiving their free BBC micro:bits.
Announced early last year, the plan was to rekindle the learning of code in schools through handing out a powerful and easy to program small computer to the students. The hope is that it will recapture the spirit of the 1980s, when school computing meant programming Acorn’s BBC Micro rather than learning how to use Microsoft Word.
Sadly the project has been delayed multiple times, the original target of last October was missed, and a revised estimate from January suggested they might ship at half-term (about four weeks ago). With only a few days to go before the Easter school holidays the kids will have to try them out at home, but at least they’re arriving. Continue reading “British Kids Finally Get Their Micro:Bits”→
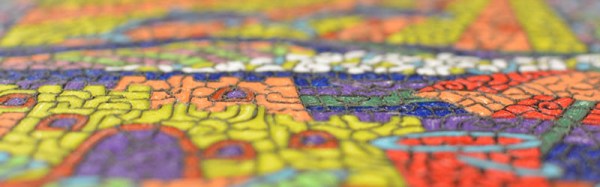
3D printing is obviously best used in printing three-dimensional objects. Laser cutters, jig saws, and CNC routers are obviously well-equipped to machine flat panels with intricate shapes out of plastic sheets, plywood, or metal, but these devices have one drawback: they’re subtractive manufacturing, and 3D printers add material. What good is this? [Jason Preuss] demonstrated a very interesting 3D printing technique at this year’s Midwest RepRap Festival. He’s producing 2D paintings with a 3D printer, with results that look like something between very intricate inlay work and a paint by numbers kit.
[Jason Preuss]’ multicolor 2D print. Notice the toolpaths in the reflection of the upper left hand corner. Click to embiggen.[Jason] is using a 3D printer, a series of very specialized techniques, and a software stack that includes a half-dozen programs to print multicolor 2D scenes. This isn’t pigment, paint, dye, or ink; the artwork becomes a single piece of plastic with individual colors laid down one at a time.
The best example of [Jason]’s work is a copy of a paint by numbers scene. Here, [Jason] makes an outline of all the shapes, separates onto different layers by color, and prints each color, one layer at a time. It’s an incredibly labor-intensive process to even get models into a slicer. Actually printing the model is even more difficult. [Jason]’s paint by numbers scene uses about twelve different colors.
[Jason]’s 3D printed paint by numbers scene. About a dozen different colors were used for this print.We’ve seen [Jason]’s work at MRRF before, including last year’s exhibition of a fantastic chocolate clock that was a 3D printed version of an old scroll saw pattern. Taking what is normally a 2D design and translating that into something that can be built with a 3D printer seems to be [Jason]’s forte, and the results are remarkable. If you don’t know what you were looking at, you would just think these art pieces are a strange industrial fabrication process. Once you look closer, you have an immediate respect for the artistry and craftsmanship that went into a sheet of plastic only a few millimeters thick and no bigger than a piece of paper.
[Jason] hasn’t documented his build process for these 2D pictures on a 3D printer quite yet. There’s a reason for that: it’s supposedly very complicated, and it’s going to take a while to get all the documentation together. Eventually, the process will be documented and a tutorial will pop up on [Jason]’s website. He’s also on Thingiverse, with a few semi-related designs available for download.
From what we’ve seen at MRRF, in the next few years, a dual extrusion printer will be a necessity. While dual extrusion won’t be able to recreate such colorful pictures, it will make the creation of these 2D plastic panels much easier, and they will surely be popular. We can’t wait to see what [Jason] comes up with next.
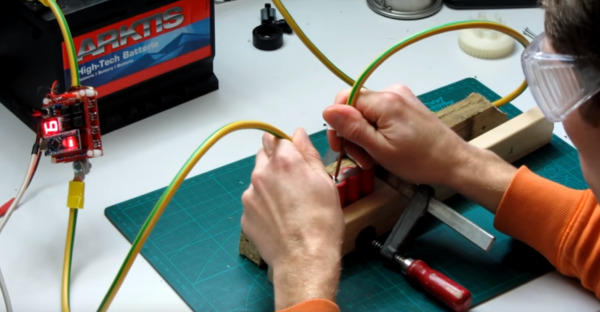
Soldering might look like a tempting and cheap alternative when building or repairing a battery pack, but the heat of the iron could damage the cell, and the resulting connection won’t be as good as a weld. Fortunately, though, a decent spot welder isn’t that tough to build, as [KaeptnBalu] shows us with his Arduino-controlled battery spot welder.
When it comes to delivering the high currents necessary for spot welding, the Arduino Nano is not necessarily the first thing that comes to mind. But the need for a precisely controlled welding pulse makes the microcontroller a natural for this build, as long as the current handling is outsourced. In [KaeptnBalu]’s build, he lets an array of beefy MOSFETs on a separate PCB handle the welding current. The high-current wiring is particularly interesting – heavy gauge stranded wire is split in half, formed into a U, tinned, and each leg gets soldered to the MOSFET board. Welding tips are simply solid copper wire, and the whole thing is powered by a car battery, or maybe two if the job needs extra amps. The video below shows the high-quality welds the rig can produce.
Spot welders are a favorite on Hackaday, and we’ve seen both simple and complicated builds. This build hits the sweet spot of complexity and functionality, and having one on hand would open up a lot of battery-hacking possibilities.
About five percent of the population is colorblind to one degree or another, and for them seeing the entire spectrum from Roy to Biv is simply impossible. Their eyes simply don’t have the cones to detect certain colors. The brain is the weirdest machine on the planet, though, and with the right tricks of light, even the colorblind can see more colors than they’re accustomed to. That’s the idea behind [PointyOintment]’s entry for the 2016 Hackaday Prize: color blindness correcting goggles.
Any device that claims to correct color blindness comes with a few caveats and a slightly loose interpretation of what ‘color blindness correcting’ actually is. For the same reason you can’t see deep infrared, someone with color blindness cannot distinguish between two colors; the eye simply doesn’t have the sensors to see a specific color of light. This doesn’t mean the ability to distinguish color in color blind individuals can’t be improved, though. The EnChroma glasses use an optical notch filter to block all colors between blue and green, and between green and red. This works, because the human brain is weird enough and can adapt to nearly anything.
[PointyOintmen] isn’t going with an optical notch filter. He’s using spinning color discs from a DLP projector and 3D ‘shutter’ glasses to present the world in different shades of color many times a second. It’s weird, untested, and will take a few hours to get used to, but it is a very interesting idea. Will it allow color blind people to see more colors? That’s a semantic issue, but if you define ‘seeing color’ as being able to differentiate between two different colors, yes, it will.
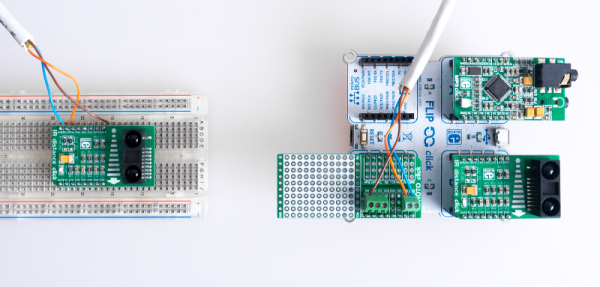
The traditional theremin is more or less an audio oscillator with two metal rods. Using proximity sensing, one rod controls the pitch of the oscillator and the other controls the volume. [Teodor Costachiou] apparently asked himself the excellent question: Why does the proximity sensor have to use capacitance? The result is an Arduino-based theremin that uses IR sensors to determine hand position.
[Teodor] used a particular type of Arduino–the Flip and Click–because he wanted to use Click boards for the IR sensors and also to generate sound via an MP3 board based around a VS1053. The trick is that the VS1053 has a realtime MIDI mode, and that’s how this Theremin makes it tones.
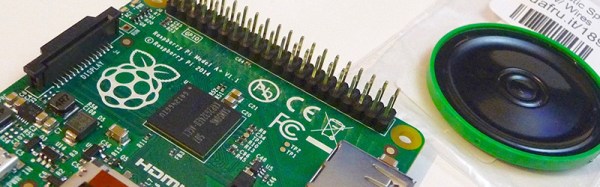
There are devices out there that will magnify text using fancy cameras and displays, devices that will convert these to Braille, and text-to-speech software has been around for thirty years. For his entry into our Raspberry Pi Zero contest, [Markus] decided to combine all these ideas into a simple device that will turn the printed word into speech.
The impetus for [Markus]’ project came to him in the form of a group of blind computer science students. These students used a specialized program that used specialized hardware and software such as mobile Braille terminals, OCR, and oral exams that allowed these students to study the same thing as everyone else. [Markus] wanted to produce something similar, using simple text-to-speech software instead of a complicated Braille display.
The physical design of [Markus]’ project is uniquely functional – a hand-held device with a camera up front, a Pi in the middle, and a speaker and headphone jack on the back. The hand grip includes a large battery and a trigger for telling the Pi to read a few words aloud.
The software is built around the SnapPicam and includes a lot of the functionality already needed. OCR is largely a solved problem with Tesseract, and text-to-speech is easy with Festival.
Although [Markus] is just plugging a few existing software modules together, he’s come up with a device that is certainly unique and could be exceptionally useful to anyone with a vision impairment.
The Raspberry Pi Zero contest is presented by Hackaday and Adafruit. Prizes include Raspberry Pi Zeros from Adafruit and gift cards to The Hackaday Store! See All the Entries
Got aliens in your attic? Squirrels in the skirting board? You need a trap, and [John Mangan] has come up with an interesting way to let you know that you have caught that pesky varmint: the IoT Critter Twitter Trap. By adding a ball switch, Electric Imp and a couple of batteries to a trap, he was able to set the trap to notify him when it caught something over Twitter. To do this, he programmed the Electric Imp to send a message over when a varmint trods on the panel inside the trap, slamming its door shut. The whole thing cost him less than $60 and can be seen in action after the break.
This is a pretty neat hack. I used to help with a Feral Fix program, where feral cats would be trapped, neutered and returned to the wild. This involved baiting the trap, then waiting hours in the cold nearby for the ferals to get comfortable enough to climb inside and trigger the trap. [John’s] version would only work indoors (as it uses WiFi), but it wouldn’t be that difficult to add a cell phone dongle or other RF solution to extend the range. With this hack, I could have at least waited somewhere warmer, while the trap would ping me when it was triggered.
![[Jason Preuss]' multicolor 2D print. Notice the toolpaths in the reflection. Click to embiggen.](https://hackaday.com/wp-content/uploads/2016/03/p2pchristmastree.jpg)
![[Jason]'s 3D printed paint by numbers scene. About a dozen different colors were used for this print.](https://hackaday.com/wp-content/uploads/2016/03/pppaintbynumber.jpg)
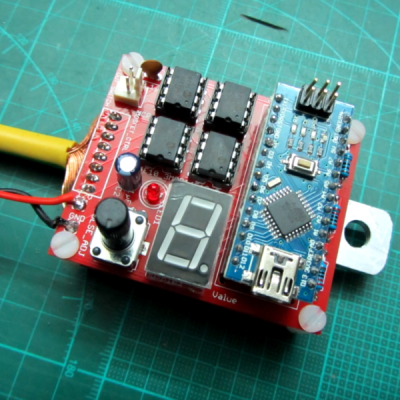 When it comes to delivering the high currents necessary for spot welding, the Arduino Nano is not necessarily the first thing that comes to mind. But the need for a precisely controlled welding pulse makes the microcontroller a natural for this build, as long as the current handling is outsourced. In [KaeptnBalu]’s build, he lets an array of beefy MOSFETs on a separate PCB handle the welding current. The high-current wiring is particularly interesting – heavy gauge stranded wire is split in half, formed into a U, tinned, and each leg gets soldered to the MOSFET board. Welding tips are simply solid copper wire, and the whole thing is powered by a car battery, or maybe two if the job needs extra amps. The video below shows the high-quality welds the rig can produce.