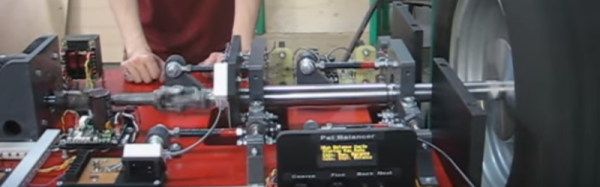
There’s an old saying that you should make things twice. Once to figure out how to build the thing, and again to build it the right way. [Pmbrunelle] must agree. His senior project in college was a machine to balance wheels. It was good enough for him to graduate, but he wanted it to be even better.
The original machine required observation of measurements on an oscilloscope and manual calculations. [Pmbrunelle] added an AVR micro, a better motor drive, and made a host of other improvements. As you can see in the video below, the machine works, but [Pmbrunelle] still wasn’t happy.
A lot of people make the argument that you can’t go wrong buying a tool made in USA, Germany, Japan, Switzerland, etc. They swear that any Chinese tool will be garbage and it’s not worth purchasing them. Now, any discerning mind will say, “Wait a minute, why? China has a huge economy, experienced people, and the ability to use all the scary chemicals that make the best steel. Why would their tools be any better or worse than ours?” It’s a very valid argument. There are lots of Chinese tools that are the best in the world. Most of what we see in our stores are not. So what is the difference. Why does a country who can make the best tools not make the best tools? Surely it isn’t purely cost cutting. Is it cultural? The opinion I wish to put forth is that it’s a matter of design intent communication.
I’ve worked as an engineer in industry. The one common thread between a quality product and a bad product has always been this, ”Is the person who designed the product involved in making the product?” If the person or peoples who imbued the design intent into the original product are actively involved in and working towards the execution of that product, that product has a vastly greater chance of being good. Or in other words: outsourcing doesn’t produce a bad product because the new people making the product don’t care. It makes a bad product because the people who understand the intent behind the product are separated from its execution.
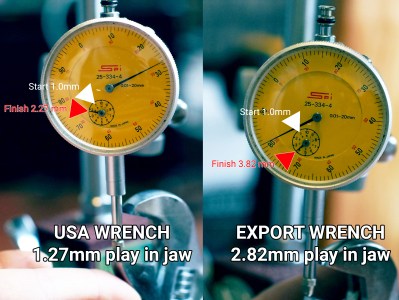
As you can see the export made crescent wrench is not made to the same tolerances as the previous wrench.
Let’s take the Crescent wrench as an example. Crescent wrenches used to be made in USA. In the past few years they have begun to make them in China. We can spot many visual differences right away. The new Crescent wrench has a different shape, the logo has changed and the stamping for the logo is dodgy, and worse, the tool just doesn’t operate as well as it used to. The jaws aren’t as hard and they wiggle more. What happened? How could Crescent mess up their flagship so badly. Surely they intended just to cut costs, not to reduce quality. This isn’t shameful in itself
What happened to the Crescent wrench is easily explained by anyone who has seen a product from design to execution before. A factory in the USA set out to make a good adjustable wrench. Hundreds of engineers and employees worked in a building to make a good wrench. When their machines didn’t work, they came up with solutions. When their quality was lacking, they implemented better processes. They had a list of trusted suppliers. They could guarantee that the materials that came in would be imbued with their vision and intent when the product came out. The intent and will of all those people built up in one place over time.
Turning the classic toy Etch-A-Sketch into a CNC drawing tablet intrigues a large number of hackers. This version by [GeekMom] certainly takes the award for precision and utility. Once you build something like this, you can hardly stop writing firmware for it; [GeekMom] produced an entire Arduino library of code to allow joystick doodling, drawing web images, and a self-erasing spirograph mode. The topper is the version that runs as a clock!
The major hassle with making a CNC version of this toy is the slop in the drawing mechanism. There is a large amount of backlash when you reverse the drawing direction. If that isn’t bad enough, the backlash is different in the vertical or horizontal directions. Part of [GeekMom’s] presentation is on how to measure and correct for this backlash.
The EtchABot uses three small stepper motors. Two drive the drawing controls and the third flips the device forward to erase the previous drawing. The motors are each controlled by a ULN2003 stepper motor drivers. An Arduino Uno provides the intelligence. Optional components are a DS3231 Real Time Clock and a dual axis X-Y joystick for the clock and doodling capability. Laser cut wood creates a base for holding the Etch-A-Sketch and the electronics.
The write up and details for this project are impressive. Be sure to check out the other entries in [GeekMom’s] blog. Watch the complete spirograph video after the break.
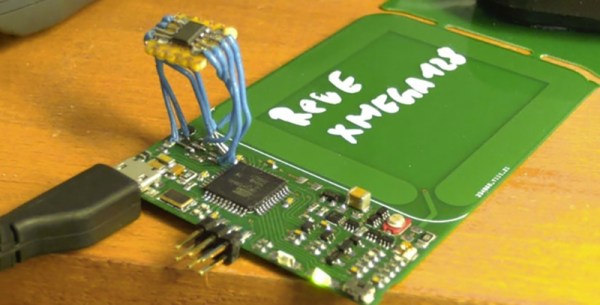
A few years ago, we saw a project from a few researchers in Germany who built a device to clone contactless smart cards. These contactless smart cards can be found in everything from subway cards to passports, and a tool to investigate and emulate these cards has exceptionally interesting implications. [David] and [Tino], the researchers behind the first iteration of this hardware have been working on an improved version for a few years, and they’re finally ready to release it. They’re behind a Kickstarter campaign for the ChameleonMini, a device for NFC security analysis that can also clone and emulate contactless cards.
While the original Chameleon smart card emulator could handle many of the contactless smart cards you could throw at it, there at a lot of different contactless protocols. The new card can emulate just about every contactless card that operates on 13.56 MHz.
The board itself is mostly a PCB antenna, with the electronics based on an ATXMega128A4U microcontroller. This micro has AES and DES encryption engines, meaning if your contactless card has encryption and you have the cryptographic key, you can emulate that card with this device. They’re also making a more expensive version that also has a built-in reader that makes the ChameleonMini a one-stop card cloning tool.
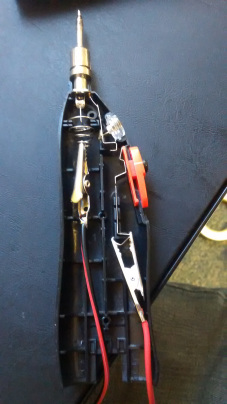
We’ve all done it. You’re walking out the door or maybe you’ve even gotten on the road when the question hits, “Did I leave the [coffee pot | stove | hair curler | soldering iron ] on?” [Daniel Johnson’s] problem was even worse. He couldn’t tell if his Hakko-936 soldering iron was off because the LED indicator wasn’t always on. Instead it flashed. He fixed that problem and along the way hacked his battery powered soldering iron since he was out of batteries. Now that’s perseverance.
Soldering Iron Hack Recursion
The Hakko’s LED turned on whenever the power turned on to heat the tip. That was about every 5 seconds once the tip was hot. But just as a watched pot never boils, a watched LED never seems to flash. After determining the LED was driven by a comparator he decide to unsolder it as part of his hack. He wisely decided using the Hakko on itself was not a good idea so reached for the battery-powered portable iron, which was sadly battery-free. Undaunted, he wired the portable to a power supply and when 4.5 volts didn’t melt the solder cranked it up to 6 volts.
Back to the Hakko, he replaced the red LED with a RBG LED but used only the red and green leads. The green was tied to the 24v power supply through a hefty 47k ohm resistor, and the red was tied to the comparator. A little masking tape to hold things in place and provide insulation finished the job. Now when the Hakko is on the green LED is lit and the red LED shows the heating cycle. Quite clever.
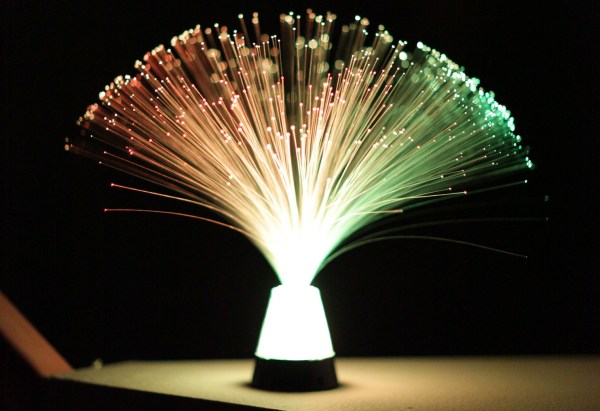
Knowing where to start when adding a device to your home automation is always a tough thing. Most likely, you are already working on the device end of things (whatever you’re trying to automate) so it would be nice if the user end is already figured out. This is one such case. [Aditya Tannu] is using Siri to control ESP8266 connected devices by leveraging the functionality of Apple’s HomeKit protocols.
Once the server is up and running (in this case, on a raspberry Pi) each connected device simply needs to communicate via MQTT. The Arduino IDE is used to program an ESP8266, and there are plenty of MQTT sketches out there that may be used for this purpose. The most recent example build from [Aditya] is a retrofit for a fiber optic lamp. He added an ESP8266 board and replaced the stock LEDs with WS2812 modules. The current version, demonstrated below, has on/off and color control for the device.
The BBC has commissioned a new series of Robot Wars. This is not Battlebots; that show was revived last year, and a second season will air again this summer. Robot Wars is the one with the ‘house’ robots. We would like to take this opportunity to remind the BBC that Robot Wars is neither Scrapheap Challenge nor Junkyard Wars, and by virtue of that fact alone is an inferior show.
Here’s your monthly, ‘WTF is this thing on eBay’ link. It’s a clamshell/toilet seat iBook (c.2000), loaded up with an Intel i5 Broadwell CPU, 128 GB of Flash storage, 4 GB of RAM, a 12″ 1024×768 LCD, Gigabit Ethernet, WiFi, Bluetooth, and runs OS X El Capitan. I might be mistaken, but it looks like someone took the motherboard out of a 2015 MacBook Air, crammed it into a sixteen year old computer, and put it up on eBay. I’m not saying that’s what it is; this is from China, and there are people over there making new improved motherboards for a Thinkpad x61. Weirder stuff has already happened.
In the last installment of the Travelling Hacker Box, I asked if anyone can receive mail in Antarctica. A person with friends in the British survey team emailed me, but nothing came of that. It’s summer, so if Antarctica is going to happen, it needs to happen soon.