Sometime this evening, after we haven’t rehydrated a pizza for dinner, all of the events portrayed in Back To The Future will have happened in the past. This is it. This is the day all your dreams die.
So, what’s so special about the technology in Back To The Future that we don’t have now? Hoverboards, obviously, but a lot of people have been doing their part to make sure we have something like a hoverboard on this important day. Last week, the record for the longest hoverboard flight was broken by a Canadian company making large multirotor platforms. While it’s called a hoverboard, it’s really not in the spirit of the device that would recreate the skateboard chase scene in front of Hill Valley’s courthouse. For that, you’ll need something that doesn’t use propellers, at least.
There’s a better way to construct a hoverboard than by strapping a few blenders to your feet. Last summer, Lexus built one with superconducting materials and magnets. Yes, it’s effectively the same demonstration you’ve always seen with superconducting materials, only this time it’s dressed up with pro skaters. There are tens of thousands of dollars worth of magnets in the Lexus hoverboard, making this entirely impractical for anyone who wants to build their own.
There is another option if you want a hoverboard. This day, last year, Hendo Hoverboards launched a Kickstarter with the best media blitz we’ve ever seen. They built a hoverboard that is basically a quadcopter, but instead of propellers, they use magnets. These magnets produce eddy currents in the metallic, non-ferrous ‘hover surface’. The grand prize for this Kickstarter? Today, October 21, 2015, you’ll be invited to a VIP event where you will not only get to ride a hoverboard, you’ll get one to take home. Price: $10,000.
News drones. People still read newspapers.
This company isn’t in the market of building hoverboards; they have a much, much more grandiose idea: the founder wants to use hoverboards as a stepping stone to an active earthquake mitigation strategy for buildings. Yes, buildings can hover inches above their foundation, just in case an earthquake strikes. You say the power might go out during an earthquake, causing the building to fall inches to the ground? I never said it was a good idea.
Lucky for us, the Hendo hoverboard did prove to be a proof of concept that a ‘spinning magnet’ hoverboard is capable of supporting the weight of a rider. We know a few people have been working on this technology before the Hendo hoverboard was announced, and replicating the Hendo hoverboard build shouldn’t cost more than about $1000 USD. We’re eventually going to have to do this, and we’re going to replicate the Pitbull hoverboard, bojo, because we want powah.
So, what else of Back to the Future Part II hasn’t become a reality? News drones. People don’t read newspapers anymore. Self-driving cars are more realistic than hovercar conversions. Pepsi Perfect exists, but only at a Comic Con. Nike Air Mags exist, but not with power laces. The world of Hill Valley still has fax machines, and I really want to rehydrate a pizza.
It’s alright, most of the technology of Back to the Future was just a joke; ‘Queen Diana’ would have never happened, and what exactly was the point of Gray’s Sports Almanac if you can look everything up on the Internet?
There was one possibly accurate prediction in Back to the Future: The Chicago Cubs may win the 2015 World Series. Let me repeat that, for effect. The most accurate prediction of the future given to us in Back to the Future was that the Chicago Cubs win the World Series. That’s how inaccurate Back To The Future was.
[MX372] is a pretty dedicated hardware hacker. Instead of chucking a 10 year old laptop with specs weaker than his latest cellphone — he decided to breath new life into it with a few hardware upgrades, and a switch to Linux of course.
Featuring a 1.1GHz Pentium M processor with a whopping 512mb DDR RAM, a dvd burner, a 40GB HDD, USB 2.0, BlueTooth, 802.11b/g wireless and even a FireWire port, his old Sony Vaio used to command a pretty hefty price tag. In fact, he’s pretty sure he paid $2,100 for it back in ’05. It was called an “ultrabook” before ultrabook actually meant a MacBook-Air sized laptop.
Still running Windows XP, it had gotten slower with age as all good computers do, and since XP is no longer supported, [MX372] thought it was time to switch it over to Linux. He started with Xubuntu 12, but quickly found Lubuntu instead. But, it still wasn’t that great. Continue reading “Laptop’s Aren’t Upgradable? Ha!”→
The BBC has developed a computer to be used by thousands of students across the UK. While not very powerful in terms of hardware, it comes with an interpreted language that will get students writing their own code and will launch the careers of an entire generation of web developers. This is, of course, the BBC Micro, a computer introduced in 1981, but is still deeply revered by millions of former students.
Microcontrollers are everywhere now, and the BBC is looking to replicate their success with the micro:bit. Unlike the BBC Micro, this isn’t a proper computer with a keyboard and a monitor. Instead, it’s a microcontroller development platform based on an ARM chip. Now, the micro:bit is getting Python, the BASIC of today, and will assuredly be even more useful in UK classrooms.
The initial development for Python on the micro:bit started down the road of using Microsoft’s TouchDevelop as a browser-based IDE that would send C++ code to an mBed cloud compilation service. A hex file would be generated, this would be downloaded to the local file system, and finally the student would simply drag the hex file over to the micro:bit since it appeared on the desktop as a USB storage device. This was a terrible idea, because MicroPython exists. The current way of running Python on the micro:bit is as simple as plugging it in to a USB port, opening a terminal, and writing some code. It’s the closest you’re ever going to get to a computer with BASIC in ROM, and it’s the best device for millions of 11-year-olds to learn how to code.
[Tom Lombardo] is an engineer and an educator. When a company sent him a Dino Pet–a bioluminescent sculpture–he found it wasn’t really usable as a practical light source. He did, however, realize it would be an interesting STEAM (science, technology, engineering, art, and math) project for students to produce bioluminescent sculptures.
The lamps (or sculptures, if you prefer) contain dinoflagellates which is a type of plankton that glows when agitated. Of course, they don’t put out a strong light and–the main problem–you have to agitate the little suckers to get them to emit light. [Tom] found that there was a mild afterglow when you stop shaking, but not much. You can get an idea of how much light they make in the video below. The idea for a school project would be to make practical ambient lighting that didn’t require much input power to agitate the plankton.
Remote control gliders typically fly like their full-size counterparts. Tail and wing rudders control the direction of flight — but what if the wings themselves could twist and change their profile, similar to that of a bird? Well, RC glider manufacturer [Jaro Müller] did just that — and it is pretty cool (You’ll need a translation to read it though).
Called the Mini Ellipse, the RC glider is designed to be able to fly in slow thermals and maneuver even better than previous models. The entire wing profile can be controlled by wing flexion — the wing itself is very flexible. Unfortunately we don’t have any info about how it actually goes about doing that, but it’s probably either servo motors pulling wires, or maybe nitinol memory wire… but we’re just guessing. Regardless — take a look at the following video and let us know what you think!
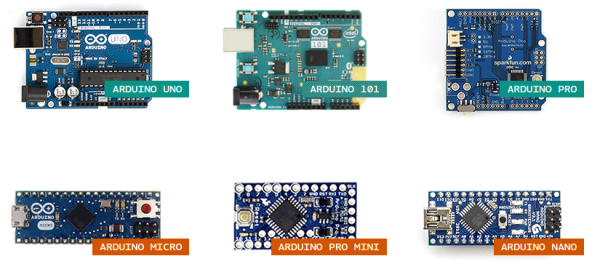
For over ten years, Arduino has held onto its popularity as “that small dev-board aimed to get both artists and electronics enthusiasts excited about physical computing.” Along the way, it’s found a corner in college courses, one-off burning man rigs, and countless projects that have landed here. Without a doubt, the Arduino has a cushy home among hobbyists, but it also lives elsewhere. Arduino lives in engineering design labs as consumer products move from feature iterations into user testing. It’s in the chem labs when scientists need to get some sensor data into their pc in a pinch. Despite the frowns we’ll see when someone blinks an LED with an Arduino and puts it into a project box, Arduino is here to stay. I thought I’d dig a little bit deeper into why both artists and engineers keep revisiting this board so much.
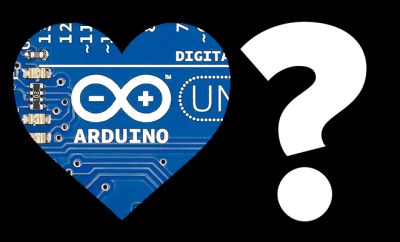
Arduino, do we actually love to hate it?
It’s not unusual for the seasoned engineers to cast some glares towards the latest Arduino-based cat-feeding Kickstarter, shamelessly hiding the actual Arduino board inside that 3D-printed enclosure. Hasty? Sure. Crude, or unpolished? Certainly. Worth selling? Well, that depends on the standards of the consumer. Nevertheless, those exact same critical engineers might also be kicking around ideas for their next Burning Man Persistence-of-Vision LED display–and guess what? It’s got an Arduino for brains! What may seem like hypocrisy is actually perfectly reasonable. In both cases, each designer is using Arduino for what it does best: abstracting away the gritty details so that designs can happen quickly. How? The magic (or not) of hardware abstraction.
Meet HAL, the Hardware-Abstraction Layer
In a world where “we just want to get things blinking,” Arduino has a few nifty out-of-the-box features that get us up-and-running quickly. Sure, development tools are cross-platform. Sure, programming happens over a convenient usb interface. None of these features, however, can rival Arduino’s greatest strength, the Hardware Abstraction Layer (HAL).
A HAL is nothing new in the embedded world, but simply having one can make a world of difference, one that can enable both the artist and the embedded engineer to achieve the same end goal of both quickly and programmatically interacting with the physical world through a microcontroller. In Arduino, the HAL is nothing more than the collection of classes and function calls that overlay on top of the C++ programming language and, in a sense, “turn it into the Arduino programming language” (I know, there is no Arduino Language). If you’re curious as to how these functions are implemented, take a peek at the AVR directory in Arduino’s source code.
With a hardware abstraction layer, we don’t need to know the details about how our program’s function calls translate to various peripherals available on the Uno’s ATMEGA328p chip. We don’t need to know how data was received when Serial.available() is true. We don’t “need to know” if Wire.begin() is using 7-bit addressing or 10-bit addressing for slave devices. The copious amounts of setup needed to make these high-level calls possible is already taken care of for us through the HAL. The result? We save time reading the chip’s datasheet, writing helper functions to enable chip features, and learning about unique characteristics and quirks of our microcontroller if we’re just trying to perform some simple interaction with the physical world.
Cross-Platform Compatibility
Teensy 3.2 keeps form factor but adds on-chip hardware features compared to 3.1
There are some cases where the HAL starts to break down. Maybe the microcontroller doesn’t have the necessary hardware to simultaneously drive 16 servos while polling a serial port and decoding serial data. In some cases, we can solve this issue by switching Arduino platforms. Maybe we actually do need three serial ports instead of one (Teensy 3.2). Maybe we do need pulse-width-modulation (PWM) capability on every pin (Due). Because of the hardware abstraction layer, the rest of the source code can remain mostly unchanged although we may be switching chip architectures and even compilers in the process! Of course, in an environment where developing code for the target platform does matter, it doesn’t make sense to go to such efforts to write the general-purpose code that we see in Arduino, or even use Arduino in the first place if it doesn’t have the necessary features needed for the target end-goal. Nevertheless, for producing an end-to-end solution where “the outcome matters but the road to getting there does not,” writing Arduino code saves time if the target hardware needs to change before getting to that end goal.
HAL’s drawbacks
Of course, there’s also a price to pay for such nice things like speedy development-time using the HAL, and sometimes switching platforms won’t fix the problem. First off, reading the Arduino programming language documentation doesn’t tell us anything about the limitations of the hardware it’s running on. What happens, let’s say, if the Serial data keeps arriving but we don’t read it with Serial.read() until hundreds of bytes have been sent across? What happens if we do need to talk to an I2C device that mandates 10-bit addressing? Without reading the original source code, we don’t know the answers to these questions. Second, if we choose to use the functions given to us through the HAL, we’re limited by their implementation, that is, of course, unless we want to change the source code of the core libraries. It turns out that the Serial class implements a 64-byte ring buffer to hold onto the most recently received serial data. Is 64 bytes big enough for our application? Unless we change the core library source code, we’ll have to use their implementation.
Both of the limitations above involve understanding how the original HAL works and than changing it by changing the Arduino core library source code. Despite that freedom, most people don’t customize it! This odd fact is a testament to how well the core libraries were written to suit the needs of their target audience (artists) and, hence, Arduino garnered a large audience of users.
Pros of Bare-Metalspeak
digitalWrite takes a whopping 52-55 cycles to change pin direction! [image source]Are there benefits to invoking the hardware directly? Absolutely. A few curious inquirers before us have measured the max pin-toggling frequency with digitalWrite to be on the order of ~100 KHz while manipulating the hardware directly results in a pin-toggling frequency of about 2 MHz, about 20 times faster. That said, is invoking the hardware directly worth it? Depends, but in many cases where tight timing isn’t a big deal and where the goal of a functional end-to-end system matters more than “how we got there,” then probably not! Of course, there are cases when tight timing does matter and an Arduino won’t make the cut, but in that case, it’s a job for the embedded engineer.
Use the HAL, Luke!
To achieve an end-to-end solution where the process of “how we got there” matters not, Arduino shines for many simple scenarios. Keep in mind that while the HAL keeps us from knowing too many details about our microcontroller that we’d otherwise find in the datasheet, I don’t proclaim that everyone throw out their datasheets from here on out. I am, however, a proponent of “knowing no more than you need to know to get the job done well.” If I’m trying to log some sensor data to a PC, and I discover I’ll be saving a few days reading a datasheet and configuring an SPI port because someone already wrote SPI.begin(), I’ll take an Arduino, please.
If you’ve rolled up your sleeves and pulled out an Arduino as your first option at work, we’d love to hear what uses you’ve come up with beyond the occasional side-project. Let us know in the comments below.
Hackaday’s first ever SuperConference is November 14th and 15th. Imagine a hardware conference that’s actually about hardware creation, packed with the most talented people – both as attendees and presenters. We are taking over Dogpatch Studios in San Francisco for the event that’s sure to change your engineering life. Apply Now for your tickets.
This isn’t hype. Our excitement is well founded, and especially so in this case. Here’s why:

 There is another option if you want a hoverboard. This day, last year, Hendo Hoverboards launched a Kickstarter with the best media blitz we’ve ever seen. They built a hoverboard that is basically a quadcopter, but instead of propellers, they use magnets. These magnets produce eddy currents in the metallic, non-ferrous ‘hover surface’. The grand prize for this Kickstarter? Today, October 21, 2015, you’ll be invited to a VIP event where you will not only get to ride a hoverboard, you’ll get one to take home. Price: $10,000.
 It’s alright, most of the technology of Back to the Future was just a joke; ‘Queen Diana’ would have never happened, and what exactly was the point of Gray’s Sports Almanac if you can look everything up on the Internet?
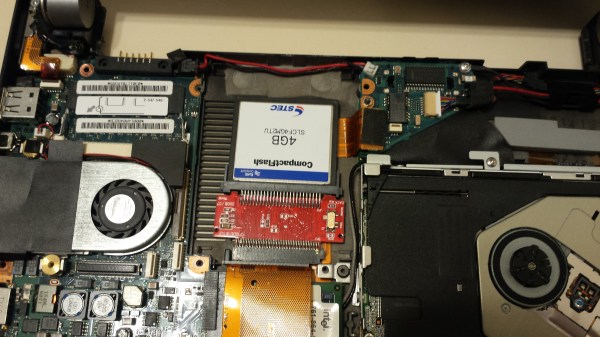


 It’s not unusual for the seasoned engineers to cast some glares towards the latest Arduino-based cat-feeding Kickstarter, shamelessly hiding the actual Arduino board inside that 3D-printed enclosure. Hasty? Sure. Crude, or unpolished? Certainly. Worth selling? Well, that depends on the standards of the consumer. Nevertheless, those exact same critical engineers might also be kicking around ideas for their next Burning Man Persistence-of-Vision LED display–and guess what? It’s got an Arduino for brains! What may seem like hypocrisy is actually perfectly reasonable. In both cases, each designer is using Arduino for what it does best: abstracting away the gritty details so that designs can happen quickly. How? The magic (or not) of hardware abstraction.
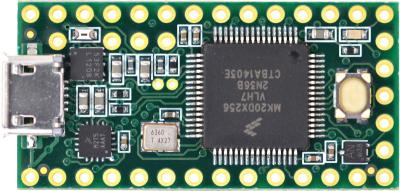
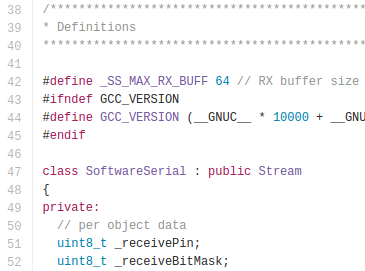 Of course, there’s also a price to pay for such nice things like speedy development-time using the HAL, and sometimes switching platforms won’t fix the problem. First off, reading the Arduino programming language documentation doesn’t tell us anything about the limitations of the hardware it’s running on. What happens, let’s say, if the Serial data keeps arriving but we don’t read it with Serial.read() until hundreds of bytes have been sent across? What happens if we do need to talk to an I2C device that mandates 10-bit addressing? Without reading the original source code, we don’t know the answers to these questions. Second, if we choose to use the functions given to us through the HAL, we’re limited by their implementation, that is, of course, unless we want to change the source code of the core libraries. It turns out that the Serial class implements a 64-byte ring buffer to hold onto the most recently received serial data. Is 64 bytes big enough for our application? Unless we change the core library source code, we’ll have to use their implementation.
![digitalWrite takes a whopping 52-55 cycles to change pin direction! [image source]](https://hackaday.com/wp-content/uploads/2015/10/arduino-digital-write-pin-toggle.jpg?w=400)