Making retro video games on today’s micro controllers brings many challenges, especially when using only the micro controller itself to handle the entire experience. Complex graphics, sound, game logic and input is taxing enough on the small chips, toss in NTSC color graphics and you have a whole different bear on your hands.
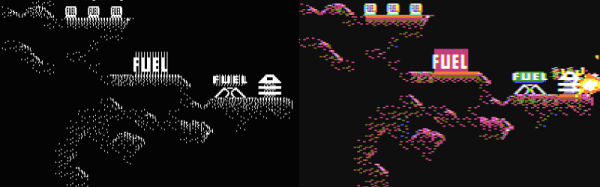
[rossum] set out making the Arduinocade retro game system using an overclocked Arduino Uno, and not much more. Supporting 4 voice sound and IR game controllers, the system also boasts 27 simultaneous colors all in software. These colors and the resolution feel like they’re impossible without a graphics chip to offload some of the work. While doing all of this the ATmega328p is also playing some faithful reproductions of classic arcade games.
The uses a couple of interesting tricks. Color is generated with NTSC color artifacts, where the screen is really black and white, but thanks to a delay or two in the signal generation the bits are out of phase from the reference “color burst” signal and appear on-screen as unique colors. This approach was used in the 8 bit Apple II personal computers to generate its colors, and also on the early IBM PC’s with CGA cards to drastically increase color depth. In this case, the chip is overclocked with a 28.6363 MHz crystal (a multiple of NTSC timing) and the SPI hardware leveraged to shift out all the necessary pixels. Check out how great it looks and sounds after the break.
It’s good to see an old trick on a new project and we are off to play some games!
Continue reading “Retro Games On ArduinoCade Just Shouldn’t Be Possible”