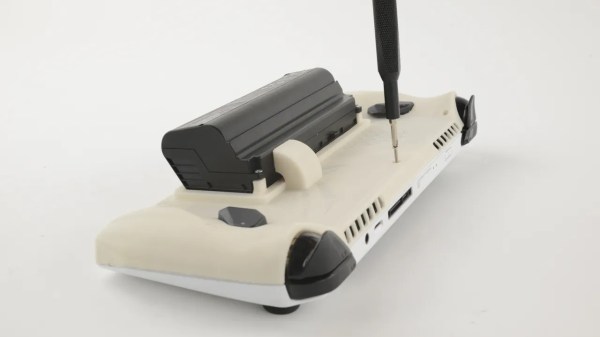
Today’s hack is an unexpected but appreciated contribution from members of the iFixit crew, published by [Shahram Mokhtari]. This is an ROG Ally Asus-produced handheld gaming console mod that has you upgrade the battery to an aftermarket battery from an Asus laptop to double your battery life (40 Wh to 88 Wh).
There are two main things you need to do: replace the back cover with a 3D printed version that accommodates the new battery, and move the battery wires into the shell of an old connector. No soldering or crimping needed — just take the wires out of the old connector, one by one, and put them into a new connector. Once that is done and you reassemble your handheld, everything just works; the battery is recognized by the OS, can be charged, runs the handheld wonderfully all the same, and the only downside is that your ROG Ally becomes a bit thicker.
If you hang out on certain kinds of sites, you can find huge-capacity USB drives and high-power yet tiny solar panels, all at shockingly low prices. Of course, the USB drives just think they are huge, and the solar panels don’t deliver the kind of power they claim. That seems to be the case with [Big Clive’s] latest folding solar panel purchase. The nice thing about the Internet is you can satisfy your urge to tear things open to see what’s inside of them vicariously instead of having to buy a lot of junk yourself. Thanks [Clive]!
The picture on the website didn’t match the actual product, which was the first sign, of course. The panel’s output in full sun was around 2.5 watts instead of the claimed 10 watts. He’s also seen sellers claim they are between 20 and 80-watt panels. But the interesting bits are when [Clive] decides to rip the panel into pieces and analyze the controller board.
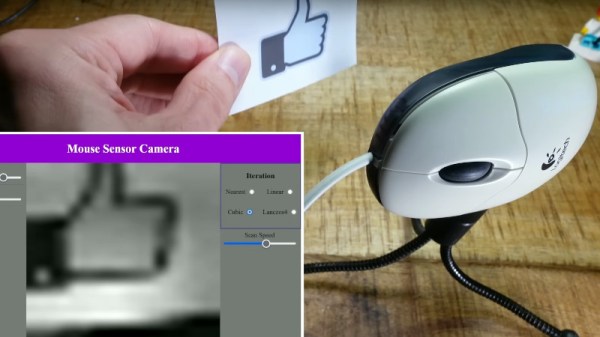
If your pointing device is a mouse, turn it over. The chances are you’ll see a red LED light if you’re not seriously old-school and your mouse has a ball, this light serves as the illumination for a very simple camera sensor. The mouse electronics do their thing by looking for movement in the resulting image, but it should be possible to pull out the data and repurpose the sensor as a digital camera. [Doctor Volt] has a new video showing just that with the innards of a Logitech peripheral.
The mouse contains a microcontroller and the camera part, which fortunately has an SPI interface. The correct register to query the sensor information was deduced, and as if my magic, an image appeared. An M12 lens provided focus with a handy 3D printed mount, and the board went back into the mouse case as a housing. The pictures have something of the Game Boy camera about them, being low-res and monochrome, but it’s still a neat hack.
We’ve made it through another trip around the sun, and for the first time in what feels like far too long, it seems like things went pretty well for the hackers and makers of the world. Like so many, our community suffered through a rough couple of years: from the part shortages that made building even the simplest of devices more expensive and difficult than it should have been, to the COVID-mandated social distancing that robbed us of our favorite meetups. But when looking back on the last twelve months, most of the news was refreshingly positive.
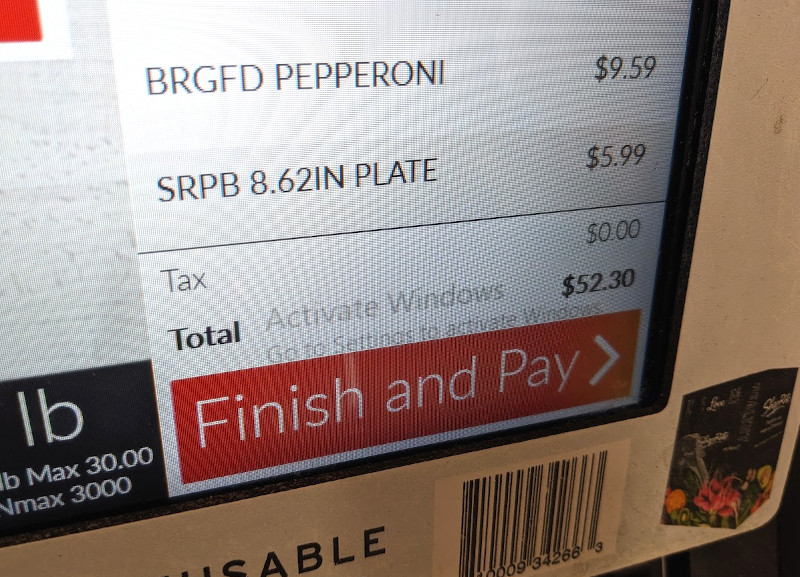
Pepperoni costs ten bucks, but they can’t activate Windows on their registers…
Oh sure, a trip to to the grocery store can lead to a minor existential crisis at the register, but there’s not much we at Hackaday can do about that other than recommend you some good hydroponics projects to help get your own home farm up and running.
As has become our New Year tradition, we like to take this time to go over some of the biggest stories and trends that we picked up on from our unique vantage point. Some will be obvious, but there’s always a few that sneak up on us. These posts tend to make for interesting reading in the future, and if you’ve got the time, we’d recommend going back and reading the previous entries in this series and reminiscing a bit.
It’s also a good time to reflect on Hackaday itself — how we’ve grown, the things that have changed, and perhaps what we can do better going forward. Believe it or not we do read all of the feedback from the community, whether it’s in the comments of individual posts or sent into us directly. We couldn’t do this without readers like you, so please drop us a line and let us know what you’re thinking.
So before we get any farther into 2024, let’s wind back the clock and revisit some of the highlights from the previous year.
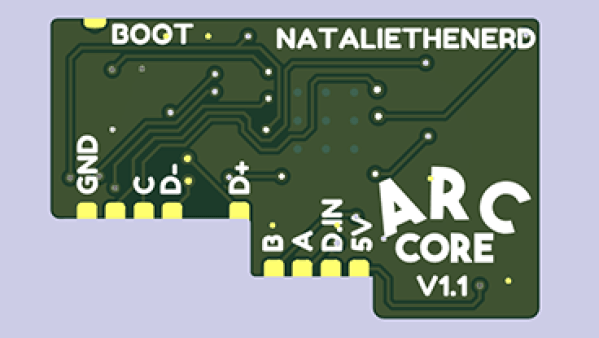
Whether you’re into chiptune or just playing Tetris on original hardware, you might like rocking a heavily-customized Game Boy. Lovely flashing LEDs can only improve the aesthetic, so if that’s what you’re after, you might consider the ARCCore board from [NatalieTheNerd].
The board is a compact and easy way to drive some addressable LEDs, with a form factor designed to take up a small amount of space when stuffed into a Game Boy or other game console. It rocks an RP2040 microcontroller set up to drive a strip of WS2812B LEDs. Three buttons are used to configure the color and brightness settings. The board is designed to run on 3.3 to 5 V, thanks to an onboard buck converter. It’s capable of delivering enough juice to run up to 10 RGB LEDs, though you could potentially use more if you ran them from external power.
You can use just about any microcontroller on the market today to run addressable LEDs if you so desire. If you want a compact drop-in solution that takes up less space, though, you might find the ARCCore useful. If you’ve got your own nifty kit for running addressable LEDs, don’t hesitate to share it with the broader hacker massive — hit the tipsline!
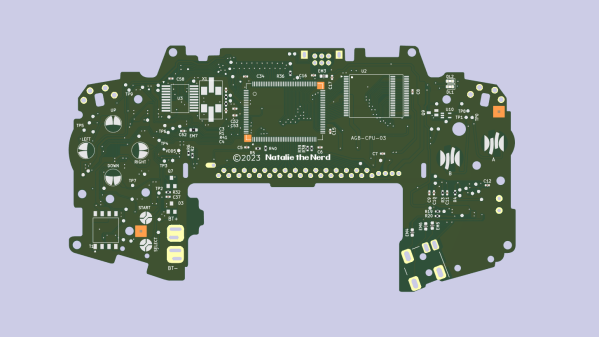
Retro gear is beloved, both for what it can do, and what it reminds us of. Nostalgia is a powerful thing, after all. But then, so is corrosion — and the latter has a habit of killing hardware and driving up prices for remaining units. Thankfully, hard workers like [NatalieTheNerd] are out there, creating reproduction PCBs to keep old hardware alive. Her Game Boy Advance (GBA) reproduction PCB is a great tool for the restoration and modding communities.
The board was reverse engineered, with [Natalie] sharing various scans and schematics of the GBA’s motherboard on the Modded Game Boy Club website. The project recreates the AGB-CPU-03 version of the GBA, and is designed to be produced on a 1 mm board with an ENIG process. You can combine the PCB with some salvaged parts and a new shell and build yourself a remarkably fresh GBA, if you so desire.
Beyond it’s intended use, [Natalie] points out the board outlines could be used as a basis for RetroPie or ESP32 projects that fit into a standard Game Boy Advance form factor. We love that idea. We’ve seen [Natalie’s] work before too, in the form of this neat little macropad. Nifty as always!
Have 73 hours to kill and fancy a 4,609-mile road trip? Then you can check out some of the best observatories in the US (although we would probably recommend taking a couple of weeks rather than cramming the trip into three days, so you can spend at least one night stargazing at each).
Matador Network compiled a list of what they call the top ten US observatories, and published the daunting map you see above. Even if your trip is plagued by cloudy skies, rest assured the destinations will still be worth a visit. From Arizona’s Lowell Observatory, where the evidence Edwin Hubble used to formulate the Big Bang Theory was collected, to the Green Bank National Radio Observatory in West Virginia, home of Earth’s largest fully-steerable radio telescope, each site has incredibly rich history.
All of the observatories are open to the public in some way or another, but some are only accessible a few days per month, so make sure you plan your trip carefully! You may even want to travel with your own homemade telescope, Game Boy astrphotography rig, or, if you’re really dedicated, portable radio telescope.