From time to time we realize that sayings which make sense to us probably will have no meaning for future generations. Two of the examples that spring to mind are “hang up the phone” or in a vehicle you might “roll down the window”. And so is the case for today’s Retrotechtacular. Linux users surely know about TTY, but if you look up the term you actually get references to “Teletypewriter”. What’s that all about?
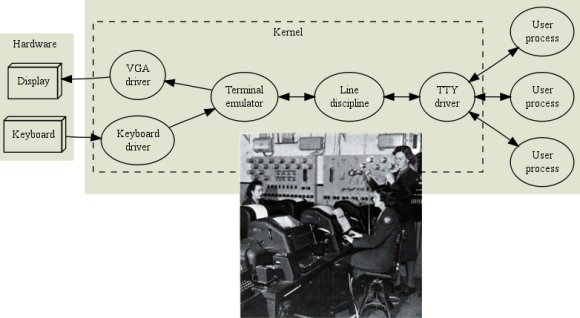
[Linus Akesson] wrote a fantastic essay on the subject called The TTY Demystified. We often feature old video as the subject of this column, but we think you’ll agree that [Linus’] article is worth its weight in film (if that can be possible). The TTY system in Linux is a throwback to when computers first because interactive in real-time. They were connected to the typewriter-mutant of the day known as a teletype machine and basically shot off your keystrokes over a wire to the computer the terminal was controlling.
This copper pipeline to the processor is still basically how the terminal emulators function today. They just don’t require any more hardware than a monitor and keyboard. We consider ourselves fairly advanced Linux users, but the noob and expert alike will find nuggets and tidbits which are sure to switch on the lightbulb in your mind.
[Thanks Chuck]
Retrotechtacular is a weekly column featuring hacks, technology, and kitsch from ages of yore. Help keep it fresh by sending in your ideas for future installments.