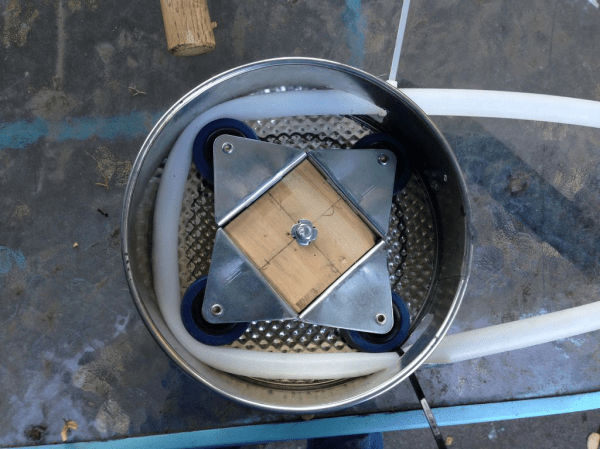
Laser Cutter Helps Make Dual Sided PCBs

laser-cutter-dual-sided-pcb

[Rich Olson] wrote in to share his technique for making dual-sided printed circuit boards using a laser cutter. Unfortunately this still depends on etching copper clad boards with chemicals. But his process makes it really easy to produce well-defined and precisely aligned etch resist on both sides of the board all at once.

This can be really tough to do with the toner transfer method. The most common way would be to use a light box to align the two printouts of resist, taping them together before putting the copper clad in between and sending the whole thing though a laminator. [Rich] uses a scrap of acrylic to ensure alignment. He tapes it to the bed of his Epilog laser cutter and cuts the board outline out (that’s the void you see in the image). He removes the scrap and uses it as a stencil for cutting out the copper clad. After prepping the board he coats both sides and sends it through the laser cutter to burn away the paint where he wants to remove copper. Don’t miss his video embedded after the break.

The acrylic outline trick is similar to the laser cutter fence we heard about several weeks back.

Continue reading “Laser Cutter Helps Make Dual Sided PCBs”

Low Water Indicator For Coffee Maker Couldn’t Be Simpler

low-water-indicator-for-coffee-maker

The coffee maker which [Donald Papp] uses every morning has a water reservoir on the back that can last for several days. This means he forgets to check it and from time to time will return to find that nothing has brewed. He decided to add a low-water indicator to the machine. His approach is about as simple as it gets and we admire that accomplishment.

If it were our project we’d probably try to complicate it in one way or another. The use of a microcontroller and ultrasonic rangefinder (like this tank level indicator from a February links post) would be overkill. No, [Donald] boiled down the electronics to a homemade switch, a blinking LED, and a battery. The switch is a flexible piece of metal attached to a plastic cap using some monofilament. The cap goes in the reservoir and floats until the water gets too low, it then pulls on that metal, completing a circuit between the battery and the LED. That’s it, problem solved.

Now he just needs to plumb the coffee maker into a water line and he’ll really be set.

Update: Lost PLA Metal Casting — The Movie

lost-pla-metal-casting-movie

Turning 3D printed plastic parts into metal objects is not a new concept. But we don’t see a lot of it and enjoyed watching the documentary version of [3DTOPO’s] lost PLA metal casting process so much we figured you’d want to see it too.

The thirty-five minute video walks through every part of the process which we originally learned about in September of last year. The process was developed as a way to fabricate parts that will be used in high-stress applications. For instance, the part seen above is a mounting bracket for the ball screws that moves the Z axis on a huge CNC build he’s been working on. A plastic part will break under the strain so he needed to make it out of aluminum alloy.

To start, the piece is modeled and printed in plastic to check the fit. Once it’s just right he scales it to 103% and prints it again to account for the shrinking of the metal as it cools. The next step is pictured above, adding paths using rigid foam insulation that allow for the metal pour and for air to escape. This is packed into a plaster and sand mold which dries before being cooked in a furnace to vaporize the foam and PLA. This leaves a perfect mold for the metal pour.

After the break you can see a 5-minute overview version of the project.

Continue reading “Update: Lost PLA Metal Casting — The Movie”

Microcontroller Enumerates As USB Printer — Can Be Programmed By Printing

avr-programming-by-printing

This is a fascinating concept. We’re not sure of its usefulness, but it definitely stands on its own just for the concept. [Dean Camera] just added a new HID class to the LUFA project that lets you flash AVR chips by printing to them. This means once you have a file like the one seen open in Notepad above, you can just click on File, then on Print, and the firmware will be uploaded to the chip.

[Dean] is the creator of the LUFA project and still likes to get his hands dirty hacking around with it. This idea came to him while he was exploring the concept of using the MIDI protocol to program a chip. That didn’t pan out because of the way Microsoft has handled MIDI in newer versions of Windows. But he did get the idea of making LUFA identify itself as a simple USB printer. He dug into the specification and figured out how to do that. Once Windows connects to the device it doesn’t really care what data gets sent to it. So [Dean] wrote a parser for the bootloader which could accept the incoming hex code and write it to the chip’s program memory.

6 Foot Tall Fire Breathing Piranha Plant From Super Mario Brothers


I always thought it would be cool to build a giant fire breathing piranha plant. I never really came up with an excuse to do it though. Eventually, I just decided I didn’t really need an excuse, and thus it was born.

The plant itself is pretty much just foam and cardboard. You can see the construction process in the video, it was really easy, but a little time consuming. I wanted to go with a bit of a crazy, hyper stylized look, so it is covered in veins and has these insane looking wrinkly lips.  The plant itself would be a fun thing just to have around the house. Actually, I may turn it into a lamp.

The fire systems were very much trial and error.

Continue reading “6 Foot Tall Fire Breathing Piranha Plant From Super Mario Brothers”

Voice Controlled Chess Robot

voice-controlled-chess-robot

[Ben Yeh] wrote in to tell us about this voice-controlled chess robot he built along with three others as a final project for their Georgia Tech ECE 4180 Embedded Systems Design class.

To handle the speech recognition they grabbed an EasyVR board. This is a fine solution because it prevents the need for a computer to process voice commands (remember, it’s an embedded systems class). This concept breaks down when you find out that the desktop computer next to the robot is where the chess game is running. Perhaps that can be moved to a microcontroller by the next set of 4180 students.

The robot arm portion of the project is shown off well in the clip after the break. Normally we’d expect to see stepper motors driving the axes of a CNC machine but in this case they’re using servo motors with built-in encoders. The encoders are i2c devices which feed info back to the main controller. There was a parts ordering snafu and the z axis motor doesn’t have an encoder. No problem, they just added a distance sensor and a reflector to measure the up and down movement of the claw.

Continue reading “Voice Controlled Chess Robot”

Everything You Need To Know To Make A Laser Engraver From Scrap

make-a-laser-engraver-from-scrap

Check out the Einstein head which [Sebastian Müller] etched on the cover of his calculator using a laser engraver he made from scratch. We think he did a great job with the build, but we’re even more impressed with the work he put into sharing the techniques he used to salvage and repurpose all the components. It’s a perfect resource that should be pretty easy to adapt to different model/manufacturer source hardware.

He used an old scanner and an old printer for the bulk of the parts. These both originally included stepper-motor actuated gantries, which pull together to form the x and y axes in his Frankenstein Laser Engraver. As the parts came together he started in on the control electronics which include a couple of EasyDriver stepper motor boards and an Arduino.

At this point he took the machine for a test-run, attaching a marker to the carriage to use it as a pen plotter. After putting in a solid performance at this [Sebastian] moved on to adding in the laser diode. He covers how to drive the diode, as well as focal point alignment in great detail. It seems like his webpage post has the same content as the Instructable linked above but we wanted to leave the link just in case.