Lathe Turns The Corner, Makes A Cube

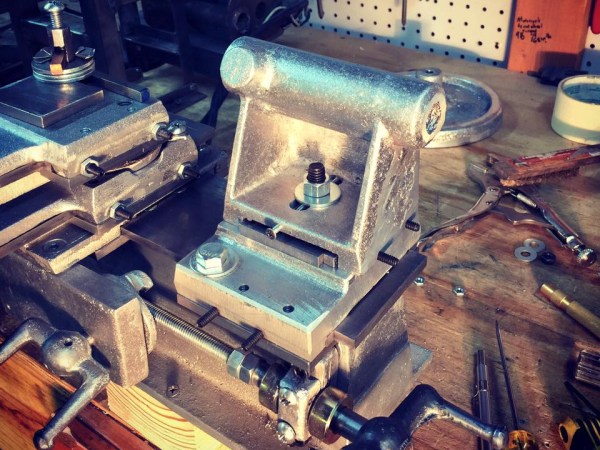
[Tim] was tired of using his lathe to turn round things. He decided to make a gaming die—something that’s iconically square—out of cylindrical scrap. As it turns out, this is possible to do on a lathe with a three jaw chuck. [Tim] discovered that the bevel on the jaws will hold a cylindrical puck of scrap sideways while he squares off the round sides into faces.

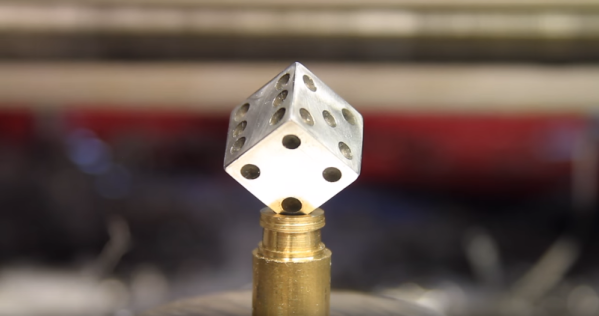
Turning a cube on a lathe looks pretty fiddly, so we applaud [Tim]’s lovely handiwork even more. As you’ll see in the video down below, things were going gangbusters until he went to make the last facing cut. Maybe the tool wasn’t lined up just so, or something was off in the chucking, but the first pass made a bit of a gouge in the stock. Looks like it was easy enough to fix, though. After four 90° turns and facing cuts, he had a nice looking rough cube to work with.

This is a regulation-sized die, so the next step was to trim it down to 16mm³. Then it was time to sand, polish, and add the dots. To lay them out, [Tim] sprayed the cube with layout fluid and scribed unique line patterns on each face. Then he drilled the indentations and filled them in with aluminium black.

Most of the dice we see are electronic, like this extremely random pair and these PIC-driven LED dice. We’d like to see [Tim] make a second D6 so he has a pair. And then make a D20. Please?

Continue reading “Lathe Turns The Corner, Makes A Cube”

Over-Engineered Mailbox Flag Machined Using Under-Engineered Mini-Lathe

[Tim Nummy] used his cheap, Chinese, bench mini-lathe to make a non-terrible mailbox flag holder (YouTube video, embedded below). Tim posts videos on his channel about garage hobby projects, many of which are built using his mini-lathe, often based on suggestions from his followers. One such suggestion was to do something about his terrible mailbox flag – we’re guessing he receives a lot of old-school fan mail.

He starts off by planning the build around 1 ¼ inch aluminum bar stock, a 688 bearing, three neodymium magnets and some screws. The rest of it is a “think and plan as you go along” project, but essentially, the new holder is in three pieces. An inner piece goes inside the mail box and holds the assembly to the mail box. The middle piece holds the two magnets which act as end-stops or limits for the flags raised and lowered positions. The final, outer piece holds the flag itself, and the bearing which allows it to rotate freely.

This part also has the third magnet embedded in it to work with the other two magnets for the limits. The use of magnets is cool, but a ball catch with two detents would have worked just as well. It’s a great simple project to follow for those who want to wet their feet on lathe work. [Tim] has also posted links to all of the tools and equipment seen in the video, so check that out if anything catches your fancy.

But workshop veterans will almost certainly cringe at several places along the video. The main one that caught our eye is obviously the shaky lathe itself. It could do with a heavier workbench, proper leveling, foundation bolts or anti-vibration mounts. And from the looks of it, the tail stock isn’t any rock steady too. Although the lathe is variable speed, the chuck rpm is set too high for aluminum, and the lack of cutting fluid makes it even more troublesome. Using oil, or even some cutting fluid, while tapping would have been wise too.

We’re not sure if it’s the shaky foundation or poor feed control, but the step cut for mounting the bearing is over-sized by a whole lot more and requires a big goop of retaining compound to glue the bearing in place. But the end result works quite well, including the magnetic catches – a complex solution for a simple problem.

We’re sure our keen-eyed readers will likely spot some more issues in [Tim]’s methods, so go at it in the comments below, but please make sure to rein in the snark and keep your feedback positive.

Continue reading “Over-Engineered Mailbox Flag Machined Using Under-Engineered Mini-Lathe”

Hackaday Prize Entry: Mini DRO For A Lathe

A manual lathe has dial wheels to control the feed of the main carriage and the cross slide to help take cuts on the workpiece. These feed wheels always have some backlash and require frequent resetting of the “zero”. The usual process would be to take measurements on the workpiece with either a vernier caliper or a micrometer at intervals which requires stopping the machine, adding up to increased machine time. The addition of a digital readout not only simplifies the process, but also reduces machining time substantially. Since the DRO magnetic strips are directly attached to the cross slide, the effects of backlash are mitigated.

[Igor] has just such a manual lathe and built his own mini DRO unit from scratch a couple of years back. Most DRO’s have encoder strips and sensors attached to the cross slide with a larger display unit attached separately on a stalk, with wires running between the two. [Igor] kept things simple by building a unit that fit within the space constraints he had. His unit consists of just two sensor modules – each attached directly to the slide. The main unit houses a linear hall sensor, electronics, buttons, a small LCD and batteries. The second axis unit houses just the sensor with a cable connecting it to the main unit for data and power. At the heart of the system is a pair of NSE-5310 linear hall sensor encoder chips. These work in conjunction with multipole magnetic strips. The encoder provides a 12-bit output, and the magnetic strips have poles spaced 2 mm apart. This translates to a theoretical resolution of almost 0.5 microns, but of course, the machine mechanics limit the actual results. The encoder chips talk to an ATtiny2313 over the I2C bus. Three buttons and the power supply round-up the hardware. To run it off a single 1.5 V rechargeable battery, [Igor] used a boost converter to get 3.3 V. The 5 V needed for the LCD is obtained by a voltage doubler connected to a PWM output from the microcontroller and regulated by a Zener diode. The second sensor unit connects via a TRRS 3.5 mm socket.

He added a Bluetooth module as an after thought, but ran out of GPIO pins as well as program space and had to get creative to make it work. The plan was to transmit the data to an Android tablet which would work as a large, remote, wireless display. He never did use that feature though, being satisfied with the small LCD display. There’s several things that went wrong in the build, and if he were to replicate the project again, several changes and improvements would help. So if anyone plans on doing something similar, do check up [Igor]’s project logs first.

Hackaday Prize Entry: 3D Printed Mini-Lathe

Lathes can be big, powerful, dangerous machines. But sometimes there’s a call for making very small parts out of soft materials, like plastic and wood. For jobs like this, you could use something like this 3D printed mini-lathe.

The benefits of 3D printing a tool like this are plentiful. The design can be customized and refined by the end user; [castvee8] notes that the machine can be made longer simply by increasing the length of the lead screw and guide rails. The machine does rely on some metal parts and a motor; but the real power here is that if you can’t source the exact components, you can always customize the files to suit what you have on hand.

[castvee8] aimed to make the entire build as easy as possible for the novice – even the motor and speed controller are off-the-shelf modules. It’s a testament to the golden age we live in that an entire lathe can be built out of modules and 3D printed parts. The project makes up another member of the family of 3D printed tools [castvee8] is showing off on Hackaday.io.

Bulking Up A Lightweight Lathe With A Concrete Cart

When it comes to machine tools, a good rule of thumb is that heavier is better. A big South Bend lathe or Bridgeport mill might tip the scales at ludicrous weight, but all that mass goes to damping vibration and improving performance. So you’d figure a lathe made of soda cans could use all the help it could get; this cast concrete machine cart ought to fit the bill nicely

Perhaps you’ve caught our recent coverage of [Makercise]’s long and detailed vlog of his Gingery lathe build. If not, you might want to watch the 5-minute condensed video of the build, which shows the entire process from melting down scrap aluminum for castings to first chips. We love the build and the videos, but the lightweight lathe on that wooden bench never really worked for us, or for [Makercise], who notes that he was never able to crank the lathe up to full speed because of the vibrations. The cart attempts to fix that problem the old fashioned way – more mass.

There are a few “measure twice, cut once” moments in the video below, as well as a high pucker-factor slab lift that could have turned into a real disaster. We might have opted for a countertop-grade concrete mix that could be dyed and polished, but that would be just for looks. When all is said and done, the cart does exactly what it was built to do, and there’s even room on it for the shaper that’s next on the build list. We’re looking forward to that.

Continue reading “Bulking Up A Lightweight Lathe With A Concrete Cart”

New Lathe Day Is Best Day

As [Quinn Dunki] rightly points out, modern industrial civilization was probably conceived on the bed of a lathe. Turning is an essential step in building every machine tool, including lathes, and [Quinn] decided it was time to invite one into her shop. But she discovered a dearth of information to guide the lathe newbie through that first purchase, and thus was born the first installment in her series on choosing and using a new lathe.

As for the specifics of the purchase, [Quinn]’s article goes into some depth on the “old US iron” versus “new Asian manufacture” conundrum. Most of us would love an old South Bend or Cincinnati lathe, but it may raise practical questions about space planning, electrical requirements, and how much work is needed to get the old timer working again. In the end, [Quinn] took the path of least resistance and ordered a new lathe of Chinese heritage. She goes into some detail as to what led to that decision, which should help other first-timers too, and provides a complete account of everything from uncrating to first chips.

Nothing beats the advice of a grizzled vet, but there’s a lot to be learned from someone who’s only a few steps ahead of her intended audience. And once she’s got the lathe squared away, we trust she’ll find our tips for buying a mill helpful getting that next big shipment delivered.

“All the best things in life arrive on a pallet.” Have truer words ever been spoken? Sure, when the UPS truck pulls up with your latest Amazon or eBay treasure, it can be exciting. But a lift-gate truck rolling up to the curb? That’s a good day.

The Best Gingery Lathe Video Series To Date

[Makercise] has been working on a Gingery Lathe since September last year. His videos on the process are by far the most detailed, clearly shot, and complete series on making a Gingery lathe we’ve come across.

For those who aren’t familiar, the Gingery series of books describe how to build an entire machine shop’s worth of bench top tools using only the hardware store, dumpster dives, charcoal, and simple skills. The series of books start out with the charcoal foundry. [Makercise] has built a nice oil fired foundry already so it’s off to the next book, Gingery 2,  is the metal lathe.

The Gingery books and, really, most DIY books from that era are: not well laid out, well written, or even complete. All but the most recent prints of the series still looked like photocopies of typewritten documents with photos glued on. The series provided just enough detail, drawings, and advice to allow the hobbyist to fill in the rest. So it’s really nice to see someone work through the methods described in the book visually. Seeing someone using a scraper made from an old file on aluminum to true the surface is much more useful than Gingery’s paragraph or two dedicated to the subject.

[Makercise] is fast approaching the end of his lathe build. We’re not certain if he’ll move onto the Shaper, mill, drill press, brake, etc. after finishing the lathe, but we’re hopeful. The playlist is viewable after the break.

Continue reading “The Best Gingery Lathe Video Series To Date”