A EuroRack synthesizer module with an oscilloscope in the background showing a waveform

Recreating The Sounds Of The ’90s With A YM3812 Synthesizer

One reason the x86 PC became the dominant game platform in the early 1990s was the availability of affordable sound cards like the AdLib and Sound Blaster. These provided a quantum leap in sound quality compared to the PC speaker’s tinny beeps, thanks to Yamaha’s YM3812 chip, also known as OPL2. [Tyler] has made a detailed study of the various OPL series chips and wrote a comprehensive guide describing their operation.

[Tyler] begins by explaining the theory of FM synthesis. The basic idea is that you generate sine waves of different frequencies, combine them through mixing and modulation, and then adjust their strength over time. This way, a few simple operations on the chip’s nine sound channels can generate an astonishing variety of sounds from clear notes to chaotic noise. He then delves into the details of the YM3812 chip, including its 279 different register settings that enable all these operations.

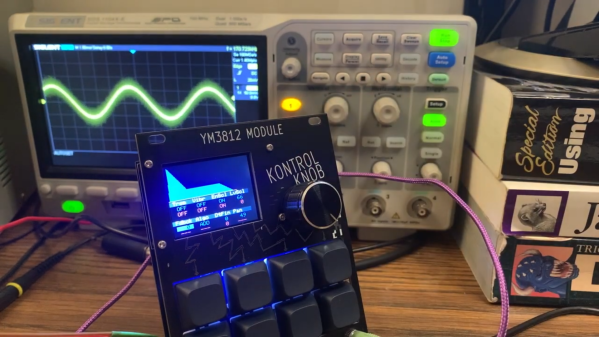
The final goal of [Tyler]’s research is the design of a YM3812 EuroRack module that fits inside standard modular synthesizers. He’ll go into detail on the board’s design and construction in future blog posts, but he already shows the finished product and demonstrates its features in the video embedded below. It’s a great introduction if you’re new to FM synthesis and want to recreate those magic DOS game sounds.

Of course, you can also just connect the OPL2 chip to your DOS computer, whether through a classic sound card or through a parallel port. The related YM2612 from the Sega Genesis also makes a fine synthesizer.

Continue reading “Recreating The Sounds Of The ’90s With A YM3812 Synthesizer”

Cardboard Game Tokens Become Shiny Click-Clacks With DIY Treatment

Tabletop games and cardboard tokens go hand-in-hand for a good reason: they are economical and effective. However, their tactile attributes leave a little to be desired. There’s something really great about high-quality pieces possessing a shiny, pleasing smoothness and click-clack handling that cardboard simply can’t deliver, but that all changes with [Dzhav]’s simple method for converting cardboard tokens into deluxe versions of themselves with a little work and a resin coating.

The result is a token with a crystal-clear, smooth, and slightly-convex coating of hardened resin on it. They feel (and sound) like plastic, rather than cardboard. The resin used is a two-part clear jewelry resin, used for casting things like pendants. It benefits from a long working time and unlike UV-cured resin (like the SLA 3D printer resin) it won’t be affected by light.

Careful application of resin relies on surface tension to prevent messes.

Like with most things, good results come from careful preparation and technique. [Dzhav] suggests preparing the tokens by sanding the edges completely smooth with fine sandpaper, then using a black marker to color them. Then, tokens are coated one side at a time with a paintbrush and correctly-mixed resin: while holding a token down with a toothpick, resin is brushed right to (but not over) the edges. Then, additional resin can be dropped in the center of the token, and gravity and surface tension will work together to ensure an even coating that doesn’t drip.

After the resin has had plenty of time to cure, the tokens are flipped over and the process repeated. The end result are tokens with both sides coated in a nice, smooth, ever-so-slightly-convex shield of resin.

They look fantastic, and sound even better. Turn up your volume and play the two-second video embedded below to listen for yourself. And when you’re ready for another gamer that didn’t settle for what was in the box, check out this redesigned Catan version.

Continue reading “Cardboard Game Tokens Become Shiny Click-Clacks With DIY Treatment”

A 386 motherboard with a custom ISA card plugged in

Emulate Any ISA Card With A Raspberry Pi And An FPGA

One of the reasons the IBM PC platform became the dominant standard for desktop PCs back in the mid-1980s was its open hardware design, based around what would later be called the ISA bus. Any manufacturer could design plug-in cards or even entire computers that were hardware and software compatible with the IBM PC. Although ISA has been obsolete for most purposes since the late 1990s, some ISA cards such as high-quality sound cards have become so popular among retrocomputing enthusiasts that they now fetch hundreds of dollars on eBay.

So what can you do if your favorite ISA card is not easily available? One option is to head over to [eigenco]’s GitHub page and check out his FrankenPiFPGA project. It contains a design for a simple ISA plug-in card that hooks up to a Cyclone IV FPGA and a Raspberry Pi. The FPGA connects to the ISA bus and implements its bus architecture, while the Pi communicates with the FPGA through its GPIO ports and emulates any card you want in software. [eigenco]’s current repository contains code for several sound cards as well as a hard drive and a serial mouse. The Pi’s multi-core architecture allows it to run several of these tasks at once while still keeping up the reasonably high data rate required by the ISA bus.

In the videos embedded below you can see [eigenco] demonstrating the system on a 386 motherboard that only has a VGA card to hook up a monitor. By emulating a hard drive and sound card on the Pi he is able to run a variety of classic DOS games with full sound effects and music. The sound cards currently supported include AdLib, 8-bit SoundBlaster, Gravis Ultrasound and Roland MT-32, but any card that’s documented well enough could be emulated.

This approach could also come in handy to replace other unobtanium hardware, like rare CD-ROM interfaces. Of course, you could take the concept to its logical extreme and simply implement an entire PC in an FPGA.

Continue reading “Emulate Any ISA Card With A Raspberry Pi And An FPGA”

Retrotechtacular: Programming By Card

The recent Supercon 6 badge, if you haven’t seen it, was an old-fashioned type computer with a blinky light front panel. It was reminiscent of an Altair 8800, a PDP-11, or DG Nova. However, even back in the day, only a few people really programmed a computer with switches. Typically, you might use the switches to toggle in a first-level bootloader that would then load a better bootloader from some kind of storage like magnetic or paper tape. Most people didn’t really use the switches.

What most people did do, however, was punch cards.  Technically, Hollerith cards, although we mostly just called them cards, punched cards, or IBM cards. There were a lot of different machines you could use to punch cards, but none were as popular, I would guess, as the IBM 029. Certainly, the models in the series were overwhelmingly what people used to punch cards.

For the uninitiated, a card was about the size of an old-fashioned dollar bill — the ones in style when Herman Hollerith invented them. The card was made of material not quite as thick as a standard file folder and was divided into 80 columns and 12 rows. Later cards had more columns, but those never really caught on to the same scale as the classic 80-column card. Continue reading “Retrotechtacular: Programming By Card”

Hackaday Podcast 187: The Sound Of Gleeful Gerbils, The Song Of The Hard Drive, And A Lipstick Pickup Lullaby

This week, Editor-in-Chief Elliot Williams and Assignments Editor Kristina Panos gushed about NASA’s live obliteration of minor planet Dimorphos using a probe outfitted with a camera. Spoiler alert: the probe reaches its rock-dappled rocky target just fine, and the final transmitted image has a decidedly human tinge.

Kristina brought the mystery sound again this week, much to Elliot’s sonic delight. Did he get it? Did he figure it out? Well, no. The important thing is one of you is bound to get it.

We kick off the hacks with a really neat 3D printed linkage that acts as an elevator for a marble run, and then we discuss a mid-century hack that helps you decide whether it’s time to emerge from the fallout shelter using the contents of your typical 1950s pockets. We spent a few minutes comparing our recent radiation exposure levels  — Kristina wins with about a dozen x-rays so far this year, but no full-body CT scans. Then we talk guitars for a bit, remember a forgotten CPU from TI, and spend a few cycles talking about a tone-wheel organ that sounds like a chorus of gleeful gerbils.

Finally, we talk toner transfer for 3D prints, argue in defense of small teams versus large committees, and get all tangled up in cursive.

Direct download.

Check out the links below if you want to follow along, and as always, tell us what you think about this episode in the comments!

Continue reading “Hackaday Podcast 187: The Sound Of Gleeful Gerbils, The Song Of The Hard Drive, And A Lipstick Pickup Lullaby”

This Found-Sound Organ Was Made With Python And A Laser Cutter

Some readers will no doubt remember attaching a playing card to the front fork of their bicycle so that the spokes flapped the card as the wheel rotated. It was supposed to sound like a motorcycle, which it didn’t, but it was good, clean fun with the bonus of making us even more annoying to the neighborhood retirees than the normal baseline, which was already pretty high.

[Garett Morrison]’s “Click Wheel Organ” works on much the same principle as a card in the spokes, only with far more wheels, and with much more musicality. The organ consists of a separate toothed wheel for each note, all turning on a common shaft. Each wheel is laser-cut from thin plywood, with a series of fine teeth on its outer circumference. The number of teeth, as calculated by a Python script, determines the pitch of the sound made when a thin reed is pressed against the spinning wheel. Since the ratio of teeth between the wheels is fixed, all the notes stay in tune relative to each other, as long as the speed of the wheels stays constant.

The proof-of-concept in the video below shows that speed control isn’t quite there yet — playing multiple notes at the same time seems to increase drag enough to slow the wheels down and lower the pitch for all the notes. There appears to be a photointerrupter on the wheel shaft to monitor speed, so we’d imagine a PID loop to control motor speed might help. That and a bigger motor that won’t bog down as easily. As for the sound, we’ll just say that it certainly is unique — and, that it seems like something [Nicolas Bras] would really dig.

Continue reading “This Found-Sound Organ Was Made With Python And A Laser Cutter”

Sound Generation Board Makes The Tunes

[Mcjack123] has been getting into chiptunes lately and realized that his original interest started in 2018 when he used an Arduino to turn a TI-84 calculator into a sound machine. His latest iteration is a custom-designed soundboard and he takes us through the design and construction of it in a recent post.

The work models classic sound generators like the 2A03 or the Commodore 64 SID. You have a bunch of simple waveform generators along with filters and modulators to make various effects. These boards eventually gave way to FM synthesis devices like the Yamaha OPL2 and OPL3 chips. All of these cards accepted commands and generated audio on their own. More modern boards are more likely to simply convert digital data from the computer into audio.

Continue reading “Sound Generation Board Makes The Tunes”