Vacuum cleaners are great for tidying up the home, but they typically can’t deal with the bulky, gross messes of a proper workshop. [CraftAndu] is currently building a sailing vessel, and has found that there’s simply too much sawdust for a regular vacuum to take on. Thus, he built a mighty vacuum of his own that’s able to deal with such conditions.
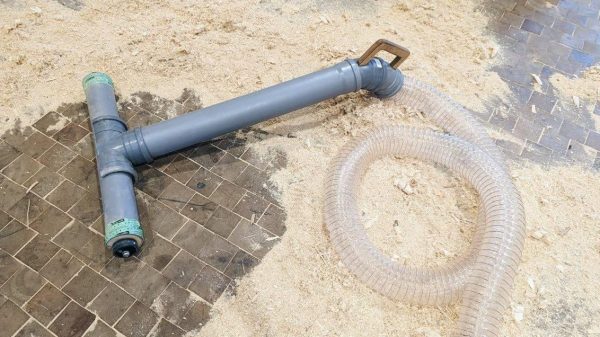
The core of the build is a giant 3.8 kW dust collector that’s used as part of a workshop dust extraction system. It’s of the type you’d normally use to suck up dust from machine tools. It’s then fitted with a long flexible hose that goes to the vacuum handle itself. The handle is made up of lengths of sewage pipe and several adaptors to fit it all together and hook up to the flexible tube. It’s also fitted with a set of wheels to allow it to be easily skated about the floor of the shop.
It’s a neat way to suck up all the lightweight sawdust that collects around the workshop. However, [CraftAndu] notes that even with the 3.8 kW extraction system powering it, it’s still quicker to use a broom for bigger detritus like wood chips and the like.
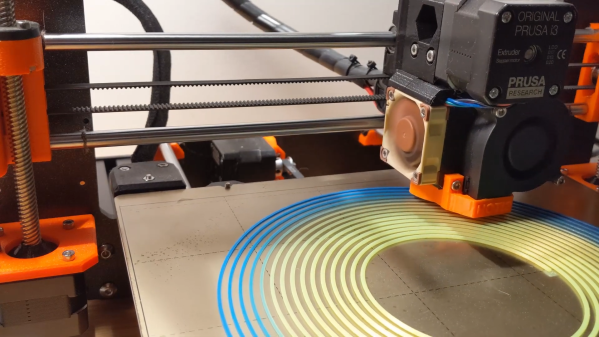
Color gradient filament is fun stuff to play with. It lets you make 3D prints that slowly fade from one color to another along the Z-axis. [David Gozzard] wanted to do some printing with this effect, and learned how to make his own filament to do the job.
[David] intended to 3D print a spectrogram of a gravity wave, and wanted the graph to go from blue to yellow. Only having a single-color printer, he needed color shift filament, but couldn’t find any blue-to-yellow filament online.
The resulting color-shifting print looks great, demonstrating the value of the technique.
Thus, he elected to create it himself. He started by creating a spiral model in Fusion 360, with a hexagonal cross-section and slowly tapering off to a point. Slicing and printing this in blue results in a filament that slowly fades down to a point. The opposite shape can then be printed in yellow, tapering from a point up to a full-sized filament. The trick is to print one shape, then the other, by mashing the G-code together and changing the filament from blue to yellow along the way. The result is the blue and yellow plastic gets printed together into a single filament that gradually changes from one to the other.
Notably, the filament is smaller than the original filaments used to create it, so it’s necessary to run slightly different settings when using it. [David] has shared the models on Thingiverse for those eager to recreate the technique at home. His resulting gravity wave print is impressive, demonstrating that this technique works well!
Reflow hotplates are a wonderful tool for PCB assembly if you can keep your designs single-sided. The 946C hotplate in particular has been on hackers’ radar for a while – a 200x200mm working surface hotplate available for under $100 is a decent investment. As with other reflow tools, it was a matter of time until someone made a replacement controller for it. This one, you’ll want to keep in mind – it’s a replacement controller project by [Arnaud Durand] and [Elias Rodriguez Martin], called Reflow946.
Keeping to best practices, the board is a drop-in replacement for the stock controller – swap cables over and go. The host processor is an ESP32, and it lets you can program reflow profiles in using BLE, with a Python application to help. The whole design is open-source and on GitHub, of course – keeping with best 3D printing traditions, you can already order the parts and PCBs, and then assemble them using the hotplate you’re about to upgrade. As far as aftermarket controllers go, here’s no doubt this board gives you way more control in reflow and lets you compensate for any possible subpar calibration while at it. Continue reading “Controller For 946C Hotplate Adds Reflow Profile Upload Over BLE”→
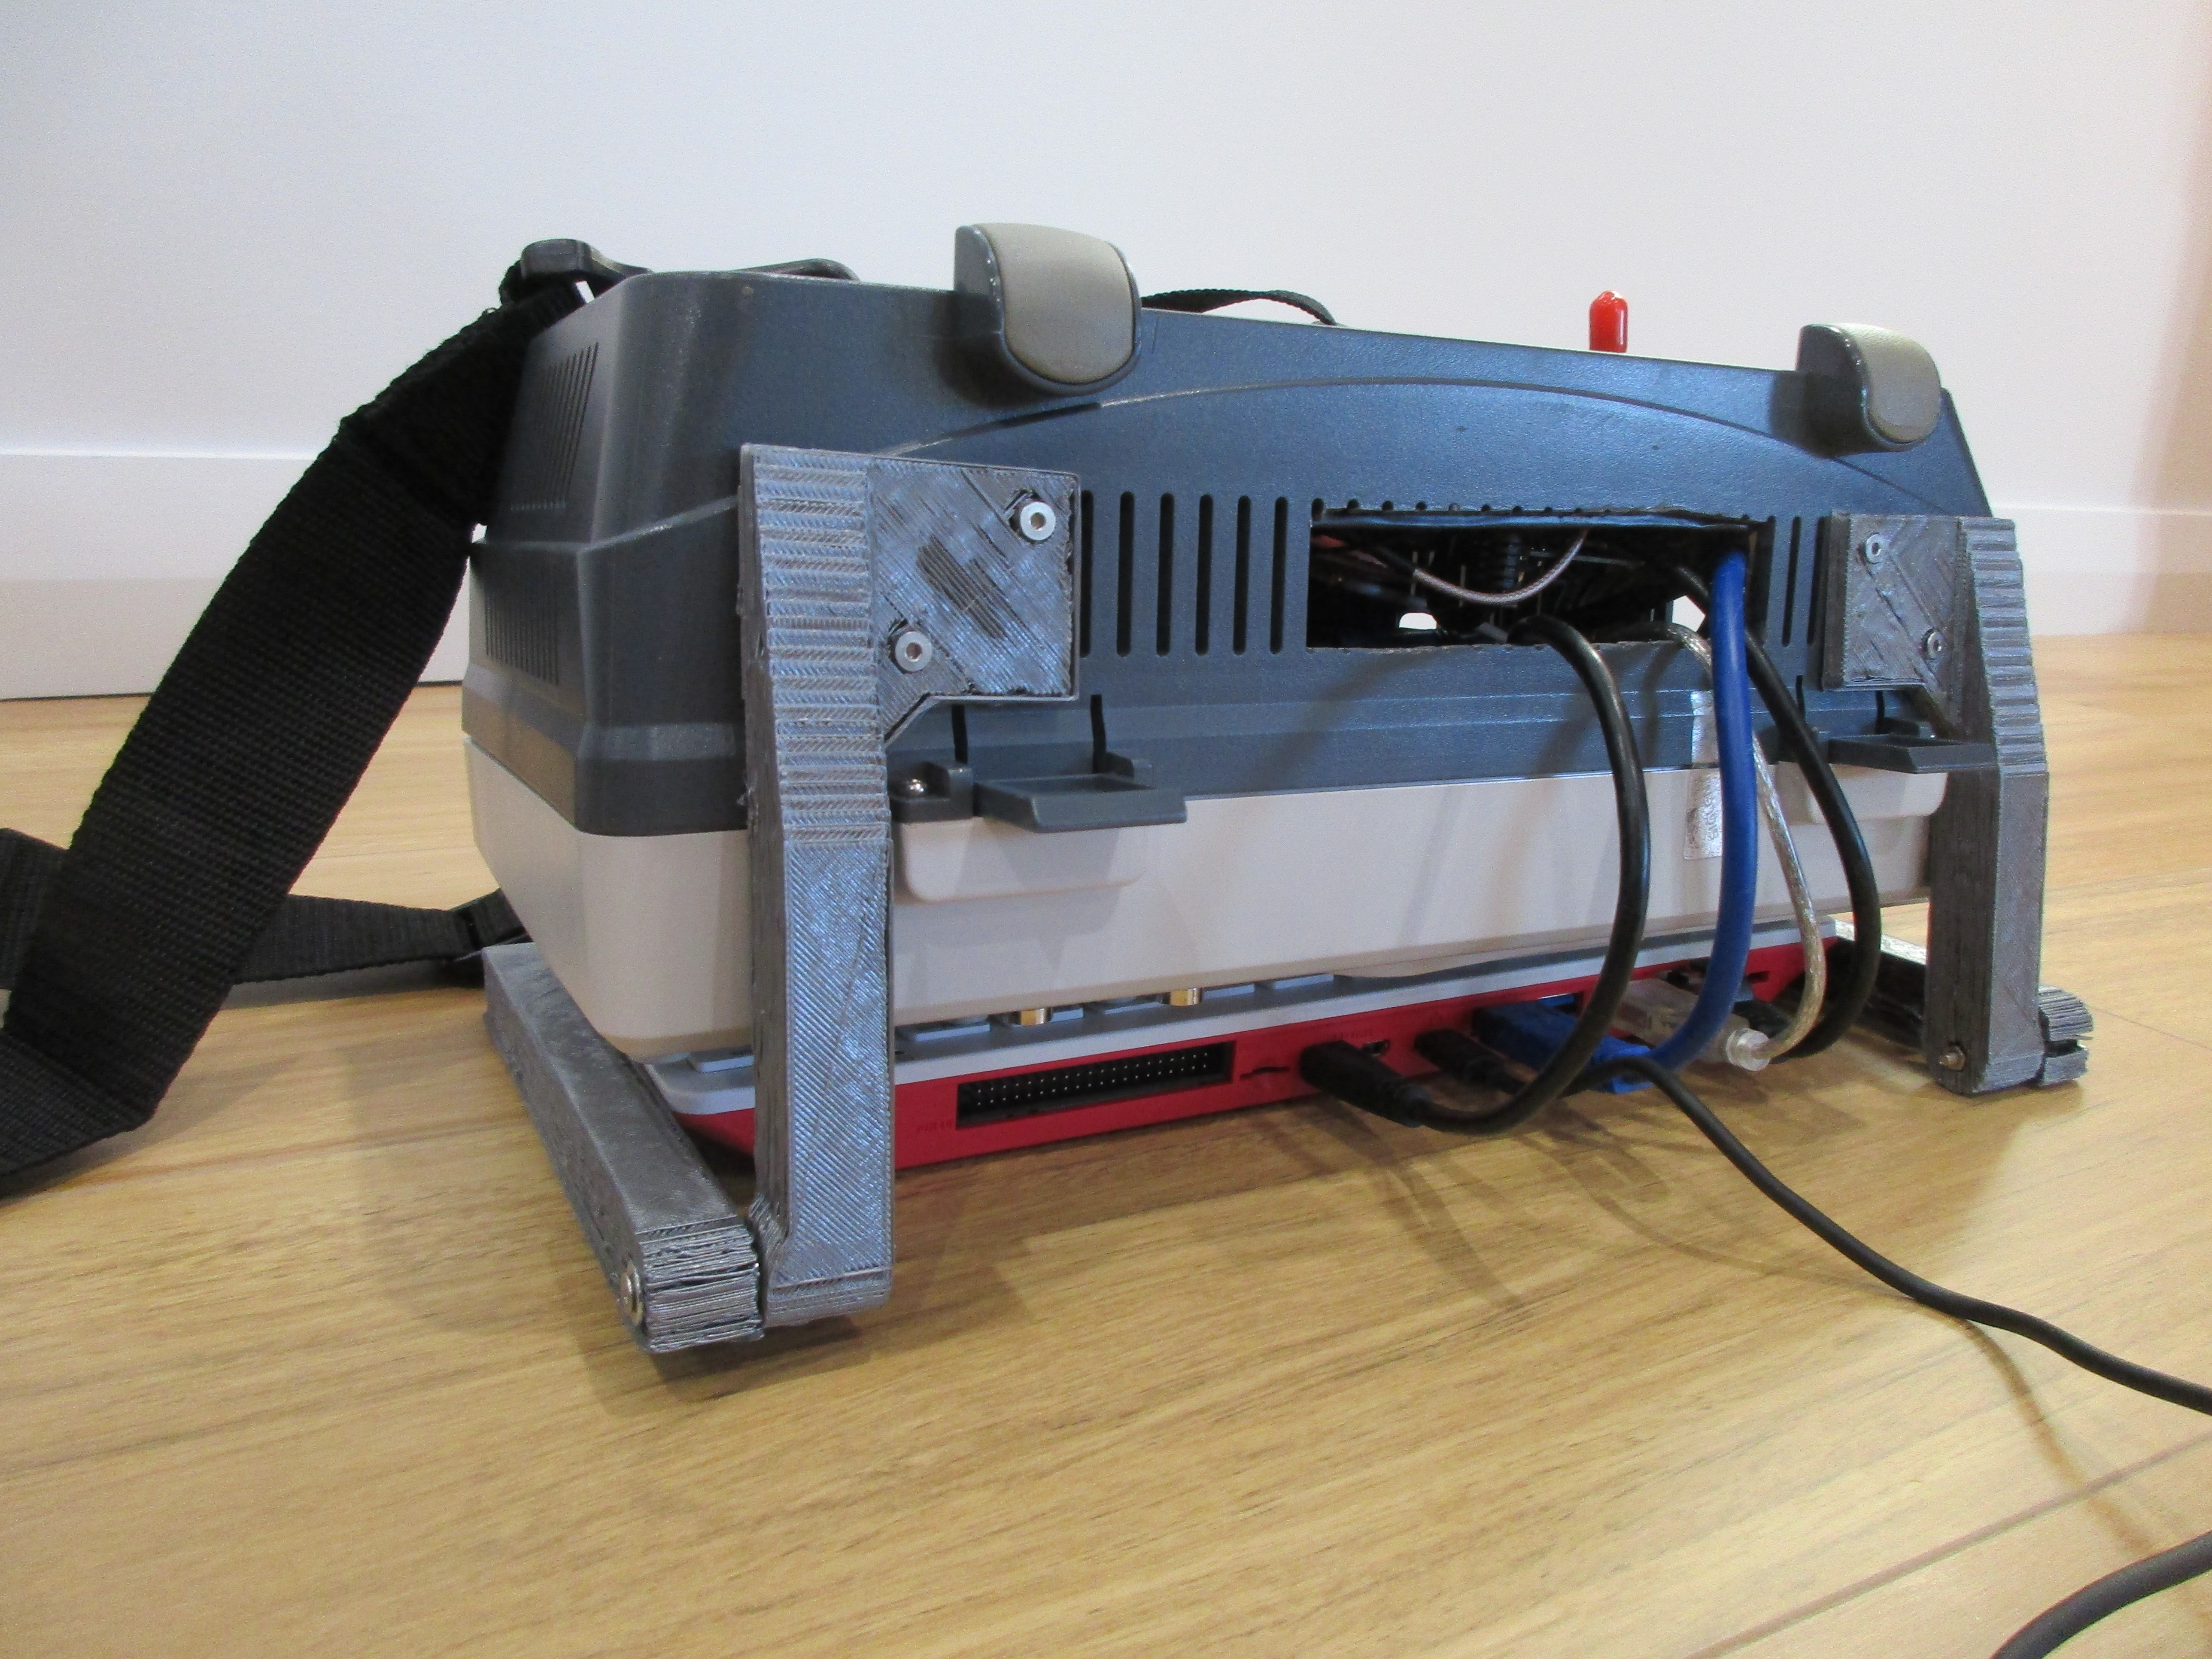
When [Jak_o_Shadows] Siglent Oscilloscope died, he didn’t just mourn the loss, he saw an opportunity. See, he had a Raspberry Pi 400 already set aside for a cyberdeck build, and he just scored a novel case. Most of the insides of the old scope came out, but the screen and control knobs live on in the new build. An HDMI-to-LVDS adapter brought the screen back to life, and the control knobs are a work-in-progress. Added to the case are some fun goodies, like a LimeSDR, connected to the old scope inputs. A PL2303 is wired to the serial port, making that functional, too. It’s a very nice touch that the build retains the original scope’s functions this way.
There’s plenty of 3d-printed goodness, like some internal brackets to hold things in place. The real star of the show is a 3d-printed hinge, holding the scope and Pi 400 together and making the whole package portable. There’s a neat tip, too, in that the Pi 400 has a huge integrated heat sync under the keyboard. It’s just a sheet of metal, so you can drill and tap it as mounting points. Cool!
This is a nifty build, and certainly a worthy deck for jacking-in to whatever you’re working on. And re-purposing an oscilloscope is a nice aesthetic. If [Jak_o_Shadows] can just get the front array of buttons and knobs working with his STM32, this will be a killer deck, the envy of console cowboys everywhere.
One of the core features of the scientific community is the concept of “peer review” where any claims made by a scientist are open to be analyzed and reproduced by others in the community for independent verification. This leads to either rejection of ideas which can’t be reproduced, or strengthening of those ideas when they are. In this community we typically only feature the first step of this process, the original projects from various builders, but we don’t often see someone taking those instructions and “peer reviewing” someone’s build. This is one of those rare cases.
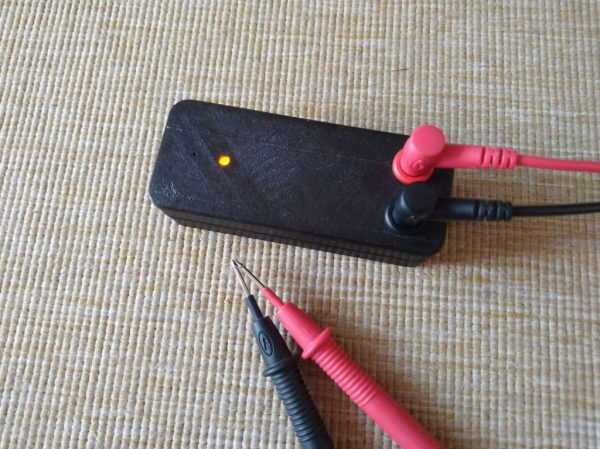
[oxullo] came across [Leo]’s original build for the ultimate continuity tester. This design is much more sensitive than the function which is built in to most multi-meters, and when building this tool specifically some other refinements can be built in as well. [oxullo] began by starting with the original designs, but made several small modifications. Most of these were changing to surface-mount parts, and switching some components for ones already available. Even then, there was still a mistake in the PCB which was eventually corrected. The case for this build is also 3D printed instead of being made out of metal, and with the original video to work from the rest fell into place easily.
[oxullo] is getting comparable results with this continuity tester, so we can officially say that this design is peer reviewed and tested to the highest of standards. If you’re in need of a more sensitive continuity sensor, or just don’t want to shell out for a Fluke meter when you don’t need the rest of its capabilities, this is the way to go. And don’t forget to check out our original write-up for this tester if you missed it the first time around.
In a perfect world, all of our electronic devices would come with complete documentation, and there’d be open source libraries available for interfacing them with whatever we wanted. There’d never be arbitrary lockouts preventing us from using a piece of hardware in a way the manufacturer didn’t approve of, and the “cloud” wouldn’t be a black-box server in some data center on the other side of the planet, but a transparent and flexible infrastructure for securely storing and sharing information.
Unfortunately, that’s not the world we live in. What’s worse, rather than moving towards that electronic utopia, the industry appears to be heading in the opposite direction. It seems like every month we hear about another service shutting down and leaving viable hardware to twist in the wind. Just yesterday Google announced they’d be retiring their Stadia game streaming service early next year — leaving users with unique Internet-connected controllers that will no longer have a back-end to communicate with.
Matthew Alt
Luckily for us, there’s folks like Matthew [wrongbaud] Alt out there. This prolific hacker specializes in reverse engineering, and has a knack not just for figuring out how things work, but in communicating those findings with others. His conquests have graced these pages many times, and we were fortunate enough to have him helm the Introduction to Reverse Engineering with Ghidra class for HackadayU back in 2020. This week, he stopped by the Hack Chat to talk about the past, present, and future of reverse engineering.
Matthew got his start in reverse engineering during college, when he was working in a shop that specialized in tuning engine control units (ECUs). He was responsible for figuring out how the ECUs functioned, which ultimately would allow them to be modified to improve engine performance beyond the vehicle’s stock configuration. Sometimes that involved uploading modified calibration data, or disabling functions that were detrimental to engine performance. These software changes could potentially increase engine output by as much as 50 HP, though he says that sometimes the goal was to simply increase throttle response so the vehicle would feel more aggressive on the road.
Moving on to the tools of the trade, Matthew explained why he prefers using Ghidra for embedded targets over classic reverse engineering tools like IDA Pro. As an example he points to a recent project where he used Ghidra’s API and intermediary language PCode to crack passwords in Game Boy Advance games. Though he does mention that IDA still has its place if you’re looking to peek into some Windows C++ software.
Matthew also pointed to new techniques and tools for working with fault injection which have opened up a lot of exciting possibilities over the last few years. In fact, he says tools like ChipWhisperer will become invaluable as newer devices adopt advanced security features. When gadgets are using secure boot and encrypted firmware, gaining access is going to take a bit more than just finding an unleaded serial port on the board. Glitching attacks will become more commonplace, so you might as well get up to speed now.
Colin O’Flynn’s ChipWhisperer makes side-channel power analysis and glitching attacks far more accessible.
We’d like to thank Matthew Alt for not just stopping by the Hack Chat, but for being such a good friend to the Hackaday community. His work has been inspirational for all of us here, and it’s always exciting when he’s penned a new blog post detailing another challenge bested. The next time your favorite MegaCorp releases some anti-consumer gadget, you can take some comfort in knowing he’s still out there bending hardware to his will.
The Hack Chat is a weekly online chat session hosted by leading experts from all corners of the hardware hacking universe. It’s a great way for hackers connect in a fun and informal way, but if you can’t make it live, these overview posts as well as the transcripts posted to Hackaday.io make sure you don’t miss out.
This week, Editor-in-Chief Elliot Williams and Assignments Editor Kristina Panos gushed about NASA’s live obliteration of minor planet Dimorphos using a probe outfitted with a camera. Spoiler alert: the probe reaches its rock-dappled rocky target just fine, and the final transmitted image has a decidedly human tinge.
Kristina brought the mystery sound again this week, much to Elliot’s sonic delight. Did he get it? Did he figure it out? Well, no. The important thing is one of you is bound to get it.
We kick off the hacks with a really neat 3D printed linkage that acts as an elevator for a marble run, and then we discuss a mid-century hack that helps you decide whether it’s time to emerge from the fallout shelter using the contents of your typical 1950s pockets. We spent a few minutes comparing our recent radiation exposure levels — Kristina wins with about a dozen x-rays so far this year, but no full-body CT scans. Then we talk guitars for a bit, remember a forgotten CPU from TI, and spend a few cycles talking about a tone-wheel organ that sounds like a chorus of gleeful gerbils.
Finally, we talk toner transfer for 3D prints, argue in defense of small teams versus large committees, and get all tangled up in cursive.
 The core of the build is a giant 3.8 kW dust collector that’s used as part of a workshop dust extraction system. It’s of the type you’d normally use to suck up dust from machine tools. It’s then fitted with a long flexible hose that goes to the vacuum handle itself. The handle is made up of lengths of sewage pipe and several adaptors to fit it all together and hook up to the flexible tube. It’s also fitted with a set of wheels to allow it to be easily skated about the floor of the shop.