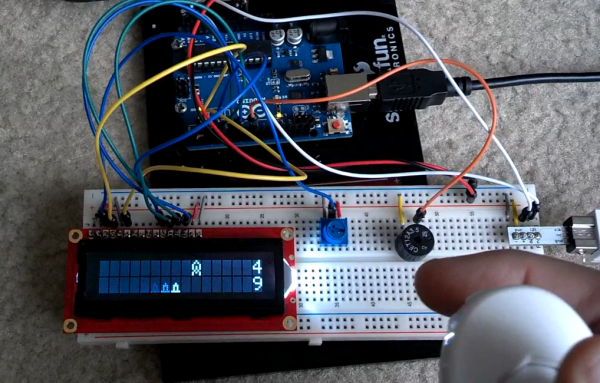
STM32 Driving A PCIe Video Card

[Gpuhackr] chose his username to explain exactly how he spends his time. For instance, here he’s using an STM32 Discovery board to drive an AMD Radeon HD 2400 graphics card. The ARM microcontroller isn’t actually using the PCIe interface on the card. Instead, [Gpuhackr] has patched into the debugging interface built into the card itself. This isn’t quite as straight forward as it sounds, but if you do the wiring carefully it’s a pretty intersting way to connect an ARM to an LCD monitor.

This project would be almost impossible if it weren’t for the open source code which AMD has released. This lets him implement the card’s 3D rendering features. The demo directly programs the UVD Xtensa CPU which is on the video card. It draws a cube with color gradients on each side. The cube spins while the debug information is overlaid on the screen. In this case the ARM chip/board is really being used as a programmer to upload some custom firmware. But we think a real code-ninja could implement a communications protocol to open up a simple way to drive the card in real-time.

[Thanks uMinded]

USB To RS-232 Adapter Hacked To Use RS485 Instead

[André Sarmento] needed to connect a computer to an RS-485 bus. A simple converter can be sourced online, but the only thing he could find locally that was even close was a USB to RS-232 converter. He used that component to craft his own USB to RS-485 bridge.

RS-485 is often used for remote sensors as it provides a method of connecting electronics over long distances. The converter which he started with seems to be encased in a hot-glue-like substance. A bit of time with a torch and he was able to get to the components on the board. There are two stages, one which converts RS-232 to TTL, and the other converts TTL to USB. [André] removed the RS-232 chip and patched his own board (shown on the left) into its TTL lines. He was also able to add a few more configuration options, like using an external power source, and having a few jumper-selected resistor options.

Sensor Based Dehumidifier System For Your Home

The apartment [Angus] lives in must be sealed up pretty tight. It was so humid during the winter that there was a mold issue. We usually have the opposite problem, needing to add humidity to the air in the colder months. To combat the issue he bought a small dehumidifier, but wanted to automate the system a bit more than what was built into its meager controls. He combined a set of wireless sensors and remote control outlets to switch the dehumidifier automatically.

The sensors are from a weather station he bought on eBay. It came with a base station and three remote units, all of which monitor both temperature and humidity. He wanted a system that could compare temperature with dew point and make decisions based on a simple look-up table. An Arduino with a custom milled shield reads these measurements from the sensors and feeds them to a router which is running a cron job script every minute. When that script judges the time and weather conditions warrant a change it tells the Arduino to switch the wireless outlet to which the dehumidifier is connected.

Scary Putin Guards Your Stash

If anyone tries to take anything from this coin bank they’re going to have to brave the creepy looks that [Vladimir Putin] gives them. That’s because [Overflo] rigged up the wall hanging to react when you approach it. It’s all in the eyes, which open and turn red based on your proximity to the picture frame.

The frame itself is the ugliest thing [Overflo] could find at Ikea. He spray painted it gold and added an image of [Putin] with a zany background. At rest [Vlad] has his eyes closed. But the lids are connected to a servo motor to pull against the spring that keeps them shut. An infrared proximity sensor is used to trigger the eyelids when you get relatively close, but if you reach out your hand it will even light up the red LEDs hidden in the pupils of the eyes. See a demonstration of the setup in the video after the break.

Continue reading “Scary Putin Guards Your Stash”

Building Up An Inventory Of SMD Parts

Once you’ve been tinkering around with electronics for a while, you’ll realize the through-hole components that make breadboarding a circuit so easy won’t cut it anymore. Surface mount parts are the future, and make it incredibly easy to build a semi-professional mockup at home. The question arises, though: how do you store thousands of surface mount parts smaller than a grain of rice?

As [George] was building up his SMD inventory, he came across a few clever solutions. The first was a binder sold by Adafruit (and others) that holds strips of cut tape SMD components. [George] wanted something a little more modular, and when he came across an eBay auction for 5000 0805 resistors and 3000 0805 caps, he needed to find a storage solution.

[George] ran across these tiny modular boxes while shopping at Adafruit. These boxes are completely modular, interlock with each other, and have a hinged lid that will hopefully prevent the eventual, ‘SMD parts everywhere’ spill everyone his likely to have.

After printing out some labels for his boxes, [George] had a very tidy solution to his SMD organization problems. We’re wondering what other Hackaday readers use to organize their parts, so if you have a better solution send it in.

OS X Port Of Gqrx Is The Easiest Way To Get Into Software Defined Radio

Many have tried to put together an easy package for running software defined radio packages on the Mac. Not many have succeeded the way [Elias]’ port of the gqrx SDR package has. It’s simply the easiest way to get a software defined radio up and running on the mac.

gqrx is a front end for the very popular GNU Radio software defined radio toolkit. Originally designed for the FUNcube SDR dongle, gqrx can also be made to work with one of the many, many USB TV tuners that have come out of China this past year for use as a software radio.

[Elias]’ port of gqrx isn’t the first app to put software defined radio on the Mac, but it certainly is the easiest. Simply by downloading [Elias] disk image, plugging in a TV tuner dongle, and starting the app, I was able to have a software radio receiver on my MacBook Air in less than a minute.

Everything required by GNU Radio and gqrx is already included, making this the easiest way to get SDR on a Mac. Very awesome work from [Elias], and we thank him.