Raspberry Pi Quadcopter

[youtube=http://www.youtube.com/watch?v=TjXvzMdf8Nk&w=470]

It was bound to happen sooner or later, but that doesn’t diminish the awesomeness of [Matthew]’s Raspberry Pi-powered quadcopter.

[Matthew]’s quadcopter is similar to all the other flying drones we’ve seen before with one important difference – all the processing, from reading the gyroscopes to computing exactly how much power to give each motor – is handled by a Raspberry Pi. This task is usually the domain of a microcontroller, as these calculations need to happen in real-time. The Linux distro [Matt] is running on his Pi has a lot more overhead than a simple AVR or ARM microcontroller, so doing everything that needs to be done in real-time isn’t guaranteed. With a bit of clever programming, [Matthew] managed to make sure all the necessary tasks were taken care of in time. It’s still not a real-time operating system, but for this project at least, it’s good enough.

Since the Raspberry Pi in [Matthew]’s quadcopter is much more powerful than a microcontroller, there’s plenty of head room to SSH into the ‘copter while it’s flying. There may even be enough processing power to stream video to a web server; we honestly can’t wait to see what [Matthew] does with his flying Linux computer in the future.

You can check out [Matthew]’s code over on the git or watch a few flight test videos over on his youtube.

 

Getting Rid Of A Tangled Web Of Phone Chargers

USB

Every night, [Roberto]’s kitchen counter is cluttered with three cell phones, three different cell phone chargers and a mess of wires until morning comes and the chargers are moved to a drawer for the following night. For [Roberto] this is a bit of a pain – a much easier solution would be to have a few USB ports embedded right into his kitchen backsplash. With the right tools, this can be easily done, resulting in a very professional looking installation for charging a trio of phones.

After removing a Euro AC outlet and replacing it with three iPhone chargers, [Roberto] simply soldered the six mains connections on the chargers to his house’s wiring. This resulted in a perfectly functional but rather ugly home project, though.

The next step was to machine a blank AC outlet cover for the three USB ports. [Roberto]’s CNC mill made quick work of this piece of plastic and turned it into a professional-looking installation.

St. Optimus Of Prime

st-optimus-of-prime

We’re pretty sure they’re not canonizing alien robots, but this Optimus Prime stained glass sure looks good enough for a place at the local cathedral. It is [Kobachi’s] very first glass project, but we’d say he’s got a bright future ahead of him. Especially since it’s about ten times more complex than the assignment called for.

The design is based on artwork by [NinjaInkArt] called Optimus Noveau. It is included in the album linked above and shows Optimus with the matrix of leadership behind his head. This of course doubles as the halo you would find around the head of a saint in religious artwork. [Kobachi] started by simplifying the design into rough outlines and colors. He then split those outlines to make for easier cuts and then got down to business assembling the pane. It uses 121 different pieces and took him 80-100 hours to complete the work. We can’t wait to see the landscape follow-up showing Optimus as a semi truck.

If you’re not handy with colored glass you could try making this with colored circuit boards instead.

[via Reddit]

Minecraft Clock Radio Puts A Creeper Head Next To Your Bed

minecraft-alarm-clock

This clock radio plays tunes from Minecraft and it’s decorated to look just like a creeper head. In the game mob heads are available as decoration and [Young_Maker] liked to spice up his virtual bedside table with a creeper head. But we think it looks just as good in its physical form.

The main part of the clock is an Arduino with a character LCD screen. A DS1307 real-time clock makes sure the device is accurate. We called this a clock radio in the title of the post, but it’s more of a clock MP3 player. The uMp3 board is used to play random music from the game. We would categorize the soundtrack as minimalism, which is a reasonable way to gently wake in the morning. But if time runs out the boom of an exploding creeper is played to make sure you’re not late for work.

We’ve embedded [Young_Maker’s] demo video after the jump.

Continue reading “Minecraft Clock Radio Puts A Creeper Head Next To Your Bed”

Open Source Capactive Charger Resurrects An Electric Skateboard

mikey-sklar-on-electric-skateboard

Here’s [Mikey Sklar] posing on his new electric skateboard. Well, it’s new to him at any rate. He bought it used on eBay for $250. That may not sound like much of a deal, but these will run more like $800 retail. The savings comes because the thing would no longer charge. But it took him just an hour and a half with his capacitive charger to resurrect the flat lithium cells.

The first thing he did in trouble shooting the situation was to measure the voltage of the battery pack. It registered 5V, which is a far cry from the 36V it should supply. The built-in charger does nothing, as it’s circuitry isn’t designed to work in a situation like this one. But [Mikey] has a tool perfect for this purpose. Da Pimp is a capacitive charger which we’ve seen before. It succeeds where the other failed because it is able to adapt itself to the internal resistance of the battery, no matter what voltage level it starts at.

[Mikey] shows off the use of his charger in the clip after the break. His first test run was more than two miles without issue.

Continue reading “Open Source Capactive Charger Resurrects An Electric Skateboard”

LED Pocket Watch

LED Pocket Watch

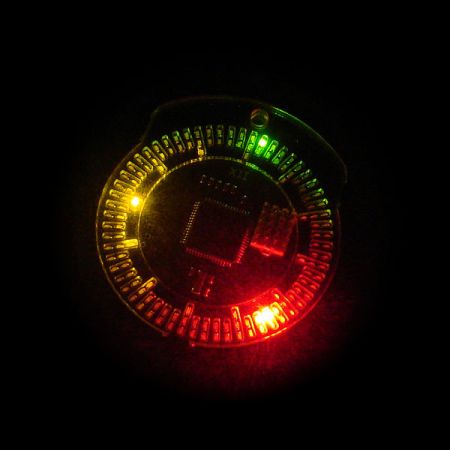
[Frank] wanted a classy way of telling the time, so he built up a LED Pocket Watch. The watch features 132 LEDs for displaying the time, two buttons to activate and change modes, a vibration motor, and a buzzer.

It’s controlled by a picoPower ATmega645P, which has enough pins to drive the array of LEDs, an internal real time clock, and low power consumption. The device is housed behind laser cut acrylic face, and sits in a 3D printed case.

To power the device, [Frank] used a rechargeable lithium coin cell battery. The charging circuitry is based on a MCP73831, which is an easy to integrate charge control IC. A USB connector is used to provide power to the board.

One of the bigger challenges of the design is driving the large array of LEDs. [Frank] uses Charlieplexing to group the LEDs and reduce the number of pins required. Another trick he used was offsetting the ISP header pins. This allows for programming the AVR without soldering a connector to the board.

[Frank]’s Instructables write-up is very detailed, and includes explanations of the schematic, PCB layout, software design, and case design. It’s a good read that details his design decisions.

After the break, watch [Frank]’s video overview of the project.

Continue reading “LED Pocket Watch”

Guitar Foot Controller Uses DSP For Audio Effects

guitar-pedal-dsp1

This a screenshot taken from [Pierre’s] demonstration of an electric guitar effects pedal combined with DSP and Pure Data. He pulls this off by connecting the guitar directly to the computer, then feeds the computer’s audio output to the guitar amp.

The foot controls include a pedal and eight buttons, all monitored by an Arduino. Pure Data, a visual programming language, interprets the input coming from the Arduino over USB and alters the incoming audio using digital signal processing. [Pierre] manages the audio connection using the JACK Audio Connection Kit software package.

In the video after the break he’s using a laptop for most of the work, but he has also managed to pull this off with a Raspberry Pi. There’s no audio input on the RPi board, but he’s been using a USB sound card anyway. The other USB port connects the Arduino and he’s in business.

Continue reading “Guitar Foot Controller Uses DSP For Audio Effects”