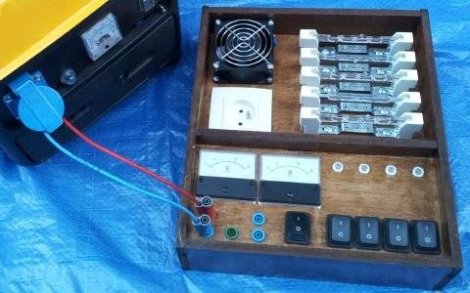
Dummy Load Uses Gray Code To Adjust Load In Small Steps

We’re not really interested in building a dummy load like this one for ourselves. But the concepts behind its design make for a nice little mental exercise as you read your way through the build description. [Pabr] wanted to build a dummy load which could be used to test a cheaply made gas generator. He wanted it to be as simple as possible, while providing a range of different loads. What he came up with is this monotonically adjustable load tester which uses gray codes for switching.

The video after the break does a good job of explaining the motivation for the design. Grey coding ensures that just one bit changes at a time. The example he uses to show the importance of this is when binary code transitions from 7 (0b0111) to 8 (0b1000). Three digits have been turned off and one has been turned on. Since he’s using light bulbs for his load this will turn off 700 Watts and then switch on 800W. That sudden jump in power draw can cause all kinds of problems with the generator’s engine. But the system he wired up will ensure that each flip of a switch moves in smaller steps.

Continue reading “Dummy Load Uses Gray Code To Adjust Load In Small Steps”
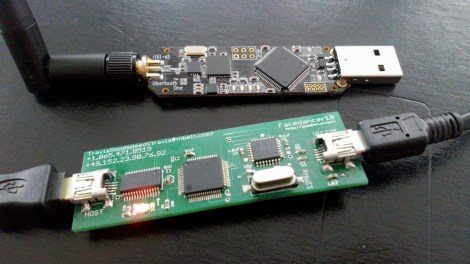
Exploiting DFU Mode To Snag A Copy Of Firmware Upgrades

[Travis Goodspeed] continues his work at educating the masses on how to reverse engineer closed hardware devices. This time around he’s showing us how to exploit the Device Firmware Updates protocol in order to get your hands on firmware images. It’s a relatively easy technique that uses a man-in-the-middle attack to dump the firmware image directly to a terminal window. This way you can get down to the nitty-gritty of decompiling and hex editing as quickly as possible.

For this hack he used his Facedancer board. We first saw the hardware used to emulate a USB device, allowing the user to send USB commands via software. Now it’s being used to emulate your victim hardware’s DFU mode. This is done by supplying the vendorID and productID of the victim, then pushing the firmware update as supplied by the manufacturer. In most cases this shouldn’t even require you to have the victim hardware on hand.

Teens Pulled Over While Driving Their Wooden Roadster

From this view we would think the handmade wooden roadster (translated) was street legal. But it’s missing a few items that are required to take it out on the highway. The teenagers that built it were pulled over the other night (translated) and cited for driving without a speedometer or side indicator lights.

The image above shows the mark II of their design. Sadly they crashed the first version, which gave them a chance to overhaul the entire design. Now they have a proper frame which was welded from steel square tube. It’s got an impressive rack and pinion steering system and shock absorbing suspension in the front and rear. A dirt bike engine mounted behind the seats drives the rear wheels via a chain. They’ve used an Arduino to add turn signals, and have headlights for night driving.

[Gerrit] sent in the tip on this one and he figures that with an Arduino already being used in the vehicle it should be a quick fix to add a speedometer and get back on the road.

Bootloader Brings USB, Firmware Updating To The ATtiny85

[Jenna] sent in a very cool bootloader she thought people might like. It’s called Micronucleus and it turns the lowly ATtiny 85 into a chip with a USB interface capable of being upgraded via a ‘viral’ uploader program. Micronucleus weighs in at just over 2 kB, making it one of the smallest USB-compatible bootloaders currently available.

The USB support comes from V-USB, a project that puts a virtual USB port on a suite of AVR microcontrollers. With V-USB, it’s easy to turn a Tiny85 into a keyboard, custom joystick, data logger, or computer-attached LED display.

One very interesting feature of Micronucleus is the ‘viral updater’ feature. This feature takes a new piece of firmware, and writes it to a Tiny85, disabling the current bootloader. If you’re designing a project that should have a means of updating the firmware via USB instead of the usual AVR programmer, this might be the bootloader for you.

Not bad for a bootloader that emphasizes small code size. At just over 2 kB, it’s possible to use this bootloader on the similar, smaller, and somewhat cheaper ATtiny45.

Bringing Java To The World Of Microcontrollers

C is a beautiful language perfectly suited for development on low-power devices such as the 8-bit microcontrollers. With newer, more powerful ARM microcontrollers making their way onto the market and workbenches around the world, it was only fitting that Oracle got in on the action. They released a version of Java targeted at these newer, more powerful microcontrollers called Java ME embedded.

The new embedded version of Java has everything you would expect from a microcontroller development platform – access to GPIO pins, including SD cards and I2C devices. The new Java machine is designed for full headless operation and is capable of running on devices with as little as 130 kB of RAM and 350 kB of ROM.

As for the utility of programming a microcontroller in Java, it’s still the second most popular language, after spending the better part of a decade as the number one language programmers choose to use. The requirements of the new embedded version of Java are far too large to fit onto even the best 8-bit microcontrollers, but with a new crop of more powerful ARM devices, we’ll expect to see more and more ARM/Java projects making their way into the Hackaday tip line in the coming months.

Tip ‘o the hat to [roger] for sending this one in.

Single Sided Arduino Is A Great Introduction To PCB Etching

After you’ve taken the plunge and decided to learn how to etch your own circuit boards, you’ll quickly find even the simplest boards are still out of your grasp. This is due mostly to the two-layer nature of most PCBs, and turn making a homemade Arduino board an exercise in frustration and improving your vocabulary of four-letter words.

After looking around for an easy-to-manufacture single-sided Arduino board, [Johan] realized there weren’t many options for someone new to board etching. He created the Nanino, quite possibly the simplist Arduino compatible board that can be made in a kitchen sink.

Billing it as something between the Veroduino and the Diavolino, [Johan]’s board does away with all the complexities of true Arduinos by throwing out the USB interface and FTDI chip. A very small parts count makes the Nanino much less expensive to produce in quantity than even the official Arduino single sided board.

For an introduction to etching your own PCBs at home, we couldn’t think of a better first board. As an Arduino, you’re guaranteed to find some use for it and the ease of manufacture and low parts count makes it the perfect subject for your hackerspace’s next tutorial series.