R2R Ladder Connects Multiple Buttons To One ADC Pin

If you’ve run out of I/O pins on a project and need a way to add user input you can find a slew of port expanders that work with various communications protocols like I2C and 1-Wire. But if you just want to add in some buttons without reaching for an extra IC you’ll love this hack. [John Boxall] shows how to add four buttons using one ADC pin.

The concept is nothing new. The buttons make up an R2R resistive ladder. When one of them is pressed, it completes the circuit for a voltage divider. The results are measured by the analog-to-digital converter of an IC to tell which button was pressed. The difficult part is calculating the resistor values. [John] is using eight resistors made up of just two different values. Every button and every combination of buttons has a unique voltage result which can be discerned by the chip. He even made a truth table so you don’t have to.

The example circuit seen in the video after the break uses an Arduino. But this concept is directly applicable to any microcontroller. And it should be quite easy to use an ADC interrupt to drive all of the button-read events. Continue reading “R2R Ladder Connects Multiple Buttons To One ADC Pin”
Browser-based Circuit Simulator Boasts A Mountain Of Features

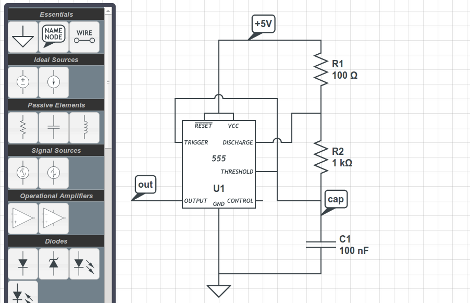
CircuitLab is an electronics simulator which you can run in a browser. Above you can see one of the example circuits provided to help show the power of the application. You can build your schematic (perhaps you want to try [Jeri’s] psu shut-off timer?) in the editor mode, then switch over to the simulator to get data back from the components. In that mode, your cursor becomes a probe, and clicking on different parts of the circuit will return the calculated input and output voltages for that component. But wait, there’s more. It’s got time and frequency simulation in addition to the voltage simulator. This lets you look at waveforms fed through analog filters, or timing data like in the 555 timer circuit above.

Where does this fantastic tool come from? [Humberto Evans] and [Mike Robbins], the guys behind NerdKits developed this site. We’ve seen a lot of their hacks around here, like milling solenoids and making them play a xylophone. Check out the CircuitLab quick start video they put together after the break. Continue reading “Browser-based Circuit Simulator Boasts A Mountain Of Features”

Build Your Own Line Laser For 3D Scanning

diy-line-laser

[Valentin] wanted to experiment with 3D scanning some objects he had around the house, but says he didn’t want to buy a line laser for the project since they are pretty expensive. Fortunately, he had some random components sitting in his parts bin, and he was able to build his own line laser without spending a ton of money.

His tutorial actually covers two different methods of building line lasers, both of which use parts that you likely have on hand already.

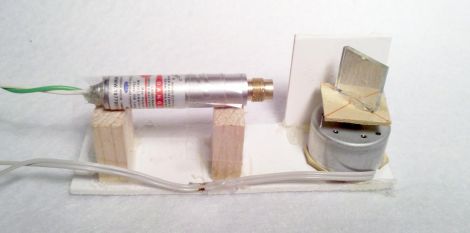
His first build involves gluing a small square mirror to a flat platform, which he then mounted on a salvaged DC motor. Once the motor starts spinning, the cheap laser pointer he has aimed at the mirror draws a perfect line across whatever medium he is scanning.

His second line laser uses parts donated from an old hard drive that he no longer used. He removed the drive’s read head from the chassis and mounted a small mirror on the actuator arm before firing up his laser. With the laser aimed at the mirror, he applied an unspecified AC current to the motor, which caused it to oscillate and draw a line similar to his first setup.

While they might not be professionally-built scanning lasers, [Valentin’s] efforts produced some decent images, as you can see on his site.

Continue reading to see a short video of his DC motor laser line in action.

Continue reading “Build Your Own Line Laser For 3D Scanning”

Wind-powered POV Weather Station

The more we think about this one the more we like it. [Michael] built himself a wind-powered persistence-of-vision weather station. Okay, that sounds interesting, but he ups the ante when you find out what’s included in the system.

A stepper motor acts as the generator which powers the electronics. As we’ve seen before; if you spin the shaft of a stepper motor electricity is produced. [Michael] is actually spinning the housing of the motor, with the shaft mounted to the base that holds the weather station in place. This way, the electrical contacts are spinning along with the blades of the generator. By mounting all of the electronics on these blades he gets around the problem of transferring power onto a spinning platform.

A set of LEDs on the end of the blades display temperature and relative humidity readings. A hall effect sensor pulled form an old floppy drive syncs the display with the rotational speed. He’s even got a shunt system which keeps the input voltage at a safe level, and will act as a break in high winds to keep the rotors from spinning out of control. See what we mean? An interesting idea because a fantastic project when you build in features like these!

Monitoring And Controlling Your Garage Door From Afar With An IP Camera

remote-control-garage-door

Last year, [Mark Simonelli’s] wife asked him if he could design something that would allow her to remotely check if their garage door had been left open. [Mark] jumped at the chance to tinker with electronics and designed a system around an old TrendNet IP camera. When remotely connected to the camera using IP Cam Viewer Pro for his Android phone, [Mark] could watch the video stream and also trigger the garage door opener via a small relay circuit he built.

His remote opener worked well, but his camera unfortunately lacked any sort of IR vision/low light capabilities. Since his camera wasn’t very useful in the dark, he decided that he needed to add some way to trigger a light when remotely monitoring his garage. He figured the best way to do this would be to control a power strip-connected light using a circuit similar to the one he built to open the garage door itself.

He stopped by the hardware store and picked up a cheap power strip, disassembling it and removing the power toggle once he got home. He fitted it with a small 5v relay, which he connected to the camera’s terminal block. While he admits that it might not be the absolute safest solution, he can easily control both the light and the garage door with a simple swipe of his phone’s screen.

Continue reading to see his remote controlled power strip in action, and be sure to swing by his site to see more details about his camera-controlled garage door opener.

Continue reading “Monitoring And Controlling Your Garage Door From Afar With An IP Camera”

BB313 Breadboard Platform Makes ATtiny Prototyping Painless

Johngineer's BB313

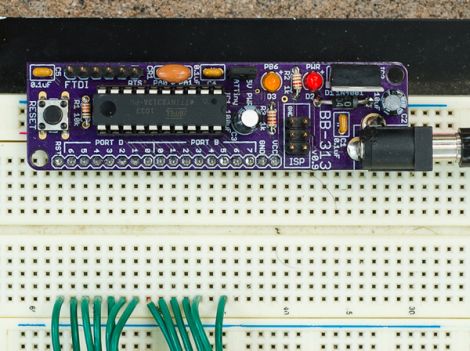
[John De Cristofaro aka Johngineer] uses various ATmega microcontrollers in his electronics projects, but he finds himself reaching for an ATtiny2313 or ATtiny4313 more often than not. He got tired of having to wire up pin headers, capacitors, and the like each time he started a project, so he spent some time designing an easy to use breadboard platform around the chips.

Inspired by LadyAda’s Boarduino, his BB313 board features FTDI pin headers, an ISP programming header, a reset button, along with breakout pins that plug directly into any breadboard. Aside from sharing a similar layout, [John] says that the similarities end there. His board is designed for designers who program in C or C++, so Arduino code won’t run without some substantial modification.

The board looks like a pretty handy benchtop tool, and we’re pretty sure it would be a big time saver for anyone who uses these chips with any frequency. [John] says that the board cost about $6.50 to make when he put it together, but that prices might vary slightly depending on where you have your PCBs made.

Be sure to swing by his site if the design looks like it might be helpful. He has made the schematics, a bill of materials, and all the rest available for the taking.

[via Adafruit blog]

Minestation – An External Weather Display For Your Minecraft World

minestation

If you’re a big Minecraft fan, the folks at [radikaldesign] have something that might be of interest to you. (Translation) Inspired by some of their Minecraft-loving friends, they have developed Minestation – a weather station for your Minecraft game.

The concept is simple. Here in the real world we have the ability to look out the window and see what it is like outside, but many of us turn to digital weather stations, the Weather Channel, or the local news to get the real scoop. They decided that the world of Minecraft should be no different, so they constructed an Arduino shield that allows players to see weather conditions as they play.

The shield contains a Nokia 6100 LCD screen which displays all sorts of useful information. It features a clock and calendar that reflect in-game time, making it easy to know when night is going to fall. It also continually displays the player’s coordinates as well as what the weather looks like in that region. Having this information at hand when you’ve been slogging away in the mines (losing track of time and weather) seems like it could be pretty useful at times.

You can buy one of the devices at Minestation.me, but the design is completely open, so you can easily construct one of your own without too much hassle.

Continue reading to see a video of the Minestation in action.

[Via HackedGadgets]

Continue reading “Minestation – An External Weather Display For Your Minecraft World”