Hackerspace Intro: The Geek Group In Grand Rapids, Michigan

We’re happy to see some links rolling in from our call for Hackerspace introductions. This is sort of a reintroduction of The Geek Group. They’ve been around for a while and we’ve featured several interesting projects coming out of the collective (check out this pulse capacitor autopsy). You may remember some tax woes they ran into when the home base was located in Kalamazoo, but they’ve moved past the issue and moved out of town. This is their new location in Grand Rapids, MI and you can get a peek at the tour starting about 4:45 into the video after the break. Be warned, there is some mildly vulgar language in the video in the form of the ‘S’ word (you’re welcome cubicle dwellers).

We hope you’ll look at the video and see that we don’t need to you spend a week in post-production. Give us a tour by video as if we were there in person. Show us what you’re up to and we’ll be eternally grateful.

Continue reading “Hackerspace Intro: The Geek Group In Grand Rapids, Michigan” →
Receiving Asynchronous Data Bursts

[Johan’s] been working on a chunk of code for about seven years and he thinks it’s ready to help you with your next project. He calls it D1 (The One) and it lets you receive asynchronous data without the need for a hardware USART. It’s capable of working with signals from an IR or RF remote, as well as tangentially related transmissions like RFID and magstripe readers.

It uses timer and port interrupts to sample the incoming data. Once it’s captured a transmission, the code sets a flag so that you can pull what it got into your own application. If you’re expecting to receive a protocol that sends packets several times in a row a verification module is also included which runs as a precondition of setting the received flag. The package is written in PIC assembly, but with all the information that [Johan] included in his post this shouldn’t be hard to port over to other chip architecture.

Scanning Turntable Digitizes Objects As 3D Models

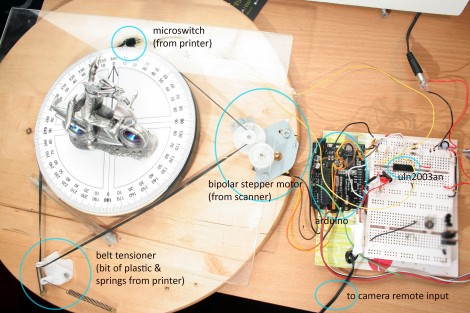
This turntable can automatically digitize objects for use in 3D rendering software like Blender3D. [James Dalby] built it using a high-quality DSLR, and some bits and pieces out of his junk box. The turntable itself is a Lazy Susan turned on its head. The base for the spinning model is normally what sits on the table, but this way it gives him an area to rest the model, and the larger portion acts as a mounting surface for the drive mechanism.

He used the stepper motor from a scanner, as well as the belt and tension hardware from a printer to motorize the platform. This is driven by a transistor array (a ULN2003 chip) connected to an Arduino. The microcontroller also controls the shutter of the camera. We’ve included his code after the break; you’ll find his demo video embedded there as well.

The concept is the same as other turntable builds we’ve seen, But [James] takes the post-processing one step further. Rather than just make a rotating gif he is using Autodesk 123D to create a digital model from the set of images.

Continue reading “Scanning Turntable Digitizes Objects As 3D Models” →

Text Adventures For Arduino Starting With Hunt The Wumpus

Let’s be honest, you’re going to have trouble getting kids to play text-based adventure games these days. But this is one way to get them interested. This weekend you should get together with niece, nephew, son, or daughter and help them build their own hardware and program it with an adventure game. One last project before school’s out and the weather’s nice.

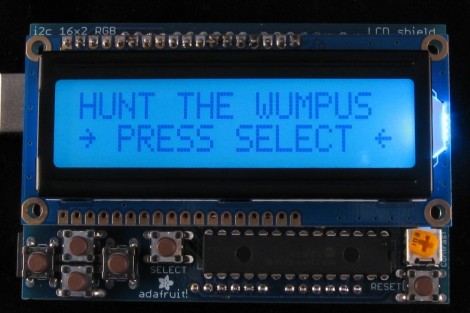
This is [Dan’s] shiny example of Hunt the Wumpus. He used Adafruit’s RGB LCD shield for Arduino. It’s got a character LCD and five buttons. But you can easily breadboard this yourself using a few tactiles plus a screen and uC of your own choosing. One nice touch with this one is the RGB backlight which is used to add an element of danger to the story line. He also mentions a few bugs in the Arduino language which he found while setting up the game.

We’ve been meaning to make our version of Zork using an Arduino, GLCD, and PS/2 keyboard ever since we read “Ready Player One”. This is just a bit more encouragement to get moving on that project.

[Thanks PT]

A Flashlight For Any Occasion

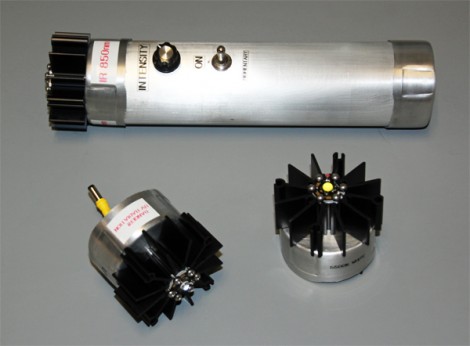
Whether you’re trying to light your path, build your own night vision, or do some tanning at home, this flashlight has you covered. [David Prutchi] designed the high power flashlight with three swappable heads.

He built the base unit out of aluminum pipe. It’s got plenty of room for the four 9V batteries that act as the power source. The driver circuit is just a bit smaller than one of those batteries, and to bring the whole thing together [David] and his helper added a potentiometer, toggle switch, and quick connector which makes head swaps a breeze. The heads themselves are all LED based, with one for visible light, another for infrared, and the final module outputs ultraviolet. We joke about tanning with it, but at 10 Watts you should be more worried about accidental damage to your vision.

The finished product is shown checking the security ink on some Canadian Currency. This would also make a nice secondary light source for your night vision monocle.

Build A Stereo Microscope From Binoculars And A Camera Lens

Here’s an oldie but a goodie. [RunnerPack] stumbled upon an article from 2001 about building a stereo microscope from a pair of binoculars and a camera lens. With a ring light attached to the end of the camera lens, we couldn’t think of a better microscope for SMD work.

To mount the binoculars to the camera lens, [Giorgio Carboni] made a very nice adapter containing four prisms. These prisms are very carefully aligned and glued down with a little bit of epoxy. By using an 8×30 pair of binoculars and a 35-100 mm camera lens, [Giorgio] was able to get a magnification factor of 10-57x. With a macro lens this factor can be increased (a 28mm lens bumps it up to 71x, but a lot more light is needed).

The pedestal is just a few ground rods and ground steel rods, something that requires a bit of machining. Since 2001, though, a lot of tinkerers have 3D printers so it could be possible to build a more easily manufactured version of the focusing apparatus.

[RunnerPack] had a pair of binoculars and a camera lens handy and tried a mono version of this build. He says he was blown away, but unfortunately didn’t provide any pictures. If you decide to build this project, be sure to snap a few pics and send it in on the tip line.

Gigantic Liquid Crystal Display Is Like A Giant Calculator

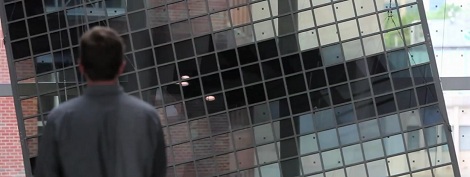
Some say he turns on his soldering iron by saying, “Flame on!.” He deadbug solders – QFP packages. All we know is he’s called [stig] and he sent in an awesome an awesome video of a new display at the Nature Research Center in Raleigh, North Carolina. It’s a 10 foot by 90 foot LCD display that uses 6 inch square glass panels containing the same liquid crystals you’d find in a calculator.

The display/installation is called Patterned by Nature and is built using 3600 pieces of LCD privacy glass. When a voltage is applied to the glass it changes from clear to opaque. While this technology has been around for decades (just look at your calculator), only in the last few years has LCD privacy glass come down in price to make a project like this economical.

The gigantic display was created in part by Sosolimited, an art studio who has made a similar project before. The display hanging in the atrium of the Raleigh Nature Research Center is amazingly efficient for its size  drawing only 75 watts.

If you’d like to try your hand at a similar build, we wish you luck; this LCD glass is still somewhat expensive but perhaps in a few years the price will come down enough that we can play Tetris on the side of a building.

Continue reading “Gigantic Liquid Crystal Display Is Like A Giant Calculator” →