Repairing An Old Pick And Place Machine

repairing_juki_placemat_360

Professional-grade pick and place machines are quite pricey, so when the crew at Null Space Labs picked up an old Juki Placemat 360 for only $1,200, they were stoked. When they finally got it in-house however, they realized that the seller’s definition of “working” was a bit different than theirs. The machine’s compressor is busted, and there are all sorts of other bits that require some TLC before they can get things up and running again. They have put together a “build log” showing off their work as the machine is taken from an ancient, mostly-working relic to a lean, mean, picking and placing machine.

So far, they have torn the thing down and inspected the upgrades and damage the machine has been subjected to over the years. The crew started making a few small repairs, and have even replaced the unit’s laser with machine vision, which seems to be working well thus far during testing.

While you might not have any similar machinery in your workshop, it’s still fun to watch as they tear it down and revamp it, bit by bit.


Engine Hacks: Liquid Fuel Amateur Rocket Roundup

When the idea of an engine hacks theme was being kicked around at Hack a Day, the subject of rocket engines was one of the first to come up. There was a problem though; solid rocket motors are far too common to be interesting, and even hybrid rocket engines are becoming passé. We’ve never seen a liquid-fuel rocket build before, so that’s what this roundup evolved into.

First up is [Robert Watzlavick], who has been has been building liquid fueled engines for the last decade. He started out with an uncooled kerosene/LOX whose death is seen in the title pic for this post. Lately he’s been working on a monster of an engine that is projected to deliver over 1,000 Newtons of thrust. As with many of the early rockets that launched man into space, [Robert] uses kerosene and liquid oxygen for fuel. This man knows his stuff.

Next up is a ‘kit’ liquid fuel rocket, the SS67B-3, that’s based on the German WWII Taifun missile. This engine is about as basic as you can get. There’s one fuel tank that holds both the Hydrogen Peroxide oxidizer and gasoline fuel. Both are blasted into the combustion chamber with pressurized gas. we found a write-up on this kit with some good pictures, but no video.

If high pressures, glowing metal, and huge flames pique your interest, there’s also a fabulous e-book (PDF warning) available that is a reprint of How to Design, Build and Test Small Liquid-Fuel Rocket Engines by [Leroy J. Krzyck]. This book was originally written in 1967, but lathes and mills haven’t changed that much over the past 44 years. Why not give it a go? There’s still plenty of time to complete the build before the 100th anniversary of Goddard’s first flight.

Building A CNC Router To Call My Own

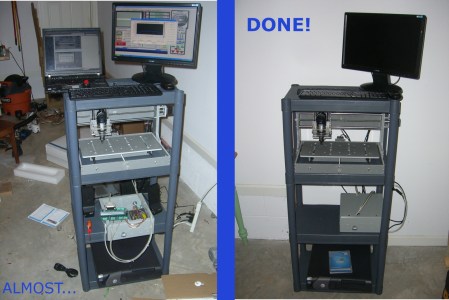
As with most writers for [HAD], I enjoy doing projects as much as I like writing about them. As a mechanical Engineer that writes for a blog mostly about electronics, a CNC router seemed like something I needed in my garage. Building a router like this requires a bit of expertise in both electronics and mechanics, so it seemed like a good challenge.

This router kit, made by Zen Toolworks, comes fairly complete frame-wise, but requires a lot of knowledge on the electrical side to get things running correctly. In order to make it look decent and work correctly, I had to rely on some zip-tie and basic diagnostic skills that I’ve honed as a former engineering Co-op and technician. Also, I had to figure out a way to cheaply stack everything in my garage as we park two cars there (the footprint is 14″ x 22″, so I consider that a success).

One of the bigger challenges that I still have to overcome with this project is learning “G-code” and how to use software to generate it.  Although I’ve done some basic programming already, as seen in the video after the break, there’s still much to learn. I’d hope that having this tool around can lead to better projects as I won’t have to be restricted to simple milled lines and circles anymore.

Continue reading “Building A CNC Router To Call My Own”

Google ADK On An EvalBot

evalbot_google_adk

After learning that Google’s ADK relied on using an Arduino-compatible board, [Benjamin] was disappointed that other microcontroller platforms weren’t invited to the party. Rather than switch camps, he took it upon himself to get the ADK working with his EvalBot. In fact, his modifications should allow the ADK to work with nearly any Stellaris ARM kit.

The hack is composed of two parts. The first, and most important bit is the USB host driver he developed to work with the ADK. The code borrows some bits from Texas Instruments, and will be published on GitHub once he gets a chance to clean up the source a bit. To get his phone working with the EvalBot, he also had tweak the external USB power supply in order to provide the current required to operate properly with other USB-connected hardware.

It’s always nice to have more options when working with Google’s ADK, and [Benjamin’s] work is likely a welcome addition to any Stellaris developers toolkit.

Continue reading to see a quick video of his EvalBot ADK demo.

Continue reading “Google ADK On An EvalBot”

Bare-bones Electronic Advent Calendar

It’s officially September now (in some parts of the world), and that means we’ve been watching the Christmas decorations go up on the floor of Costco, Walmart and Target for the last few weeks. As a small test of reality, [Eric] decided to build an electronic advent calendar that counts down the days until Christmas. As a simple build using parts lying around on the bench, [Eric] did a pretty good job at deferring his kid’s questions of, “How long until Christmas?” to a machine.

The build is fairly bare-bones, using only an Arduino Pro Mini, RTC and LCD display. For the real-time clock, [Eric] used the ever popular DS3231 RTC. The software reads the time from the clock and calculates the number of seconds between the present time and the hard-coded target date.

Everything is powered by a 9 Volt battery that wouldn’t last the remaining 115 days until Christmas. There is a power switch and the RTC has a battery backup, so the build will probably suffice for all but the most fanatical child.

vacuum_forming_consistent_results_every_time

How To Build A Vacuum Form Table That Gets It Right Every Time

[James] builds all sorts of robots and superhero costume replicas at home, so he is always searching for a better way to get consistent results when using his vacuum table. A lot of people use their oven or exposed heating coils from electric frying pans to warm the plastic sheets, but [James] wasn’t really interested in going down that route. He cites that he would rather not heat plastic in the oven where he cooks his food, nor is he really keen on the idea of exposed heating elements.

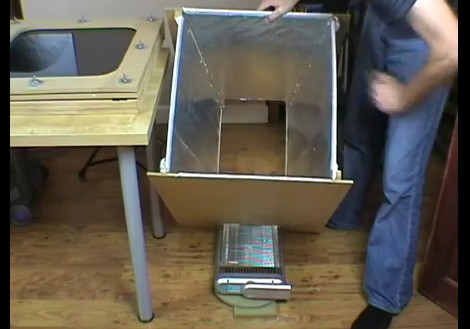
Instead, he opted for a slightly pricier, though completely reasonable setup that produces consistent results every time. Most of the forming table was built using MDF sheeting, as you can see in the video below. His heating apparatus was the most expensive part of the rig, since it’s an off the shelf quartz-based room heater. He lays the heater on its back side, and directs the heat up through an MDF frame using aluminum foil as a reflector. The plastic sheeting mounted at the top heats evenly, and in no time, he has a perfectly vacuum formed prop that is ready to be painted.

Sure, it might cost a bit more than some other vacuum formers we’ve looked at before, but spending a bit more up front to get consistent results is well worth it if you ask us.

Continue reading “How To Build A Vacuum Form Table That Gets It Right Every Time”

Multitouch Tower Defense Uses Physical Towers

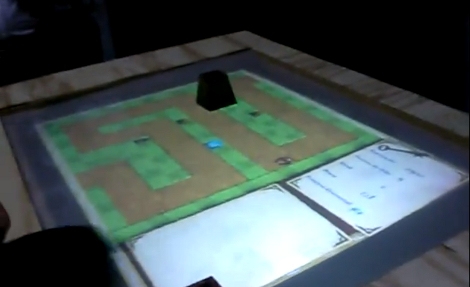
If you’re tired of playing flash games with a mouse, perhaps you’ll draw inspiration from this project. Arthur built a multitouch interface that uses objects as part of the control scheme. In the image above you can see that the game board for a tower defense game is shown on the display. There is a frustum-shaped game piece resting on the surface. Just place that piece where you want to build your next tower, and then select the tower type from the list.

The controller itself is pretty straight-forward. The surface is a piece of acrylic topped with some light diffusing material. A projector shines through another acrylic window on the side of the unit, reflecting on a mirror positioned at a 45 degree angle. As for the multitouch detection, the hardware uses a series of UV LEDs along with a modified PS3 eye camera. [Arthur] chose the reacTIVision software package to process the input from the camera. Check out a couple of videos after the break to see the hardware, and some game play.

Continue reading “Multitouch Tower Defense Uses Physical Towers”