LED Backlight Conversion Using Recycled CCFL Inverter Parts

inverter_repair

[Ammon] repairs busted LCD monitors as a side hobby, so replacing burned out CCFLs and inverter circuits is something he can do in his sleep. One Dell monitor he received had him so perplexed, that he simply gave up on trying to repair the inverter circuit. He still wanted to get it working, so he had some narrow PCBs made and started working on his LED replacement backlight.

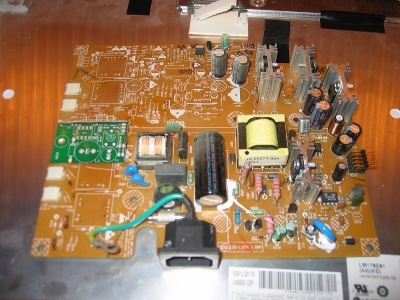
He built a driver board for the LEDs, populated with left over components that he stripped from the LCD panel’s inverter circuit. He needed space to insert his driver board, so he simply cut out a chunk of the inverter board and slipped his replacement driver board in its place. As you can see in the picture above, his board (in green) takes up far less space than the original inverter circuit it replaces.

He provides a schematic for his circuit as well as a PCB layout file, so it should be fairly easy to replicate his work. He has not posted schematics or layout information for his LED strips, but we’re betting he will if someone asks nicely.

Check out this pair of posts if you are interested in reading more about replacing your burned out CCFL with LEDs.
Real-time Arduino Interpreter Ditches The PC

computerless_arduino

When prototyping a project using an Arduino, there are a few things that are pretty much required equipment. A computer for generating sketches is typically one of those things, but [Adam] over at Teague Labs is looking to change all that with his current project, the Computerless Arduino.

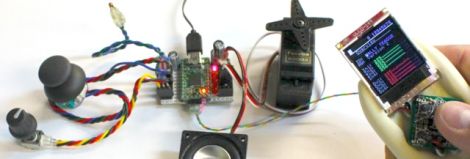
Instead of using a computer to alter the code running on the Arduino, they have implemented a real-time code interpreter using a Teensy 2.0. The microcontroller is connected to a 5-button LCD display where the user can view the status of any port, view the current running code, as well as alter that code on the fly.

The real-time instruction set is somewhat limited, making it a breeze for newcomers to begin using the Arduino. While that may turn some people off, it still has enough functionality baked in to handle moderately sized projects as well.

Be sure to check out the video we have posted below to see the interpreter in action.

Continue reading “Real-time Arduino Interpreter Ditches The PC”

Analog Robot Navigates Around The Workshop With Ease

556_wall_following_robot

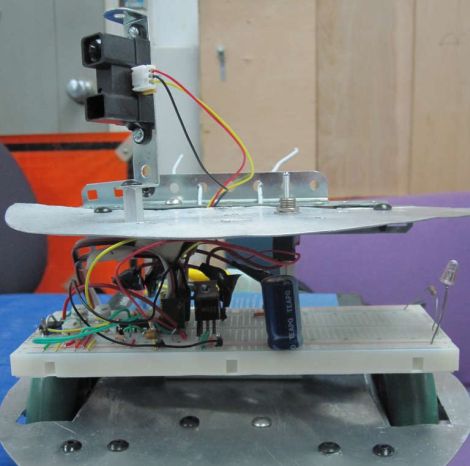
Many of the robots we feature here are driven by some sort of microcontroller, whether it be an Arduino, Launchpad, Picaxe, etc. Rarely do we see a robot however, using analog circuits to perform higher-level functions typically relegated to those more complex controllers. Instructables user [hasn0life] built such a robot recently, which he entered into a contest at his college. After hearing about the 555 design contest from a friend, he tweaked his project and created a wall-following robot using a 556 timer.

The robot is fairly simple when you take a close look, though that does not take away from the elegance of his design. A single IR sensor is used to detect objects in the robot’s periphery, guiding the robot along. When the robot gets too close to a wall, one wheel reverses, pulling the robot away. Once the robot has moved a sufficient distance, the other wheel is reversed in order to straighten out the robot. Then, both wheels work in concert to get the robot moving forward.

Take a look at the video below to watch the robot navigate its way around his workshop, and if you are interested in learning more about analog robotics, check out this post from a few days back.

Continue reading “Analog Robot Navigates Around The Workshop With Ease”

On Air Light Parses Webpage Data Wirelessly Without A Computer

[Matt Richardson] built this on-air light to indicate whether a Make streaming show is currently in progress. Despite the obvious cord leaving the bottom of the base (it’s a power cord) his creation is pulling data from the Internet wirelessly. He’s using an Xbee module along with an Arduino to pull this off.

In addition to the light itself there’s a base station that we haven’t seen before. The hardware is a Digi ConnectPort Zigbee-to-Internet Gateway. That’s a mouthful but it’s just a box that acts as an Xbee node and facilitates communication between its own Ethernet port and other Xbee devices in the network. So no, you don’t need a computer but you do need an Ethernet connection somewhere for the base station. [Matt] is running an open source software package on the ConnectPort call Xbee Internet Gateway (xig). Watch the video after the break to see the configuration for this package. It’s a snap, and if you’ve never used an Xbee module before this gives you a good idea of how easy it really is.

Continue reading “On Air Light Parses Webpage Data Wirelessly Without A Computer”

.Net OS For Your ARM

Pyxis 2 is a recently released new embedded operating system. The first Pyxis OS would run on an arduino with a touch screen, and provided a nice GUI. Pyxis 2 on the other hand has departed from most of its predicator, and is now made on top of the .NET micro framework, and natively supports FEZ Cobra and ChipworkX systems. It supports 320×240, 480×272, even 800×480 (if you have the ram), LCDs.

Some of the features of the OS include alpha blended desktop icons, file dialogs, prompts, input, color selection, file box, buttons, all the standard stuff to construct your applications, support for network, USB, SD and Mp3. Since it is .NET you can also use C# visual studio to construct everything without dedicating yourself to hardware until you are ready.

Join us after the break for a short video.

Continue reading “.Net OS For Your ARM”

Arduino Sip N Puff Switch

[kayakdiver] is developing a SIP and PUFF controlled kayak, but in order to start you first need a SIP and PUFF switch. These devices allow the user to lightly sip or puff into a tube to control switches or sensors, and are sometimes mounted in joysticks for control of a computer, or wheelchair, etc, but finding the cost prohibitive the next best thing was to whip up their own.

The design is clean and direct featuring off the shelf tubing and fittings, 2 pressure/vacuum switches, and an Arduino. Each one of the switches can detect pressure or vacuum, so one switch set to each is fed though a Y and up to the mouthpiece, since everything is sealed this has the advantage of only needing pressure and not airflow making it more comfortable for the user over long periods, and keeps down on humidity in the tubes.

Haptic Feedback Joystick Uses Air Muscles

[Ben Krasnow] is working on a force-feedback joystick. It centers around the concept of an air muscle which transfers pressure into linear motion. He cites another air muscle project as part of the inspiration in his build, but where he’s gone with it is one of the better uses for these blow-up components that we’ve seen.

Basically you have a bladder, in this case rubber tubing. A mesh surrounds it to reinforce the material and cause inflation to shorten the length of the package. In the image above there are four black air muscles that connect the base of a joystick with the outer frame that houses it. How and when each muscle is pressurized determines the type of motion the user will feel on the joystick. This is where his pressure controller comes into play. It uses a voltage-to-pressure transducer to feed a manifold, the combination of which not only makes each muscle addressable but allows him to dial in the force sent to the muscles. Check out the video after the break for his start-to-finish walk through.

Continue reading “Haptic Feedback Joystick Uses Air Muscles”