The Printed Solution To A Handful Of Resistors

Resistors are an odd bunch. Why would you have 1.0 Ω resistors, then a 1.1 Ω resistor, but there’s no resistors in between 4.7 Ω and 5.6 Ω? This is a question that has been asked for decades, but the answer is actually quite simple. Resistors are manufactured according to their tolerance, not their value. By putting twenty four steps on a logarithmic scale, you get values that, when you take into account the tolerance of each resistor, covers all possible values. Need a 5.0 Ω resistor? Take a meter to some 4.7 Ω and 5.6 Ω resistors. You’ll find one eventually.

As with all resistor collections, the real problem is storage. With SMD resistors you can stack your reels in stolen milk crates, but for through hole resistors, you’ll need some bins. [FerriteGiant] over on Thingiverse did just that. It’s a 3D printable enclosure that takes all of your E24 series resistors.

The design of this resistor storage solution is a bit like those old wooden cases full of index cards at that building where you can rent books for free. Or, if you like, a handy plastic small parts bin from Horror Fraught. The difference here is that these small cases are designed for the standard length of through-hole resistors, and each of the bins will hold a small 3D printed plaque telling you the value in each bin.

While this is a print that will take a lot of time — [FerriteGiant] spent 100 hours printing everything and used two kilograms of filament — it’s not like through-hole resistors are going away anytime soon. This is a project that you can build and have for the rest of your life, safely securing all your resistors in a fantastic box for all time.

3D Printed U-M

3D Printing At The Speed Of Light

3D printers now come in all shapes and sizes, and use a range of technologies to take a raw material and turn it into a solid object. We’re most familiar with Additive Manufacturing – where the object is created layer by layer. This approach is quite useful, but has a down side of being time consuming. Two professors at the University of Michigan have figured out a way to speed this process up, big time.

They start off with a VAT additive printing approach. These work by using an ultraviolet laser to harden or cure specific areas in a vat of resin, layer by layer, until the object is complete. The resin is then drained revealing your 3D printed object. Traditionally, VAT printing has been limited to small objects because the resin needs to have a relatively low viscosity.

The clever professors at U-M were able to get around this problem by adding a second laser that keeps the resin in a liquid state. By combining a curing laser with an ‘uncuring’ laser, they’re able to use resins that are more viscous, allowing them to print more durable parts. And do so about 100 times faster than traditional printers!

Thanks to [Baldpower] for the tip!

3D Printing An Entire Rocket

If you’re ever flying into LAX and have the left side window seat, just a few minutes before landing, look out the window. You’ll see a small airport just below you and what appears at first glance to be a smokestack. That’s not a smokestack, though: that’s a rocket, and that’s where SpaceX is building all their rockets. Already SpaceX has revolutionized the aerospace industry, but just down the street there’s another company that’s pushing the manufacturing of rocket engines a bit further. Relativity Space is building rockets. They’re 3D printing rocket engines, and they’re designing what could be the first rocket engine made on Mars.

Bryce Salmi is an avionics hardware engineer at Relatively Space, and he made it out to the 2018 Hackaday Superconference to tell us all about manufacturing rockets. It’s an entirely new approach to manufacturing rockets and rocket engines with a clean-slate design that could eventually be manufactured on Mars.

Continue reading “3D Printing An Entire Rocket”

Electromagnetic 7-Segment Display Easy On The Eyes AND The Ears

We love electromagnetic displays: take the modern look of a digital readout, combine with the low-tech coil mechanism that you theoretically could create yourself, add a dash of random clacking sounds, and what’s not to like? Evidently, [Nicolas Kruse] shares our affection for these displays, because he’s taken it beyond theory and created a 7-segment magnetically-actuated display from scratch.

The display is 3D-printed, as you would expect these days. Each segment contains a small neodymium magnet, and each coil a 1 mm iron core for flux concentration. The coils are driven with a 1.6 A peak current, causing the segments to flip in less than 10 ms. [Nicolas] provides STL files for the display base, segments, and spools so you can print your own display. He’s also released the schematics and code for the driver, which uses an ATtiny44 to drive the coils through N- and P-channel MOSFETs. Initially designed to drive a passive 4×7 matrix of displays, the driver couldn’t quite manage to flip one segment without affecting its neighbors. However, for a single display, the driver works fine. We hope he figures out the matrix issue soon, because we really want to see a clock made with these displays.

You can see (and hear) a short video of the display in action after the break. The clacking does not disappoint!

Continue reading “Electromagnetic 7-Segment Display Easy On The Eyes AND The Ears”

Making An Ultrasonic Cutter For Post-processing Tiny 3D Prints

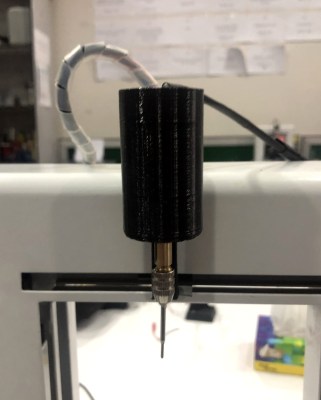
An ultrasonic knife is a blade that vibrates a tiny amount at a high frequency, giving the knife edge minor superpowers. It gets used much like any other blade, but it becomes far easier to cut through troublesome materials like rubber or hard plastics. I was always curious about them, and recently made my own by modifying another tool. It turns out that an ultrasonic scaling tool intended for dental use can fairly easily be turned into a nimble little ultrasonic cutter for fine detail work.

Cheap ultrasonic scaler. The blue disk is for adjusting power. Foot switch not shown.

I originally started thinking about an ultrasonic knife to make removing supports from SLA 3D prints easier. SLA resin prints are made from a smooth, hard plastic and can sometimes require a veritable forest of supports. These supports are normally removed with flush cutters, or torn off if one doesn’t care about appearances, but sometimes the density of supports makes this process awkward, especially on small objects.

I imagined that an ultrasonic blade would make short work of these pesky supports, and for the most part, I was right! It won’t effortlessly cut through a forest of support bases like a hot knife through butter, but it certainly makes it easier to remove tricky supports from the model itself. Specifically, it excels at slicing through fine areas while preserving delicate features. Continue reading “Making An Ultrasonic Cutter For Post-processing Tiny 3D Prints”

Sugar As A Bed Adhesive For 3D Printing

3D printers, like most CNC machines, reward careful thought and trial and error. It’s important to use the correct machine settings and to prepare the build environment properly in order to get good results. Fused Filament Fabrication printers rely on melting plastic just so in the production of parts, and have their own set of variables to play with. [Mysimplefix] has been exploring various solutions to bed adhesion and found something that seems to work perfectly, right in the pantry.

That’s right, this solution to the problem of bed adhesion is more commonly stirred into your coffee every morning – it’s sugar. [Mysimplefix] shares their preferred process, consisting of first mixing up a sugar/water solution in the microwave, before applying it to the bed with a paper towel and allowing the water to evaporate off.

Several test prints are then shown, with major overhangs, to show the adhesive capabilities of the sugar. The results are impressive, with parts sticking well while the bed is hot, while being easy to remove once cool. The video deals with PLA, but we’d be interested to see the performance with other materials as well.

It’s a tidy solution, and we’d love to know your thoughts and experiences in the comments. We’ve had a good long think about adhesives ourselves, too.

Continue reading “Sugar As A Bed Adhesive For 3D Printing”

3D-Printing Wankel Engine From Mazda’s Beloved “Rotary Rocket”

Although there was briefly a company called Rotary Rocket, the term is much better known as a nickname for the Mazda RX-7 — one of the few cars that used a Wankel, or rotary, engine. If you ever wondered how these worked, why not print a model? That’s what [Engineering Explained] did. They printed a 1/3 scale model and made a video explaining and demonstrating its operation. The model itself was from Thingiverse, created by [EricThePoolBoy].

One thing we really liked about the model was the use of lights to show the different stages of combustion. Cool air intake is a blue light, hot air is red, and so on. It really helps visualize what’s happening. You can watch the video below.

If you haven’t seen a Wankel before, it is a clever design. It has very few moving parts and offers very smooth power transfer and high power to weight ratio. The downside, though, is that the engine deliberately burns oil to lubricate and seal, so it is difficult to meet emission standards and requires a lot of oil. The fuel efficiency of current designs is not very good either, especially since manufacturers will often trade fuel efficiency for better emissions.

If you’d like to read more about the Wankel, check out our earlier post (and the 165 comments attached). We also looked at — or rather through — another Wankel earlier this year.

Continue reading “3D-Printing Wankel Engine From Mazda’s Beloved “Rotary Rocket””