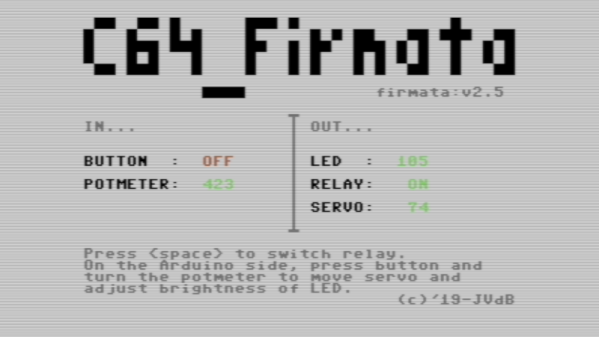
Microcontrollers are cool, but sometimes the user interface options they can deliver are disappointing. The platform in question may not have the horsepower required to drive a decent screen, and often a web interface is undesirable for security or complexity reasons. Sometimes you just need a good software interface between chip and computer. Firmata is a protocol that’s designed to do just that, and [nanoflite] has brought it to the Commodore 64.
It’s a fun project, which allows one to use the C64’s charming retro graphics to interface with an Arduino-based project. Connection is achieved at 2400bps over the user port, which is plenty fast for most UI applications. [nanoflite] demonstrates the interface with an Arduino Uno and a Grove shield. The C64 is able to display the state of the LED, relay and servo outputs, as well as read the Arduino’s button and potentiometer inputs.
It’s an excellent way to integrate a Commodore 64 into a microcontroller setup without reinventing the wheel. We think it would make an awesome vintage interface to a home automation system or similar build. If you’re interested, but you don’t have a C64 of your own to play with, never fear – you can just build a new one.
It wasn’t long ago that graphene seemed to take the science and engineering communities by storm. You can make bits of it with a pencil and some sticky tape, yet it had all sorts of wonderful properties. The key, of course, is that it is a single layer of atoms. Now scientists have done the same trick with boron to form borophene, and it looks to be even more exciting than graphene. You can read a pretty dense paper about the material if you want to dig deeper.
The new material is stronger and more flexible than graphene. It appears too that it could boost the performance of lithium-ion batteries. Computer simulations showed that borophene was possible back in 1990, but it wasn’t until 2015 that anyone was able to make any. The material is a good conductor of electricity and heat. It also exhibits superconductivity. Another exciting prospect is that it can be created in different arrangements, each with a unique set of properties. So you may be able to build borophene to be, for example, especially conductive or particularly strong.
Visitors to the Wizarding World of Harry Potter at Universal Studios are able to cast “spells” by waving special interactive wands in the air. Hackers like us understand that there must be some unknown machinations happening behind the scenes to detect how the wands are moving, but for the kids wielding them, it might as well be real magic. So when his son asked to have a Harry Potter themed birthday party, [Adam Thole] decided to try recreating the system used at Universal Studios in his own home.
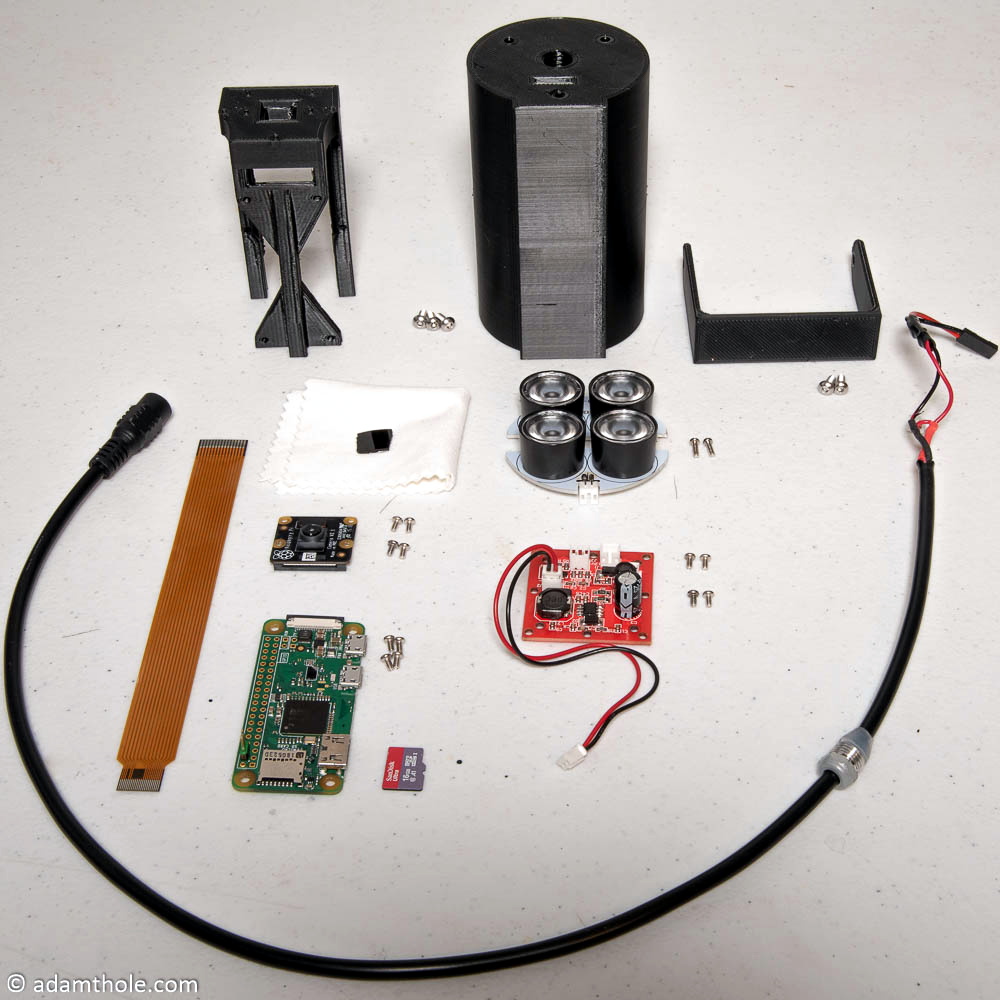
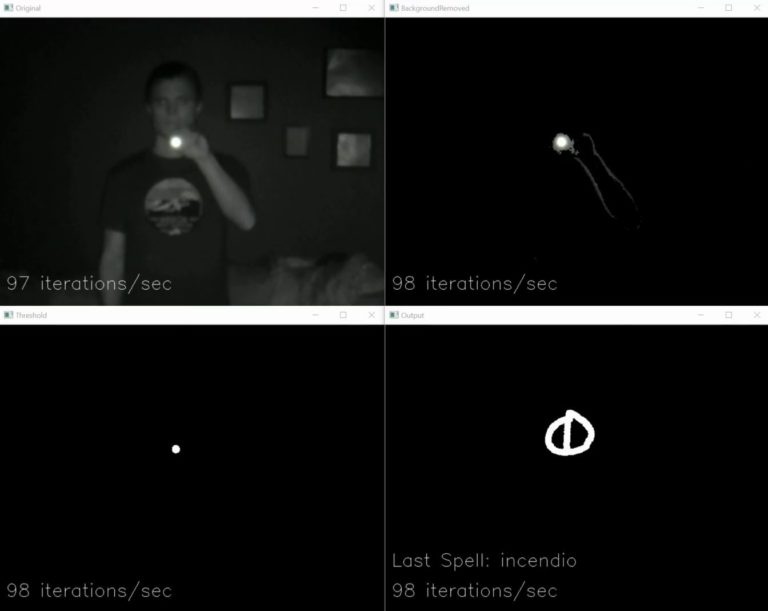
Components used in the IR streaming camera
The basic idea is that each wand has a reflector in the tip, which coupled with strong IR illumination makes them glow on camera. This allows for easy gesture recognition using computer vision techniques, all without any active components in the wand itself.
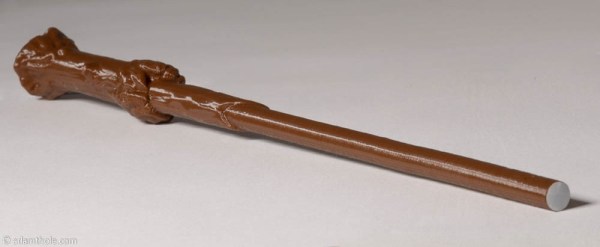
[Adam] notes that you can actually buy the official interactive wands from the Universal Studios online store, and they’d even work with his system, but at $50 USD each they were too expensive to distribute to the guests at the birthday party. His solution was to simply 3D print the wands and put a bit of white prismatic reflective tape on the ends.
With the wands out of the way, he turned his attention to the IR imaging side of the system. His final design is a very impressive 3D printed unit which includes four IR illuminators, a Raspberry Pi Zero with the NoIR camera module. [Adam] notes that his software setup specifically locks the camera at 41 FPS, as that triggers it to use a reduced field of view by essentially “zooming in” on the image. If you don’t request a FPS higher than 40, the camera will deliver a wider image which didn’t have any advantage in this particular project.
The last part of the project was taking the video stream from his IR camera and processing it to detect the bright glow of a wand’s tip. For each frame of the video the background is first removed and then any remaining pixel that doesn’t exceed a set brightness level if ignored. The end result is an isolated point of light representing the tip of the wand, which can be fed into Open CV’s optical flow function to show [Adam] what shape the user was trying to make. From there, his software just needs to match the shape with one of the stock “spells”, and execute the appropriate function (such as changing the color of the lights in the room) with Home Assistant.
Overall, it’s an exceptionally well designed system considering the goal was simply to entertain a group of children for a few hours. We almost feel bad for the other parents in the neighborhood; it’s going to take more than a piñata to impress these kids after [Adam] had them conjuring the Dark Arts at his son’s party.
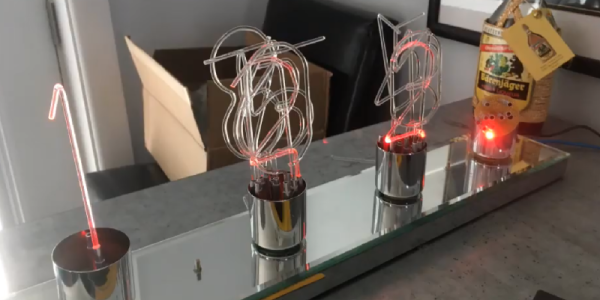
If you want to display numbers, just go for Nixies. There’s no better way to do that job, simply because they look so cool. Unfortunately, Nixies require high voltages, controlling them is a tiny bit strange, and they suck down a lot of power. These facts have given us a few Nixie alternatives, and [Dave] is here with yet another one. It’s a light pipe Nixie, made from acrylic rod.
The idea of using lights shining into a piece of acrylic to display a number is probably as old as the Nixie itself. There were a few tools in the 60s that used side-lit plastic panels to display numbers, and more recently we’ve seen a laser-cut version, the Lixie. This display is just ten sheets of acrylic etched with the numbers 0 through 9. Shine a light through the right acrylic sheet, and that number lights up.
You can do just about everything in acrylic, and it’s already used for a light pipe, so [Dave] grabbed some acrylic rod and bent it into the shape of a few numbers. With a little work, he was able to make his own FauxNixie by mounting these numbers in a carefully modified lamp socked wired up with ten individual LEDs. The results make for big, big, big Nixie-style numbers, and the perfect clock for the discerning glowey aficionado.
What prosthetic limbs can do these days is nothing short of miraculous, and can change the life of an amputee in so many ways. But no matter what advanced sensors and actuators are added to the prosthetic, it has to interface with the wearer’s body, and that can lead to problems.
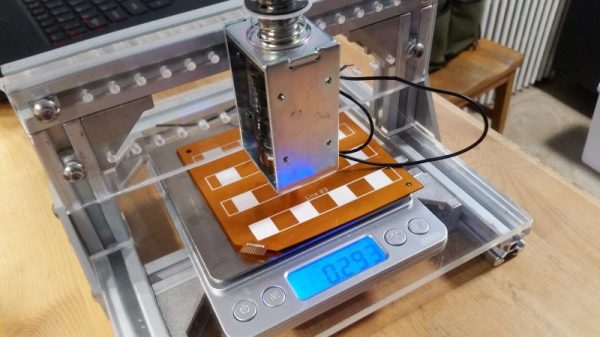
Measuring and mapping the pressure on the residual limb is the business of this flexible force-sensing matrix. The idea for a two-dimensional force map came from one of [chris.coulson]’s classmates, an amputee who developed a single-channel pressure sensor to help him solve a painful fitting problem. [chris.coulson] was reminded of a piezoresistive yoga mat build from [Marco Reps], which we featured a while back, and figured a scaled-down version might be just the thing to map pressure points across the prosthetic interface. Rather than the expensive and tediously-applied web of copper tape [Marco] used, [chris] chose flexible PCBs to sandwich the Velostat piezoresistive material. An interface board multiplexes the 16 elements of the sensor array to a PIC which gathers and records testing data. [chris] even built a test stand with a solenoid to apply pressure to the sensor and test its frequency response to determine what sorts of measurements are possible.
We think the project is a great application for flex PCBs, and a perfect entry into our Flexible PCB Contest. You should enter too. Even though [chris] has a prototype, you don’t need one to enter: just an idea would do. Do something up on Fritzing, make a full EAGLE schematic, or just jot a block diagram down on a napkin. We want to see your ideas, and if it’s good enough you can win a flex PCB to get you started. What are you waiting for?
The increase in network-connected devices the past years has been something of a dual-edged sword. While on one hand it’s really nice to have an easy and straight-forward method to have devices talk with each other, this also comes with a whole host of complications, mostly related to reliability and security.
With WiFi, integrating new devices into the network is much trickier than with Ethernet or CAN, and security (e.g. WPA and TLS) isn’t optional any more, because physical access to the network fabric can no longer be restricted. Add to this reliability issues due to interference from nearby competing WiFi networks and other sources of electromagnetic noise, and things get fairly complicated already before considering which top-layer communication protocol one should use. Continue reading “Transcending The Stack With The Right Network Protocol”→
Remote control cars can be great fun, particularly if you’ve got a spare carpark or dirt lot to hoon them around. Any good hobby store will have shelves stocked with all manner of vehicles – buggies, touring cars, prototypes – but you don’t have to settle for what’s already available. Why not 3D print the car of your dreams instead? (YouTube, embedded below.)
The build comes to us from [Engineering Nonsense], now in its third revision. The design is produced in PLA, to make it accessible as possible to printer owners the world over. Almost the entire car is 3D printable – not just the chassis. The gearbox, differentials and driveshafts, and even suspension arms and tie rods are all printed, rather than bought. This also means the car is easier to build, with everything being printed to the correct size, as opposed to using off-the-shelf adjustable parts.