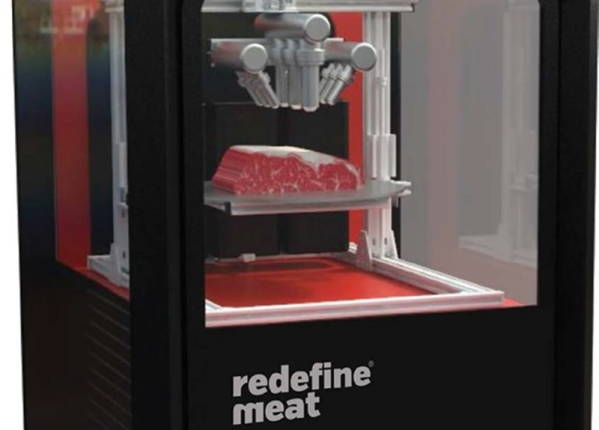
An Israeli start-up company, Redefine Meat recently raisedabout $6 million to perfect and commercialize its technology to 3D print meat alternatives, sometimes called alt-meat. The company claims that producing animal protein for consumption is unsustainable but that their product reduces environmental impact by 95% and has other benefits such as containing no cholesterol and a lower cost to consumers.
Reports say the ingredients of the faux meat includes three different plant protein sources, fat, and water. We assume the fat is also plant-based. The prototype printer can produce about two pounds of “meat” an hour, but their next machine is supposed to be capable of about ten times that production.
They aren’t the only company in the space, either. Novameat is also 3D printing meat. There’s also competition from companies that are basically growing real animal tissue in labs without the animals–so-called cultured meat.
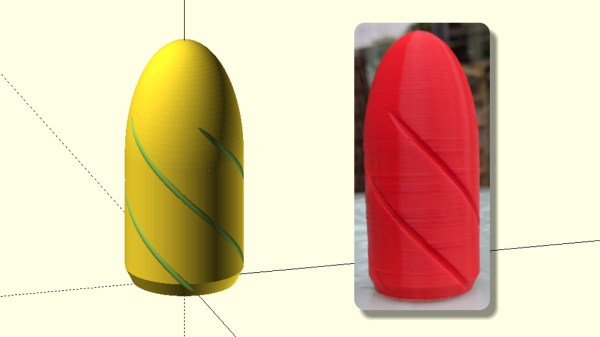
The ballistics of humble potato is a time-honoured research topic for everyone who likes things that go bang. The focus of such work is usually on the launcher itself, with the projectiles being little more than an afterthought. [drenehtsral] decided that the wares of the local organic ammunition supplier were not good enough for him and his minions, so he designed and then 3D printed some rifled potato cannon slugs.
The design was done using OpenSCAD, has a number of adjustable parameters like infill and rifling. We doubt that the rifling introduces any spin, since it is being fired from a smooth bore barrel, but as always 3D printing brings the capability to quickly test different ideas. A quick search on Thingiverse shows a number of 3D printed spuds, so [drenehtsral] is not the first give it a go. However, this did bring to our attention that the field of spud gun projectiles is begging to be explored.
There is enough space inside a projectile to fit an IMU and logging electronics, which would give some very nice empirical data (providing you can recover it of course) on spin, acceleration, and trajectory that can be used to further improve designs. Spring loaded stabilising fins would be cool, and maybe someone can even manage to implement some form of guidance? The possibilities are endless! If you’re up for the challenge, please document your work it and let us know.
It’s rare that makers get involved in out-and-out munition production. It’s dangerous, and usually frowned upon by local authorities. That said, it can be fun to experiment around, and [Ivan] does just that, attempting to launch a 3D-printed torpedo from a kayak. The build may have been done as a marketing exercise, but it raises some interesting questions about naval engineering.
The first revision consists of a 3D-printed hull, containing a rubber-band powered propeller. A soda bottle filled with compressed air is then used as a warhead, fitted with a contact fuse to release its charge on impact. Unfortunately, initial tests were underwhelming, with the rubber band mechanism failing to provide any real forward propulsion.
A trip back to the drawing board was due, and the design was revived with a brushless motor powerplant instead. This allowed the torpedo to trawl, albeit slowly, through the water. It also proved that the compressed air “warhead” could successfully discharge, albeit with less of a bang, more of a whimper.
The build, while undertaken for the sake of fun, does highlight some of the engineering challenges inherent in building a working torpedo. There were issues with buoyancy, as well as providing the torpedo with enough power to move quickly in the water. On top of this, the matter of guidance is also an important one. We’d love to know how the Hackaday commentariat would go about solving these issues when undertaking their own build – let us know down below. We’ve seen others tackle similar builds before, too. Video after the break.
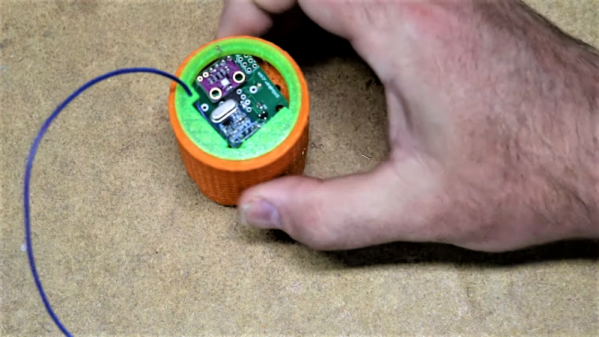
We don’t know where [Scott M. Baker] calls home, but it must be a pretty humid place indeed. After all, he has invested quite a bit in fancy vacuum storage containers to keep his 3D-printer filament dry, with the result being this sensor-laden filament drying farm.
[Scott] wasn’t content to just use these PrintDry containers without knowing what’s going on inside. After a little cleaning and lube to get all the containers working, he set about building the sensors. He settled on a wireless system, with each container getting a BME280 temperature/humidity/pressure sensor and an SYN115 315-MHz ISM band transmitter module. These go with an ATtiny85 into a compact 3D-printed case holding a little silica desiccant. The transmitters are programmed to comply with ISM-band regulations – no need to run afoul of those rules – while the receiver is just an SDR dongle and a Raspberry Pi running rtl_433. The long-ish video below details design and construction.
The idea behind these vacuum containers would seem to be to pull out humid air and prevent it from coming back in. But as [Scott] quickly learned from his telemetry, following the instructions results in the equivalent atmospheric pressure of only about 2700′ (823 meters) elevation – not exactly a hard vacuum. But as [Scott] points out, it’s enough to get a nice, tight seal, and his numbers show a lowered and constant relative humidity over time.
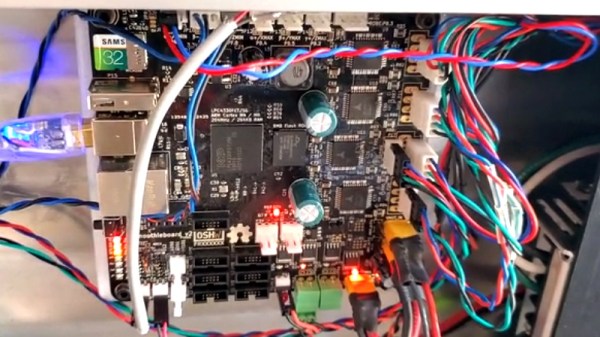
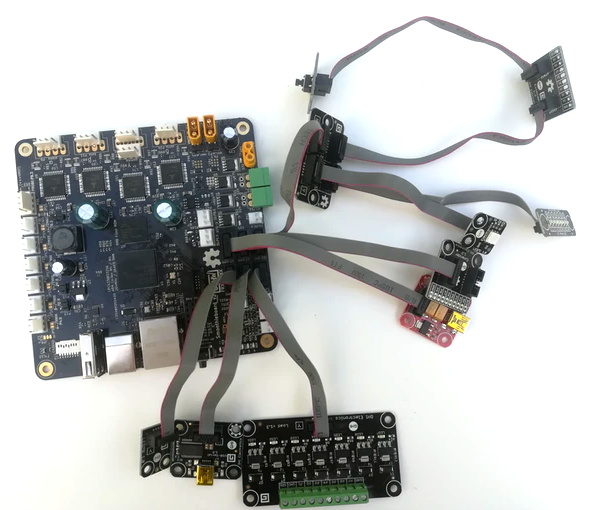
If you’ve been reading Hackaday for awhile, there’s an excellent chance you’ve seen a project or two powered by the Smoothieboard. The open source controller took Kickstarter by storm in 2013, promising to be the last word in CNC thanks to its powerful 32-bit ARM processor. Since then we’ve seen it put to use in not only the obvious applications like 3D printers and laser cutters, but also for robotic arms and pick-and-place machines. If it moves, there’s a good chance you can control it with the Smoothieboard.
But after six years on the market, the team behind this motion control powerhouse has decided it’s time to freshen things up. The Kickstarter for the Smoothieboard v2 has recently gone live and, perhaps unsurprisingly, already blown past its funding goal. Rather than simply delivering an upgraded Smoothieboard, the team has also put together a couple “spin-offs” targeting different use cases. If Smoothie v1 was King of CNC boards, then v2 is aiming to be the Royal Family.
Smoothieboard v2-Prime with breakouts
The direct successor to the original board is called v2-Prime, and it’s everything you’d expect in an update like this. Faster processor, more RAM, more flash, and improved stepper drivers. There’s also available GPIO expansion ports to connect various breakout boards, and even a header for you to plug in a Raspberry Pi. If you’re looking to upgrade your existing Smoothieboard machines to the latest and greatest, the Prime is probably what you’re after.
Then there’s the v2-Mini, designed to be as inexpensive as possible while still delivering on the Smoothieboard experience. The Mini has the same basic hardware specs as the Prime, but uses lower-end stepper drivers and deletes some of the protection features found on the more expensive model. For a basic 3D printer or laser cutter, the Mini and its projected $80 price point will be a very compelling option.
In the other extreme we have the v2-Pro, which is intended to be an experimenter’s dream come true. It features more stepper drivers, expansion ports, and even an integrated FPGA. Realistically, this board probably won’t be nearly as popular as the other two versions, but the fact that they’ve even produced it shows how committed the team is to pushing the envelope of open source motion control.
Our coverage of the original Smoothieboard campaign back in 2013 saw some very strong community response, with comments ranging from excited to dismissive. Six years later, we think the team behind the Smoothieboard has earned a position of respect among hackers, and we’re very excited to see where this next generation of hardware leads.
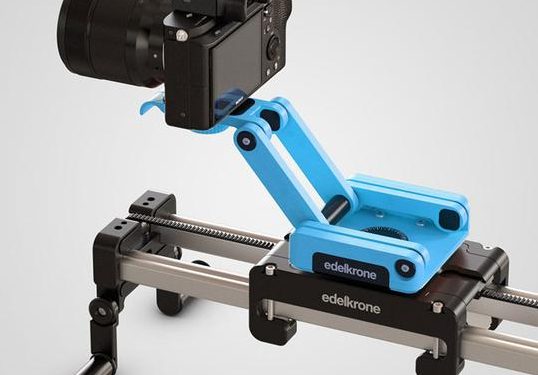
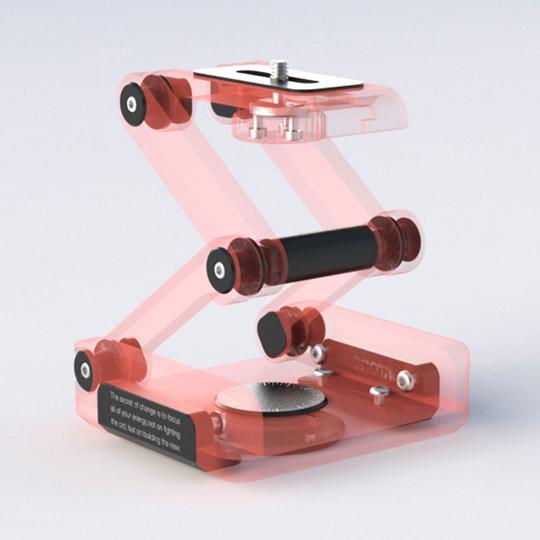
When shooting video, an easy way to get buttery smooth panning and tracking is to use a mechanical device like a rail to literally slide the camera side to side. These range from what is essentially a skateboard to incredible programmable multi-axis industrial robots, a wide variety of which have been visible in the backgrounds of Youtuber’s sets for years. But even the “low end” devices can run hundreds of dollars (all that anodized aluminum doesn’t come cheap!). Edelkrone has been building lust worthy professional (read, pricey) motion setups for a decade. But in the last year they’ve started something pretty unusual; lowering prices with their Ortak series of 3D printed equipment. But this time, you do the printing.
In the FlexTILT Head 3D, everything in red is printed at home
Since the RepRap we’ve been excited about the future of democratized at home manufacturing, but to a large extent that dream hasn’t materialized. Printers are much more useful now than in the early days but you can’t buy a new mug from Starbucks and print it at home. But maybe that’s changing with Edelkrone’s offering.
When you buy an Ortak product you get one thing: all the fasteners and hardware. So the final product is more durable and appears more finished than what would pop out of your Prusa unaided. What about the rest of the device? That’s free. Seriously. Edelkrone freely provides STLs (including print setting recommendations) with detailed step-by-step assembly instructions and videos (sample after the break). Nice hack to avoid piracy, isn’t it?
Why choose the do-it-at-home style product? A significant price reduction of course! The Ortak line currently includes two products, the FlexTILT head you see above, and a skateboard-style slide called the SKATER 3D. Both of these were sold fully finished before making it to the DIY scene. The FlexTILT Head 2 comes in at $149 when you buy it whole. And when the PocketSKATER 2 was for sale, it included a FlexTILT Head and came to $249. Now? Each hardware kit is just $29.
So is this it? Have we hit the artisanal DIY micro-manufactured utopian dream? Not yet, but maybe we’re a little closer. Edelkrone is a real company which is really selling these as products, right there on their website along with everything else. They refer to it as “co-manufacturing” which we think is a clever name, and talk about expanding the program to include electronics. We can’t wait to see how the experiment goes!
We’ve noticed a trend lately that advanced 3D printing people are calling their normal print setup as 2.5D, not 3D. The idea is that while the machine has 3 axes, the actual geometry generation is typically only in the X and Y axis. The Z axis simply lifts up to the next layer unless you are working in vase mode. [Teaching Tech] wanted to experiment with real 3D printing where the Z axis actually helps build the shape of the printed object, not just advancing with each step.
As it turns out his first investigation linked back to one of our early posts on the topic. There’s been more recent work though, and he found that too. It took a little surgery to get more Z clearance, but nothing too serious — just a movement of a fan.