Interfacing Philips Hue Lights With Everything

The Internet of Things is eating the world alive, and we can’t buy incandescent light bulbs anymore. This means the Internet is now in light bulbs, and with that comes some special powers. You can turn lights on and off from a botnet. You can change the colors. This is the idea for the Philips Hue system, which is well respected among people who like putting their lights on the Internet. There are other brands — and you can make your own — but the Hue system does work pretty well.

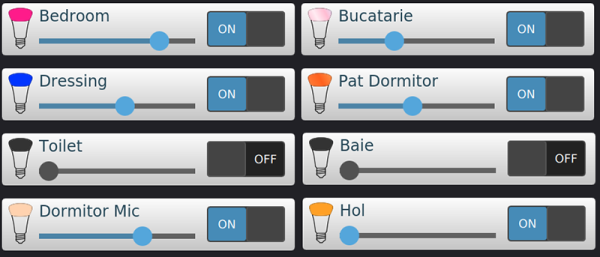
This is what led [Marius] to create software to interface various electronics with the Hue system. It’s a project called diyHue, and already there’s a vibrant community of devs creating their own smart lights and connecting them to the Internet.

The software for this project is built in Python, and is designed to run on certain single board computers. This allows the SBC to connect to the Hue bridge so Hue bulbs can be controlled, a MiLight hub so MiLight bulbs can be controlled, or, with the addition of a ZigBee radio, all those ZigBee devices can be controlled. Right now the only thing that doesn’t work is Google Home because it requires a remote API, the Home & Away feature from the Hue app (again, remote API), and the Eneco Toon.

There really are a fantastic number of devices this software works with, and if you’re building out your Internet-connected home lighting solution, this is one piece of software you need to check out. Thanks to [cheesemarathon] for bringing our attention to this. He also liked it so much he’s now contributing to the GitHub. Very cool.

Bootstrapping An MSDOS Assembler With Batch Files

You have a clean MSDOS system, and you need to write some software for it. What do you do? You could use debug, of course. But there are no labels so while you can get machine code from mnemonics, you’ll still need to figure out the addresses on your own. That wasn’t good enough for [mniip], who created an assembler using mostly batch files. There are a few .COM files and it looks as if the first time you use debug to create those, but there’s also source you can assemble on subsequent builds with the assembler.

Why? We aren’t entirely sure. But it is definitely a hack. The technique sort of reminded us of our own universal cross assembler — sort of.

Continue reading “Bootstrapping An MSDOS Assembler With Batch Files”

Laptop Chargers Team Up To Get The Juice Flowing

There’s perhaps nothing harder to throw away than a good power supply. Whether it’s the classic “wall wart” whose mate has long since been misplaced or a beefy ATX you pulled out of a trashed computer, it always seems like there should be something you could do with these little wonders of modern power conversion. So into the parts bin it goes, where it will stay evermore. But not for the [TheRainHarvester], who figured out that the secret to putting a drawer full of old laptop chargers to use was combing them like hacker Voltron.

Using three old IBM laptop chargers, he’s able to produce up to 48 volts DC at a healthy 4.5 amps. His cobbled together power supply even features an variable output, albeit with some mighty coarse adjustment. As each charger is individually rated for 16V, he can unplug one of the adapters to get 32V.

In the video after the break [TheRainHarvester] walks viewers through the construction of his simple adapter, which could easily be made with salvaged parts. Built on a trace-free piece of fiber board, the adapter consists of the three barrel jacks for the chargers and a trio of beefy Schottky diodes.

The nature of the barrel jacks (which short a pin once the plug is removed) along with the diodes allows [TheRainHarvester] to combine the output of the three adapters in series without running the risk of damaging them if for example one is left plugged into the adapter but not the wall. He’s also looking to add some status LEDs to show which chargers are powered on.

Unfortunately, [TheRainHarvester] realized a bit too late that what he thought was an inert piece of board actually had a ground plane, so he’s going to have to come up with a new way to tie the whole thing together on the next version which he says is coming now that he knows the concept seems workable.

In the meantime, if you’re thinking of hacking something together with the wealth of old laptop chargers we know are kicking around the lab, you might want to take a look at our primer for understanding all those hieroglyphs on the back of the thing.

Continue reading “Laptop Chargers Team Up To Get The Juice Flowing”

Crawling PCB ‘Bot Is Flexible Where It Counts

20 years ago, PCB production was expensive and required a multitude of phone calls and emails to a fab with significant minimum order restrictions. Now, it’s cheap and accessible online, which in addition to curtailing the home etching market has created significant new possibilities for home projects. Now that flexible PCBs are also readily available, it’s possible to experiment with some cool concepts – and that’s precisely what [Carl] has been doing.

The aim is to build a walking robot that uses actuators made from flexible PCBs. The flexible PCB is printed with a coil, capable of generating a small magnetic field. This then interacts with a strong permanent magnet, causing the flexible PCB to move when energised.

Initial attempts with four actuators mounted to a 3D printed frame were unsuccessful, but [Carl] has persevered. With a focus on weight saving, the MK II prototype has shown some promise, gently twitching its way across a desk in testing. Future steps will involve building an untethered version. This will replace the 3D printed chassis with a standard fibreglass PCB acting as both control board and the main chassis to minimise weight, similar to PCB quadcopter designs we’ve seen in the past.

We can’t wait to see the next revision, and if you’ve been working on your own walking robots, make sure you let us know.

Mini Van De Graaff Is A Shocking Desk Toy

The Van De Graff generator is a device capable of generating potentially millions of volts of electricity which you can build in an afternoon, probably from parts you’ve got in the junk bin. This is not a fact that’s escaped the notice of hackers for decades, and accordingly we’ve seen several Van De Graaff builds over the years. So has high voltage hacker [Jay Bowles], but he still thought he could bring something new to the table.

The focus of his latest build was to not only produce one of the most polished and professional versions of this venerable piece of high voltage equipment, but also make it accessible for others by keeping the design simple and affordable. The final result is a 40,000 volt Van De Graaff generator that’s powered by two AA batteries and can fit in the palm of your hand.

Put simply, a Van De Graaff generator creates static electricity from the friction of two metal combs rubbing against a moving belt, which is known as the triboelectric effect. The belt is stretched between the two combs and passes through an insulated tube, which serves to “pump” electrons from one side to the other. The end result is that a massive charge builds up on the positive side of the Van De Graaff generator, which is all too willing to send a spark firing off towards whatever negatively charged object gets close enough.

The video after the break guides viewers through the process of turning this principle into a practical device, illustrating how remarkably simple it really is. A common hobby motor is used to get the belt going, in this case just a wide rubber band, and the rest of the components are easily sourced or fabricated. Even for what’s arguably the most intricate element of the build, the combs themselves, [Jay] uses nothing more exotic than aluminum foil tape and a piece of stranded wire splayed out.

Combined with the acrylic base and the purpose-made metal sphere (rather than using a soda can or other upcycled object), the final result not only generates healthy sparks but looks good doing it. Though if the final fit and finish isn’t important, you could always build one out of stuff you found in the trash.

Continue reading “Mini Van De Graaff Is A Shocking Desk Toy”

The Space Station Has A Supercomputer Stowaway

The failed launch of Soyuz MS-10 on October 11th, 2018 was a notable event for a number of reasons: it was the first serious incident on a manned Soyuz rocket in 35 years, it was the first time that particular high-altitude abort had ever been attempted, and most importantly it ended with the rescue of both crew members. To say it was a historic event is something of an understatement. As a counterpoint to the Challenger disaster it will be looked back on for decades as proof that robust launch abort systems and rigorous training for all contingencies can save lives.

But even though the loss of MS-10 went as well as possibly could be expected, there’s still far reaching consequences for a missed flight to the International Space Station. The coming and going of visiting vehicles to the Station is a carefully orchestrated ballet, designed to fully utilize the up and down mass that each flight offers. Not only did the failure of MS-10 deprive the Station of two crew members and the experiments and supplies they were bringing with them, but also of a return trip which was to have brought various materials and hardware back to Earth.

But there’s been at least one positive side effect of the return cargo schedule being pushed back. The “Spaceborne Computer”, developed by Hewlett Packard Enterprise (HPE) and NASA to test high-performance computing hardware in space, is getting an unexpected extension to its time on the Station. Launched in 2017, the diminutive 32 core supercomputer was only meant to perform self-tests and be brought back down for a full examination. But now that its ticket back home has been delayed for the foreseeable future, NASA is opening up the machine for other researchers to utilize, proving there’s no such thing as a free ride on the International Space Station.

Continue reading “The Space Station Has A Supercomputer Stowaway”

Dozens Of Servos Flip The Segments Of This 3D-Printed Digital Clock

A digital clock based on seven-segment displays? Not exciting. A digital clock with seven-segment displays that’s really big and can be read across a football field? That’s a little more interesting. A large format digital clock that uses electromechanical seven-segment displays? Now that’s something to check out.

This clock comes to us by way of [Otvinta] and is a nice example of what you can do with 3D-printing and a little imagination. Each segment of the display is connected to a small hobby servo which can flip it 90°. Mounted in a printed plastic frame, the segments are flipped in and out of view as needed to compose the numerals needed to display the time. The 28 servos need two Pololu controller boards, which talk to a Raspberry Pi running Windows IoT, an interesting design choice that we don’t often see. You’d think that 28 servos clattering back and forth might be intolerable, but the video below shows that the display is actually pretty quiet. We’d love to see this printed all in black with white segment faces, or even a fluorescent plastic; how cool would that look under UV light?

We’re not saying this is the only seven-segment servo clock we’ve seen, but it is a pretty slick build. And of course there’s more than one way to use servos to tell the time.

Continue reading “Dozens Of Servos Flip The Segments Of This 3D-Printed Digital Clock”