Repairs You Can Print: 3D Printing Is For (Solder) Suckers

[Joey] was about to desolder something when the unthinkable happened: his iconic blue anodized aluminium desoldering pump was nowhere to be found. Months before, having burned himself on copper braid, he’d sworn off the stuff and sold it all for scrap. He scratched uselessly at a solder joint with a fingernail and thought to himself: if only I’d used the scrap proceeds to buy a backup desoldering pump.

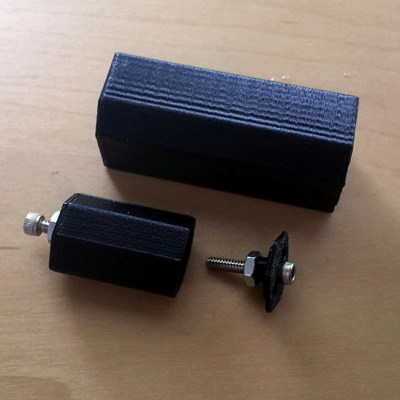
Determined to desolder by any means necessary, [Joey] dove into his junk bin and emerged carrying an old pump with a broken button. He’d heard all about our Repairs You Can Print contest and got to work designing a replacement in two parts. The new button goes all the way through the pump and is held in check with a rubber band, which sits in a groove on the back side. The second piece is a collar with a pair of ears that fits around the tube and anchors the button and the rubber band. It’s working well so far, and you can see it suck in real-time after the break.

We’re not sure what will happen when the rubber band fails. If [Joey] doesn’t have another, maybe he can print a new one out of Ninjaflex, or build his own desoldering station. Or maybe he’ll turn to the fire and tweezers method.

Continue reading “Repairs You Can Print: 3D Printing Is For (Solder) Suckers”

Printed Nexus 7 SIM Tray Is Good ‘Nuff

When repairing something, there are in effect two schools of thought: you can craft a repair that seamlessly blends into the original hardware and doesn’t look like a repair, or you can slap that thing together and keep it moving. A lot of variables go into this decision making process, such as the complexity of the repair, the available materials, and of course whether or not you need to keep the fact you broke the thing from your significant other.

When the SIM holder on his Nexus 7 tablet broke recently, [Alex Whittemore] did the mental arithmetic and came to the conclusion that it wasn’t worth his time trying to figure out how to model an exact replacement. But he was able to print something that works well enough for his purposes, which is all that matters in the end. A perfect entry for our ongoing “Repairs You Can Print” contest.

You must be this small to ride

Apparently the SIM holder in the 2013 Nexus 7 is notoriously poor, and of course since this is a known issue, online retailers are trying to get as much as $100 USD out of you for a tiny sliver of plastic. Sometimes it really seems like Google was determined to run the Nexus line into the ground before bailing on it.

Printing such a tiny part, especially with the little details like the channel for you to hook your fingernail into, requires a fairly well calibrated printer. If you can’t muster up a 0.1mm first layer you might as well sit this one out; and if you haven’t mastered the art of bridging, that little valley to help you get the SIM back out may end up overflowing into a river of tears.

For [Alex], the piece ended up working perfectly. It might look a little weird, but if you’ve got the tablet in a case you’ll never see it anyway. It’s also worth noting that this design may work on other devices with a similar SIM arrangement, or at the very least, might be a good starting point to work from if you’ve got to come up with your own.

Remember, there’s still plenty of time to enter your own printed fix into our “Repairs You Can Print” contest. The top 20 repairs will take home $100 in Tindie credit, and for the best repair done by a Student or Organization, there’s two Prusa i3 MK3 printers with the Quad Material upgrade kits on the line.

Repairs You Can Print: Racing The Clock For A Dishwasher Fix

No matter how mad your 3D printing skills may be, there comes a time when it makes more sense to order a replacement part than print it. For [billchurch], that time was the five-hour window he had to order an OEM part online and have it delivered within two days. The race was on — would he be able to model and print a replacement latch for his dishwasher’s detergent dispenser, or would suffer the ignominy of having to plunk down $30 for a tiny but complicated part?

As you can probably guess, [bill] managed to beat the clock. But getting there wasn’t easy, at least judging by the full write-up on his blog. The culprit responsible for the detergent problem was a small plastic lever whose pivot had worn out. Using a caliper for accurate measurements, [bill] was able to create a model in Fusion 360 in just about two hours. There was no time to fuss with fillets and chamfers; this was a rush job, after all. Still, even adding in the 20 minutes print time in PETG, there was plenty of time to spare. The new part was a tight fit but it seemed to work well on the bench, and a test load of dishes proved a success. Will it last? Maybe not. But when you can print one again in 20 minutes, does it really matter?

Have you got an epic repair that was made possible by 3D printing? We want to know about it. And if you enter it into our Repairs You Can Print Contest, you can actually win some cool prizes to boot. We’ve got multiple categories and not that many entries yet, so your chances are good.

The Engineering Analysis Of Plastic-Dissolving Lubricant

Over the years, E3D has made a name for themselves as a manufacturer of very high-quality hotends for 3D printers and other printer ephemera. One of their more successful products is the Titan Extruder, a compact extruder for 3D printers that is mostly injection-molded plastic. The front piece of the Titan is a block of molded polycarbonate, a plastic that simply shouldn’t fail in its normal application of holding a few gears and bearings together. However, a few months back, reports of cracked polycarbonate started streaming in. This shouldn’t have happened, and necessitated a deep dive into the failure analysis of these extruders. Lucky for us, E3D is very good at doing engineering teardowns. The results of the BearingGate investigation are out, and it’s a lesson we can all learn from.

The first evidence of a problem with the Titan extruders came from users who reported cracking in the polycarbonate case where the bearing sits. The first suspect was incorrectly manufactured polycarbonate, perhaps an extruder that wasn’t purged, or an incorrect resin formulation during manufacturing. A few whacks with a hammer of each production run ruled out that possibility, so suspicion turned to the bearing itself.

After a few tests with various bearings, the culprit was found: in some of the bearings, the lubricant mixed with the polycarbonate to create a plastic-degrading toxic mixture. These results were verified by simply putting a piece of polycarbonate and the lubricant in a plastic bag. This test resulted in some seriously messed up plastic. Only some of the bearings E3D used caused this problem, a lesson for everyone to keep track of your supply chain and keep records of what parts went into products when.

The short-term fix for this problem is to replace the bearing in the Titan with IGUS solid polymer bushings. These bushings don’t need lubricant, and therefore are incapable of killing the polycarbonate shell. There are downsides to this solution, namely that the bushings need to be manufactured, and cause a slight increase in friction reducing the capability of the ‘pancake’ steppers E3D is using with this extruder.

The long-term solution for this problem is to move back to proper bearings, but changing the formulation of the polycarbonate part to something more chemical resistant. E3D settled on a polymer called Tritan from Eastman, a plastic with similar mechanical properties, but one that is much more chemically resistant. This does require a bit more up-front work than machining out a few bearings, but once E3D gets their Tritan parts in production, they will be able to move back to proper bearings with the right lubrication.

While this isn’t a story of exploding smartphones or other disastrous engineering failures, it is a great example of how your entire supply chain goes into making a product, and how one small change can ruin an entire product. This is real engineering right here, and we’re glad E3D finally figured out what was going on with those broken Titan extruders.

Repairs You Can Print: The Zipper Box

Picture it: winter, a few years ago. [Ted Yapo]’s son is sent to the front lines of a snowball war. He rises to the task, pelting kid after kid with ease and taking down the Johnson twins with a two-fisted trebuchet maneuver. As he hunkers down to form the last snowball needed to claim victory, the unthinkable happens: the zipper box on his coat breaks and falls silently into the snow. Unaware, he leaps to his feet to take his final shot and the whole zipper unfurls, exposing him to both the cold and the enemy. They won the war, but at what cost?

[Ted] figured the coat was done for. He thought about replacing the zipper entirely, but that was going to be a lot of work. He cast a forlorn look around his workshop and his gaze fell upon the 3D printer in the corner. I can rebuild it! He thought. I have the technology! He was off to design a new box in OpenSCAD and had sturdy ABS replacement zipper box in no time. He installed it with dab of Duco cement, and the rest is history. That coat saw two more winters and countless snowball wars before [Private Yapo] presumably grew out of the thing.

Zippers are the unsung heroes of clothing. If you don’t know much about zippers, sink your teeth into [Dan Maloney]’s recent ode to the quickest fastener we’ve got.

What Is This, A Controller For Ants?!

What’s the smallest controller you’ve ever used? [BitBuilt] forum user [Madmorda] picked up a cool little GameCube controller keychain with semi-working buttons at her local GameStop. As makers are wont to do, she figured she could turn it into a working controller and — well — the rest is history.

This miniaturized controller’s original buttons were essentially one piece of plastic and all the buttons would depress at once — same goes for the D-pad. Likewise, the original joystick and C-stick lacked springs and wouldn’t return to a neutral position after fidgeting with them. To get the ball rolling, [Madmorda] picked up a GC+ board — a custom GameCube controller board — just small enough to fit this project, eleven hard tact switches for the various buttons, and two squishy tact switches to replicate the original controller’s L and R button semi-analog, semi-digital functionality.

Continue reading “What Is This, A Controller For Ants?!”

Roll Your Own Magnetic Encoder Disks

[Erich] is the middle of building a new competition sumo bot for 2018. He’s trying to make this one as open and low-cost as humanly possible. So far it’s going pretty well, and the quest to make DIY parts has presented fodder for how-to posts along the way.

One of new bot’s features will be magnetic position encoders for the wheels. In the past, [Erich] has used the encoder disks that Pololu sells without issue. At 69¢ each, they don’t exactly break the bank, either. But shipping outside the US is prohibitively high, so he decided to try making his own disks with a 3D printer and the smallest neodymium magnets on Earth.

The pre-fab encoder disks don’t have individual magnets—they’re just a puck of magnetic slurry that gets its polarity on the assembly line. [Erich] reverse-engineered a disk and found the polarity using magnets (natch). Then got to work designing a replacement with cavities to hold six 1mm x 1mm x 1mm neodymium magnets and printed it out. After that, he just had to glue them in place, matching the polarity of the original disk. We love the ingenuity of this project, especially the pair of tweezers he printed to pick and place the magnets.

Rotary encoders are pretty common in robotics applications to detect and measure wheel movement. Don’t quite recall how they work? We’ll help you get those wheels turning.

via Dangerous Prototypes