A Plywood Laptop For Your Raspberry Pi

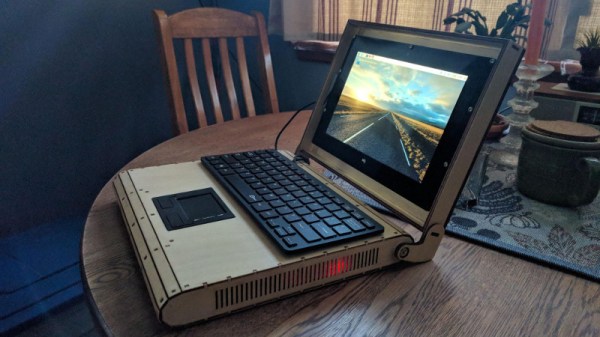
[Rory Johnson] writes in to tell us about PlyTop Shell, a Creative Commons licensed design for a laser cut wooden laptop that he’s been working on since 2016. It’s designed to accommodate the Raspberry Pi (or other similarly sized SBCs), and aims to provide the builder with a completely customizable mobile computer. He’s got a limited run of the PlyTop up for sale currently, but if you’ve got the necessary equipment, you can start building yours while you wait for that new Pi 3B+ to arrive.

Originally [Rory] was working on a 3D printed design, but quickly ran into problems. The vast majority of 3D printers don’t have nearly the build volume to print out a laptop case in one shot, so the design needed to be broken up into multiple smaller pieces and then grafted together into the final case. Not only did this take a long time and a lot of material, but the final result had the rather unfortunate appearance of a plastic quilt.

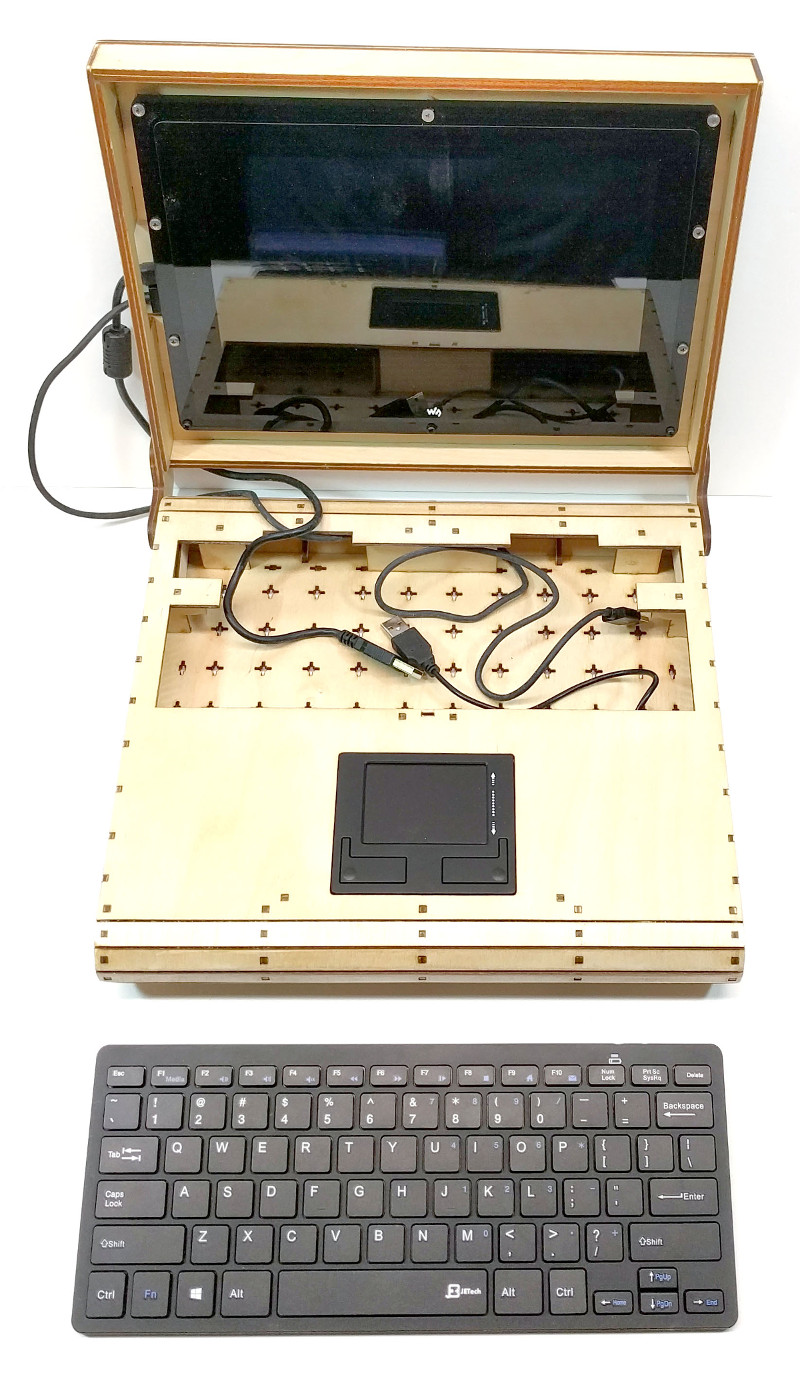
Eventually he got hooked up with a maker collective in Minneapolis that had a laser cutter, and the PlyTop was born. There’s still a 3D printed component in the design that goes in the screen hinge, but the rest of the PlyTop is cut out of a three 2′ x 4′ sheets of 1/8″ Baltic birch plywood. As you might expect, plenty of fasteners are required, but [Rory] has a complete Bill of Materials (complete with purchase links) for everything you’ll need to turn the cut pieces into a fully fledged laptop. He’s considering selling kits in the future, but is still working on the logistics.

In keeping with the idea of complete flexibility, there’s no defined layout for the internals of the PlyTop. Rather, there’s an array of star-shaped openings on the bottom plate that allow the builder to connect hardware components up in whatever way works for them. [Rory] actually suggests just holding everything down with zip ties to allow for ease of tinkering.

He’s also come up with a list of suggested hardware for the keyboard, touchpad, and display; but those are really just suggestions. The design is open enough that it shouldn’t take much work to adapt to whatever gear you’ve got laying around.

Of course, this isn’t the first open source laptop we’ve seen here at Hackaday. It isn’t even the first wooden one. But we love the lines of the PlyTop and the focus on complete customization.

Continue reading “A Plywood Laptop For Your Raspberry Pi”

A Pin Pusher To Make Life Easier

Picture the scene: you’ve whipped up an amazing new gadget, your crowdfunding campaign has gone well, and you’ve got a couple hundred orders to fill. Having not quite hit the big time, you’re preparing to tackle the production largely yourself. Parts begin to flood in, and you’ve got tube after tube of ICs ready to populate your shiny new PCBs? After the third time, you’re sick and tired of fighting with those irksome little pins. Enter [Stuart] with the answer.

It’s a simple tool, attractively presented. Two pieces of laser cut acrylic are assembled in a perpendicular fashion, creating a vertical surface which can be used to press pins out of IC tubes. [Stuart]’s example has rubber feet, though we could easily see this built into a work surface as well.

The build highlights two universal truths. One, that laser cutters are capable of producing elegant, visually attractive items almost effortlessly, something we can’t say about the garden variety 3D printer. Secondly, all it takes is a few little jigs and tools to make any production process much easier. This is something that’s easy to see in the many factories all over the world – special single-purpose devices that make a weird, tricky task almost effortless.

In DIY production lines, testing is important too – so why not check out this home-spun test jig?

A Compensated Thermocouple Amp, Ready For Arduino

When you want to measure temperature with an Arduino or other microcontrollers, there are a ton of options for sensors. Temperature chips and sensor modules abound, some with humidity sensors built-in and all with easy interfacing and an expansive supporting code library. But dip one of those sensors into, say, molten aluminum, and you’ve got a problem.

If you’re measuring something hot, you need a thermocouple. Trouble is, the signal from a thermocouple is pretty small, and needs amplification and compensation before being fed into the ADC of a typical microcontroller. Unable to find a commercial amp to meet his needs, [MonkHelios] built his own thermocouple amp for microcontrollers. The design is centered around an LTC2053 instrumentation amp, which does the job of converting the K-type thermocouple’s 40.6μV/°C output to a nicely scaled 10mV/°C range, just right for ADC consumption. He also thoughtfully included an LT1025 cold-junction compensator; thermocouple amps are referenced to 0°C, so the compensator measures the actual temperature of the cold end of the junction and scales the output accordingly. The whole amp is nicely laid out on a DIY single-sided PCB with meticulously applied solder mask — this is one of the nicest home-etched boards we’ve seen in a long time.

[Bil Herd] designed a similar thermocouple amp not too long ago himself, so you might check that out too.  Or maybe you need the basics of instrumentation amps? Our “Beyond Measure” series will get you started.

Carbon Augmented Spider Silk

Some of the creepy-crawlers under our feet, flitting through the air, and waiting on silk webs, incorporate metals into their rigid body parts and make themselves harder. Like Mega Man, they absorb the metals to improve themselves. In addition to making their bodies harder, silk-producing creatures like worms and spiders can spin webs with augmented properties. These silks can be conductive, insulating, or stronger depending on the doping elements.

At Italy’s University of Trento, they are pushing the limits and dosing spiders with single-wall carbon nanotubes and graphene. The carbon is suspended in water and sprayed into the spider’s habitat. After the treatment, the silk is measured, and in some cases, the silk is significantly tougher and surpasses all the naturally occurring fibers.

Commercial spider silk harvesting hasn’t been successful, so maybe the next billionaire is reading this right now. Let’s not make aircraft-grade aluminum mosquitoes though. In fact, here’s a simple hack to ground mosquitoes permanently. If you prefer your insects alive, maybe you also like their sound.

Thank you for the tip, [gippgig].

Get Together And Hack This Saturday At World Create Day!

Spend some time with the Hackaday Community in your area this weekend. There are more than 100 community organized meetups happening this Saturday for Hackaday World Create Day. Check the big map for one near you and click the “Join this event” button in the upper right of their events page to let them know you’re coming.

Sticker packs we’ve been sending out to local event organizers.

It’s always a blast to get together with friends new and old to work on a project you’ve been itching to build. Grab something from your work bench and have fun geeking out about it in the company of others. This is a great opportunity to get started on your 2018 Hackaday Prize entry. Brainstorm ideas for a project, get advice on your early build plans, and consider forming a team. Submit what you come up with this Saturday as your entry and improve upon it over the coming weeks.

Can you still sign up to host World Create Day? Of course! Fill out this form and we’ll get you set up right away.

If you simply can’t make it to a live event, you can still take part. Set aside time to hack and show off the stuff you’re working on through social media. We have a Tweetwall set up (great to put up on the projector during group meetups) which shares Tweets with the hashtag #WorldCreateDay.

Don’t Forget to Tell the Story of Your World Create Day

We’re on the lookout for cool stories and interesting hacks from your meetup so that we can feature them here on Hackaday. Last year we featured a number of meetups, like automated gardening in Cyprus and etching Robot PCBs in Osaka. There was also a roundup with baby guitar amps, power racing series, and Wacky Waving costume assembly. It’s truly a worldwide thing, here’s a roundup that spanned India, Austrailia, and the USA.

Take pictures, write about what goes one, and tag everything #WorldCreateDay so we have the info to report on your meetup!

Building A Portable Solar-Powered Spot Welder: Nearly Practical!

Last time, we covered storing and charging a 3000 Farad supercapacitor to build a solar-powered, portable spot welder. Since then, I’ve made some improvements to the charging circuit and gotten it running. To recap, the charger uses a DC-DC buck converter to convert a range of DC voltages down to 2.6 V. It can supply a maximum of 5 A though, and the supercapacitor will draw more than that if allowed to.

Capacitor charge current decreases with time as the capacitor charges. Source: Hyperphysics

After some failed attempts, I had solved that by passing the buck converter output through a salvaged power MOSFET. A spare NodeMCU module provided pulse width modulated output that switched the MOSFET on for controlled periods of time to limit the charging current. That was fine, but a constant-voltage charger really isn’t the right way to load up a capacitor. Because the capacitor plates build up a voltage as it charges, the current output from a constant-voltage charger is high initially, but drops to a very low rate in the end.

Continue reading “Building A Portable Solar-Powered Spot Welder: Nearly Practical!”

Reverse Engineer An X-Ray Image Sensor

If you think of a medical x-ray, it is likely that you are imagining a photographic plate as its imaging device. Clipped to your tooth by your dentist perhaps, or one of the infamous pictures of the hands of [Thomas Edison]’s assistant [Clarence Madison Dally].

As with the rest of photography, the science of x-ray imaging has benefited from digital technology, and it is now well established that your hospital x-ray is likely to be captured by an electronic imaging device. Indeed these have now been in use for so long that their first generation can even be bought by an experimenter for an affordable sum, and that is what the ever-resourceful [Lucy Fauth] with the assistance of [Jana Marie Hemsing], has done. Their Trophy DigiPan digital x-ray image sensor was theirs for around a hundred Euros, and though it’s outdated in medical terms it still has huge potential for the x-ray experimenter.

The write-up is a fascinating journey into the mechanics of an x-ray sensor, with the explanation of how earlier devices such as this one are in fact linear CCD sensors which track across the exposed area behind a scintillator layer in a similar fashion to the optical sensor in a flatbed scanner. The interface is revealed as an RS422 serial port, and the device is discovered to be a standalone unit that does not require any commands to start scanning. On power-up it sends a greyscale image, and a bit of Sigrok examination of the non-standard serial stream was able to reveal it as 12-bit data direct from the sensor. From those beginnings they progressed to an FPGA-based data processor and topped it all off with a very tidy power supply in a laser-cut box.

It’s appreciated that x-rays are a particularly hazardous medium to experiment with, and we note from their videos that they are using some form of shielding. The source is a handheld fluoroscope of the type used in sports medicine that produces a narrow beam. If you remember the discovery of an unexpected GameBoy you will be aware that medical electronics seems to be something of a speciality in those quarters, as do autonomous box carriers.

Continue reading “Reverse Engineer An X-Ray Image Sensor”