Solving Endstop Woes With A Simple Analog Filter

NoiseEndstop

You know what’s cool? Using your engineering knowledge to solve problems that you have while building something. This is exactly what [Reinis] did when his 3D printer’s endstop wasn’t working.

Many of us automatically go to a microcontroller when we run into a problem with a sensor, but often a simple analog filter will do the trick. The endstop in [Reinis’s] RepRap style 3D printer was giving off an unusual amount of noise when closed. When he hooked the endstop up to his oscilloscope, he was shocked to see how much noise there really was. In comes the low-pass filter. Unhappy with the response time of his low-pass filter, [Reinis] solved the problem using a pullup resistor. Two resistors and a capacitor was all that he needed to fix the problem. A great solution!

How have you used analog filters in your projects? Send us a tip and let us know!

3D Printed Zipper Saves The Day!

20140228_015826_preview_featured

[Amr] recently built a 3D printer and came across his first practical application for it — his jacket’s zipper broke!

What we like about this project is [Amr] goes through the entire design process to finished product in his video. He starts by showing us the failed zipper, explaining where and why it failed, and then identifies the design features he needs to keep in order to make a functional replacement. To help accomplish this he checks out the Wikipedia article on zippers which shows an excellent animation of what happens inside of the zipper.

Now confident in his knowledge of all things zipper, he begins to model his replacement using SolidWorks, which is an industry standard among 3D CAD packages — for more information on how to use SolidWorks, we’ve been covering it in our 3D Printering articles! Continue reading “3D Printed Zipper Saves The Day!”

The Stepper Driver Driver

KONICA MINOLTA DIGITAL CAMERA

The Stepstick and Pololu motor drivers are the heart of just about every Reprap electronics board, but they can go bad. The usual way of testing these things is to rig up a microcontroller on a breadboard, grab some cables, and wire something up. [Ken]’s Easy Stepper Motor Controller is a much simpler solution to the problem of testing these drivers and could, with a bit of practice, be constructed on a single-sided homebrew PCB.

The Easy Stepper Motor Controller is a very simple board with connections to a motor, a power supply, and headers for a single Pololu or Stepstick motor driver. Two buttons and a pot control the rotation of the motor with the help of an ATtiny10, and jumpers for up to 16x microstepping are right there on the board.

There’s a video after the break showing what this stepper motor driver driver can do. It’s not much, but if you’re just testing a driver, it’s all you need.
Continue reading “The Stepper Driver Driver”

3D Printing Metal Structures With A 6-axis Robot

robot printer

[Joris Laarman] is working on a project called the MX3D-Metal which uses an ABB industrial robot arm and a welding machine to create strong metal structures on any working surface and in any direction.

He started last year with the MX3D Resin printer, which is the exact same concept, but instead of metal, it uses a two-part epoxy that bonds instantly upon mixing. Their lab is located in Amsterdam, and they work closely with IAAC (the Institute for Advanced Architecture of Catalonia) — Autodesk provides funding for the research.

[Joris] has successfully printed complex structures using steel, stainless steel, bronze, copper, and even aluminum. Poking around their website you can find many examples of different things they have printed, including intricate matrices of multiple curved lines which end up looking more organic than mechanical. It uses mostly the same concept as the Rostock Welding robot we covered a few months ago, which is open source and fairly cheap to make at home!

Stick around for a video of both the MX3D-Metal and Resin robot printers in action!

Continue reading “3D Printing Metal Structures With A 6-axis Robot”

3D Printed RGB LED Bracelet

3dprintedrgbbraclet

[Marcus’s] 3D-printed LED bracelet has moved through a number of revisions recently, but each iteration is impressive in both simplicity and functionality. Inspired to experiment with his print of [nervoussystem’s] Diagrid Bracelet, [Marcus] took the opportunity to add some LEDs with his first build, which combined a strip of RGB LEDs, a small battery, and an Adafruit Trinket microcontroller.

A second build soon followed, which overhauled the bracelet’s design into a more solid form and managed to double the amount of LEDs by upgrading to a different strip. The bracelet is currently in its third revision, cycling through the spectrum for around 3.5 hours on a single charge. This build also sports a 3-axis accelerometer: when the wearer shakes the bracelet, the colors skip around. If shaken long enough, the bracelet will enter a dazzling flurry of color flickering. Stick around after the break for a few demonstration videos. If you want to print your own, head over to [Marcus’s] Thingiverse file.

Continue reading “3D Printed RGB LED Bracelet”

Dual Color Extruder With A Single Stepper

extruder

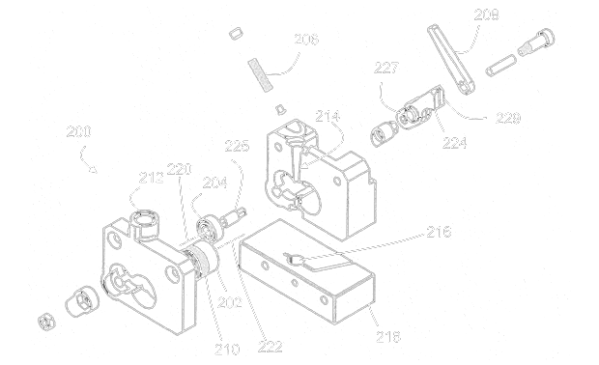
Once you have a 3D printer able to build a few objects in a single color, the next logical upgrade is a dual extruder. A dual extruder allows for multiple color prints, and by adding a dissolvable filament, the ability to print object that would otherwise be impossible. Fitting a dual extruder on an existing 3D printer presents a problem: simply by using a second stepper motor, you reduce the print area of your printer significantly. That’s the problem Dglass 3D aims to solve with their extruder. It’s a dual filament extruder that uses only one stepper motor and takes up less space than some other single filament extruders.

This isn’t the first time the guys at Dglass 3D have tried Kickstarting a dual filament extruder; last year we saw a very similar mechanism that used a single stepper motor to feed two filaments. This older model lacked retraction, though, meaning two colored prints would range somewhere between messy, inaccurate, to impossible.

The new extruder uses a servo to ‘latch’ the filament and drive it into the hot end. This means retraction of the filament is possible and from the sample prints with this extruder, the results look pretty good.

Below You’ll see a few video demos of the dual color/retraction extruder printing an object in black and white filaments at the same time. It’s very cool, and with the addition of a dissolvable filament means very complex objects can be printed very easily.

Continue reading “Dual Color Extruder With A Single Stepper”

We’re Going To The Midwest RepRap Fest

One month from now, Goshen, Indiana – deep in the land of Dairy Queens – will become one of the premier sites for RepRapping, 3D printing and everything involving open source manufacturing. It’s the 2nd annual Midwest RepRap Festival to be held March 14-16. Oh, Hackaday will also be there, cavorting around, distributing some swag, and doing some live videos and posts of the event.

Highlights of the Festival include [Prusa] giving a talk on the state of open source printing, [Sonny Monicou] discussing the challenges of his RepRap workshops, a roundtable discussion of the RepRap project, [Nicholas Seward] and his creations – the Wally, Simpson, and Lisa, along with a few folks from Lulzbot and UltiMachine. Basically, the only way to go to a bigger RepRap convention would be to visit a Maker Faire, and even that would only add a few hundred 9-year-olds astounded by printed Minecraft figurines.

If you’re willing to make the drive, there’s no fee to attend; just register, show up, and you’ll get a table for all that up-til-midnight RepRapping. There’s also a waffle breakfast on Sunday, along with me walking around makin’ it rain Hackaday stickers.