Pulse Generator Does The Job With An STM8

When working with hardware, whether a repair or a fresh build, it’s often necessary to test something. Depending on what you’re working with, this can be easy or a total pain if you can’t get the right signal to the right place. To eliminate this frustrating problem, [WilkoL] built a useful pulse generator for use in the lab.

[WilkoL] notes that historically, the job of generating pulses of varying length and frequency would be achieved with a smattering of 555 timers. While this is a perfectly cromulent way to do so, it was desired to take a different approach for the added flexibility modern hardware can offer. The pulse generator is instead built around an STM8 microcontroller; an unusual choice in this era, to be sure. [WilkoL] specified the part for its incredibly low cost, and highly capable timer hardware – perfect for the job.

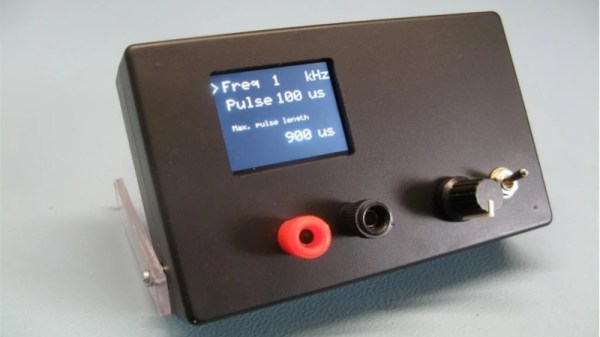
Combined with an ST7735 TFT LCD screen, and programmed in bare metal for efficiency’s sake, the final project is installed in a project box with controls for frequency and pulse length – no more, no less. Capable of pulse lengths from 250 ns to 90 s, and frequencies from 10 mHz to 2 MHz, it’s a tool that should be comfortable testing everything from servos to mechanical counters.

Of course, if you need to get down to picosecond timescales, an avalanche pulse generator might be more your speed. Video after the break.

Continue reading “Pulse Generator Does The Job With An STM8”

Eight Motors Can Sure Pump A Lot Of Water

Once upon a time, 3D printing was more of a curiosity than a powerful tool, with many printing trinkets and tchotchkes rather than anything of real use. However, over the years as technology and techniques have progressed, we now see more application-ready builds. This water pump from [Let’s Print] is a great example.

The pump consists of two major pieces – a drive unit, and an impeller. The drive unit consists of a gearbox that combines the power of eight electric motors, driving a single shaft. This is all achieved with striking yellow ABS gears in a black housing. The build video does a great job of explaining how to make the project work with different motors, and how to properly use the bolt adjuster to set the backlash on the gear train. The drive unit is then used to turn a 3D-printed impeller pump which is capable of delivering a great deal of water very quickly.

When fired up, the leaky assembly makes an awful racket and a huge mess, but sure as heck shifts a lot of water while it does so. Watching the water spray off the gears as it leaks through the bearings is a great sight, and it’s clear that the device works well. We’d love to see a cost and performance analysis of this pump versus a commercial offering.

While it’s certainly not the most rugged build, it’s a fun one that nevertheless gets the job done. We’d love to see this running a foam machine or a classic slip and slide. Video after the break.

Continue reading “Eight Motors Can Sure Pump A Lot Of Water”

Soldering Practice Kit Remains Useful After Completion

Unsatisfied with the standard fare of soldering practice kits that offer little to no purpose once they’re built, [Jim Heaney] decided to take matters into his own hands and design an easy-to-assemble kit for his class that, once put together, becomes the handiest of tools in any maker’s workbench: a functional voltmeter.

At the heart of the kit is a standard Atmega 328P microcontroller. While he could’ve picked something smaller or cheaper, not only does the bulky part make for easier soldering, [Jim] reasons that it’s a chip that’s easy to repurpose should his students want to build something like a breadboard Arduino, for example. The voltmeter has a fixed measurement range from 0 to 100 VDC, the only switches on the board are for powering it on and a hold button, which freezes the value currently being shown in the three-digit, seven-segment display.

Along with selling his kit to other makers and educators, [Jim] also hopes that his project encourages others to design similar soldering kits which favor some sort of function rather than getting binned once there’s solder on all the pads, as well as part variety and documentation. If you’re on the other end of the soldering spectrum, then why not challenge your skills soldering on a time limit?

Cheap Current Probe Gets Good Review

A current probe isn’t a very common fixture on most workbenches because they are pretty expensive. [VoltLog] looks at a fairly inexpensive current probe from Micsig. He seemed impressed with the workmanship and it looks similar to more expensive offerings. There are two models with different bandwidth numbers (800 kHz and 2 MHz). It can measure current on a 10A and 100A scale.

According to [VoltLog] comparable probes from other vendors are more expensive and have lower bandwidth. He also liked that the device powers from USB since most newer scopes will have a USB port available.

Continue reading “Cheap Current Probe Gets Good Review”

Building A Compact Reflow Oven With Halogen Lamps

Very often, particularly on the Internet, we’re fooled into thinking bigger is always better. The fact remains that this isn’t always the case. When it comes to reflow ovens, for example if you’re working with short runs of small PCBs, or if you just don’t have a lot of space in the workshop, a smaller oven will be more desirable than a large one. It’s factors like these that drove [Sergi Martínez]’s latest build.

Built inside a metal project case, first attempts involved using an off-the-shelf heating element, with poor results. The element had a high thermal inertia, and was designed for use in water, so didn’t last in the reflow application. Learning from the experience of others, [Sergi] switched to using halogen lamps, netting much greater success. An Arduino Nano is responsible for running the show, using firmware developed by [0xPIT]. There’s also a screen for monitoring reflow profiles, and a cooling fan to help keep temperature in the ideal zone.

It’s a tidy build that would be particularly useful for quickly running batches of small PCBs without the long wait times required to heat a larger oven. Energy efficiency should be better, too. Of course, if you’re a fan of the classic toaster oven builds, we’ve got those too. Video after the break.

Continue reading “Building A Compact Reflow Oven With Halogen Lamps”

In Praise Of The DT830, The Phenomenal Instrument You Probably Don’t Recognise For What It Is

If we had to make a guess at the single piece of electronic bench equipment owned by the highest proportion of Hackaday readers, it would not be a budget oscilloscope from Rigol, nor would it be a popular portable soldering iron like the TS100. Instead we’re guessing that it’s a multimeter, and not even the most accomplished one.

The DT830 is a genericised Chinese-manufactured 3.5 digit digital multimeter that can be had for an astonishingly low price. Less than a decent hamburger gets you an instantly recognisable plastic case with a chunky rotary range selector switch, and maybe a socket for some kind of transistor or component tester. Make sure that there is a 9 volt battery installed, plug in the pair of test leads, and you’re in business for almost any day-to-day electrical or electronic measurement. They’ve been available in one form or another for decades and have been the subject of innumerable give-aways and loss-leader offers, so it’s a reasonsble guess that you’ll have one somewhere. I have three as far as I know, they make great on-the-go instruments and have proved themselves surprisingly reliable for what they are. Continue reading “In Praise Of The DT830, The Phenomenal Instrument You Probably Don’t Recognise For What It Is”

How To Create Hermetically Sealed Electrical Connections

[Eric Strebel] is no stranger to pressure and vaccum tanks, regularly using them for all manner of resin casting jobs for his product design business. However, sometimes it becomes necessary to run equipment within a pressure tank, such as for rotomoulding or other similar jobs. In order to get power into a tank under pressure, [Eric] built a special plug with a hermetic seal to do the job. (Video, embedded below.)

The build starts with a large metal plug which screws into the pressure vessel, into which a square recess is machined. For the electrical passthrough, [Eric] selected GX-16 aviation connectors, in this case packing six conductors. The connectors are hooked up back-to-back through the hole in the metal tank plug, using bare copper wire. This is to avoid insulation on wires acting as a channel for gases to pass through. With the connectors wired up and an acrylic disc in place to stop overflow, the metal plug is filled with resin to create the hermetic seal.

Results are good, with the connectors functioning electrically and the resin acting as a perfect seal. There’s a small risk of short circuit with the exposed copper conductors, but [Eric] is exploring some easy solutions to avoid issues. We’ve seen his work before, too – like this great discussion on cardboard as a design tool. Video after the break.

Continue reading “How To Create Hermetically Sealed Electrical Connections”