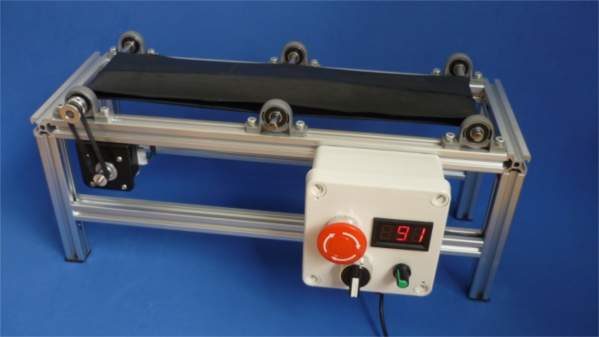
Waiting For A Letter? This IoT Mailbox Will Tell You Exactly When It Arrives.

If you’re waiting for a much sought-after letter, checking your mailbox every five minutes can be a roller-coaster of emotion — not to mention time-consuming. If you fall into this trap, Hackaday.io user [CuriosityGym] as whipped up a mailbox that will send off an email once the snail-mail arrives.

The project uses an Arduino Uno, an ESP 8266 wifi module, and an idIoTware shield board — making specific use of its RGB LED and light dependent resistor(LDR). Configuring the RGB LED on the idIoTware board to a steady white light sets the baseline for the LDR, and when a letter is dropped in the box, the change in brightness is registered by the LDR, triggering the Arduino to send off the email.

Continue reading “Waiting For A Letter? This IoT Mailbox Will Tell You Exactly When It Arrives.”

RC receiver to arduino converter for BB-8

Ask Hackaday: How Do You Convert Negative Voltages To Positive?

I have a good background working with high voltage, which for me means over 10,000 volts, but I have many gaps when it comes to the lower voltage realm in which RC control boards and H-bridges live. When working on my first real robot, a BB-8 droid, I stumbled when designing a board to convert varying polarities from an RC receiver board into positive voltages only for an Arduino.

Today’s question is, how do you convert a negative voltage into a positive one?

In the end I came up with something that works, but I’m sure there’s a more elegant solution, and perhaps an obvious one to those more skilled in this low voltage realm. What follows is my journey to come up with this board. What I have works, but it still nibbles at my brain and I’d love to see the Hackaday community’s skill and experience applied to this simple yet perplexing design challenge.

The Problem

RC toy truck and circuit with no common

I have an RC receiver that I’ve taken from a toy truck. When it was in the truck, it controlled two DC motors: one for driving backwards and forwards, and the other for steering left and right. That means the motors are told to rotate either clockwise or counterclockwise as needed. To make a DC motor rotate in one direction you connect the two wires one way, and to make it rotate in the other direction you reverse the two wires, or you reverse the polarity. None of the output wires are common inside the RC receiver, something I discovered the hard way as you’ll see below.

Continue reading “Ask Hackaday: How Do You Convert Negative Voltages To Positive?”

Arduino With A… PIC?

Before the Arduino took over the hobby market (well, at least the 8-bit segment of it), most hackers used PIC processors. They were cheap, easy to program, had a good toolchain, and were at the heart of the Basic Stamp, which was the gateway drug for many microcontroller developers.

[AXR AMR] has been working with the Pinguino, an Arduino processor based on a PIC (granted, an 18F PIC, although you can also use a 32-bit device, too). He shows you how to build a compatible circuit on a breadboard with about a dozen parts. The PIC has built-in USB. Once you flash the right bootloader, you don’t need anything other than a USB cable to program. You can see a video of this below.

You will need a programmer to get the initial bootloader, but there’s plenty of cheap options for that. The IDE is available for Windows, Linux, and the Mac. Of course, you might wonder why you would use a PIC device instead of the more traditional Arduino devices. The answer is: it depends. Every chip has its own set of plusses and minuses from power consumption to I/O devices, to availability and price. These chips might suit you, and they might not. That’s your call.  Of course, the difference between Microchip and Atmel has gotten less lately, too.

We’ve covered Pinguino before with a dedicated board. If you never played with a Basic Stamp, you might enjoy learning more about it. If you’re looking for more power than a PIC 18F can handle, you might consider the Fubarino, a PIC32 board you can use with the Arduino IDE.

Continue reading “Arduino With A… PIC?”

A Trove Of Arcade Projects

[Ryan Bates] loves arcade games, any arcade games. Which is why you can find claw machines, coin pushers, video games, and more on his website.

We’ve covered his work before with his Venduino project. We also really enjoyed his 3D printed arcade joystick based off the design of a commercial variant. His coin pushing machine could help some us finally live our dream of getting a big win out of the most insidious gambling machine at arcades meant for children.

Speaking of frustrating gambling machines for children, he also built his own claw machine. Nothing like enabling test mode and winning a fluffy teddy bear or an Arduino!

It’s quite a large site and there’s good content hidden in nooks and crannys, so explore. He also sells kits, but it’s well balanced against a lot of open source files if you’d like to do it yourself. If you’re wondering how he gets it all done, his energy drink review might provide a clue.

ArduWorm: A Malware For Your Arduino Yun

We’ve been waiting for this one. A worm was written for the Internet-connected Arduino Yun that gets in through a memory corruption exploit in the ATmega32u4 that’s used as the serial bridge. The paper (as PDF) is a bit technical, but if you’re interested, it’s a great read. (Edit: The link went dead. Here is our local copy.)

The crux of the hack is getting the AVR to run out of RAM, which more than a few of us have done accidentally from time to time. Here, the hackers write more and more data into memory until they end up writing into the heap, where data that’s used to control the program lives. Writing a worm for the AVR isn’t as easy as it was in the 1990’s on PCs, because a lot of the code that you’d like to run is in flash, and thus immutable. However, if you know where enough functions are located in flash, you can just use what’s there. These kind of return-oriented programming (ROP) tricks were enough for the researchers to write a worm.

In the end, the worm is persistent, can spread from Yun to Yun, and can do most everything that you’d love/hate a worm to do. In security, we all know that a chain is only as strong as its weakest link, and here the attack isn’t against the OpenWRT Linux system running on the big chip, but rather against the small AVR chip playing a support role. Because the AVR is completely trusted by the Linux system, once you’ve got that, you’ve won.

Will this amount to anything in practice? Probably not. There are tons of systems out there with much more easily accessed vulnerabilities: hard-coded passwords and poor encryption protocols. Attacking all the Yuns in the world wouldn’t be worth one’s time. It’s a very cool proof of concept, and in our opinion, that’s even better.

Thanks [Dave] for the great tip!

Launitor Saves You From Accidentally Smelly Clothes

[domiflichi] is human and fallible. So he can’t be blamed for occasionally forgetting the laundry in one of the machines and coming back to a less than stellar result. However, while fallible, he is not powerless.

What if his washer/dryer could email or text him about his laundry? It seemed simple enough. Add a vibration sensor to the side of the machine along with some brains. When the load is done it will bother him until he comes down to push the button or There Will Come Soft Rains.

img_2437cropped-resized_thumbnailHe started off with an Arduino-and-ESP8226 combination and piezo sensors. The piezos had lots of shortcomings, so he switched to accelerometers and things worked much better. We really like the way he mounts them to the side of the washer dryer using the PCB’s mounting screws as angle brackets. The case is a standard project box with some snazzy orange acrylic on the front.

It took some fiddling, but these days [domiflichi]’s clothes are fresher, his cats fed, and his appliances more aware. Video of it in operation after the break.

Continue reading “Launitor Saves You From Accidentally Smelly Clothes”

1MHz, 2 Boards, 4 Bits And A Homebrew CPU

[Agp.cooper] saw a vintage 4Kx4 bit RAM chip and decided that it needed a CPU design to match. The TTL design fits on two boards and has a functional front panel.

This custom CPU project has a few interesting bits worth noting. First, it is small enough that you can wrap your head around it pretty easily. And [Agp.cooper] gives  a good account of the instructions set architecture choices he considered and why he settled on the final design.

Continue reading “1MHz, 2 Boards, 4 Bits And A Homebrew CPU”