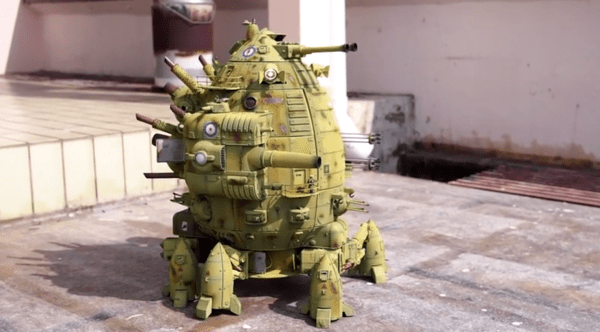
Take A Spin On This Voice-Controlled 3D Scanning Rig

[Aldric Negrier] wanted to make 3D-scanning a person streamlined and simple. To that end, he created this voice-controlled 3D-scanning rig.

[Aldric] used a variety of hacking skills to make this project, and his thorough Instructable illustrates this nicely. Everything from CNC milling to Arduino programming to 3D-printing was incorporated into the making of this rig. Plywood was used to construct the base and the large toothed gear. A 12″ Lazy Susan bearing was attached to this gear to allow smooth rotation. In order to automate the rig, a 12V DC geared motor was attached to a smaller 3D-printed gear and positioned on the base. When the motor is on, the smaller gear’s teeth take the larger gear for a spin. He used a custom dual H-bridge motor driver made by a friend, which is connected to an Arduino Nano. The Nano is also connected to a Bluetooth module and an ultrasonic range finder. When an object within 1-35cm is detected on the rig for 3 seconds, the motor starts to spin, stopping when the object is no longer detected. A typical scan takes about 60 seconds.

This alone would have been a great project, but [Aldric] did not stop there. He wanted to be able to step on the rig and issue commands while being scanned. It makes sense if you want to scan yourself – get on the rig, assume the desired position, and then initiate the scan. He used the Windows speech recognition SDK to develop an application that issues commands via Bluetooth to Skanect, a 3D-scanning software. The commands are as simple as saying “Start Skanect.” You can also tell the motor to switch on or off and change its speed or direction without breaking form. [Aldric] used an Asus Xtion for a 3D-scanner, but a Kinect will also work. Afterwards, he smoothed his scans using MeshMixer, a program featured in previous hacks.

Check out the videos of the rig after the break. Voice commands are difficult to hear due to the background music in one of the videos, but if you listen carefully, you can hear them. You can also see more of [Aldric’s] projects here or on this YouTube channel.

Continue reading “Take A Spin On This Voice-Controlled 3D Scanning Rig”

SXSW Create: Sparkfun Gives Kids Awesome Badges To Hack

By far the most desirable booth for the crowds at SXSW Create was the Sparkfun quadrant. We call it a quadrant because they had a huge footprint approaching 1/4 the tented area, but it was well used. They brought a number of staff down to Austin in order to give away a legit electronic badge project they call BadgerHack.

sxsw-sparkfun-badgerhack-kit-thumbWe love badge hacking. LOVE IT! But South-by isn’t purely a hardware conference so the badges aren’t made of PCBs (for shame). Add to that, free entry to Create scores you a wristband but no badge.

This is the answer to that, a badge giveaway and build-off aimed at kids but cool enough to make me feel only slightly awful for accepting one when I pretty much knew they were going to run out before the final day was done.

The USB stick PCB is, as you guessed it, an Arduino compatible loaded up with an FTDI chip and an ATmega328p which they call the BadgerStick. Accompanying this is a multiplexed 8×7 LED matrix board. Solder the three pin headers and the battery holder leads, connect to the plastic badge using the supplied double-stick tape, and you have a badge that scrolls a message in LEDs.

DSC_0508What an awesome giveaway. I really like it that they didn’t cut corners here. First off, the kids will value the badge much more because they had to actually assemble it rather than just being handed a finished widget. Secondly, there is the USB to serial chip and USB footprint that means they can reprogram it without any extra equipment. And an LED matrix… come on that’s just a gateway drug to learning Wiring. Bravo Sparkfun and Atmel for going this route with your marketing bucks.

The badge activity rounded out with some hardware interfacing. There’s a 3-pin socket that attendees could plug into 4 different stations around the booth. Once done they received a coupon code for Sparkfun that scrolls whenever the badge is booted up. For some at-home fun, the writeup (linked at the top) for the BadgerHack firmware is quite good. It offers advice on changing what is displayed on the badge and outlines how to build a game of Breakout with just a bit of added hardware.

Orbit Kinetic Sculpture

A Motor, An Arduino And A Whole Bunch Of Laser Cutting

[Guido] was recently commissioned to build a kinetic sculpture for a client who wanted something unique. What he came up with is really awesome.

It’s called ORBIS: The Wooden Kinetic & Lighting Sculpture. It mounts to the wall and provides a focal point for the room – a bright flashy spinning one at that! Does it just stay there and do random things? Nope, of course not! [Guido] built it with a unique control box, two Arduino 2560’s and an Xbee to communicate between them.

Orbit Kinetic Sculpture

He was told to design it using old and new technologies so he’s got a rotary phone dial on the side of the box which allows the user to change through the different modes.

Switches on top also let you change the color of the sculpture and the speed at which it moves around. Since it’s wireless it can be easily set on the coffee table and become an instant conversation starter.

See it in action after the break.

Continue reading “A Motor, An Arduino And A Whole Bunch Of Laser Cutting”

IoT Chameleon Lamp Does It With Python

If this Internet of Things thing is gonna leave the launchpad, it will need the help of practical and semi-practical project ideas for smartifying everyday items. Part of getting those projects off the ground is overcoming the language barrier between humans that want to easily prototype complex ideas and hardware that wants specific instructions. A company called Things on Internet [TOI] has created a system called VIPER to easily program any Spark Core, UDOO or Arduino Due with Python by creating a virtual machine on the board.

The suite includes a shield, an IDE, and the app. By modifying a simple goose neck IKEA lamp, [TOI] demonstrates VIPER (Viper Is Python Embedded in Realtime). They opened the lamp and added an 24-LED Adafruit NeoPixel ring, which can be controlled remotely by smartphone using the VIPER app. To demonstrate the capacitive sensing capabilities of the VIPER shield, they lined the head of the lamp with foil. This code example will change the NeoPixels to a random color each time the button is pressed in the app.

Check out the lamp demonstration after the break and stay for the RC car.

Continue reading “IoT Chameleon Lamp Does It With Python”

chess robot

Lonely? Build Yourself A Chess Robot!

[Oriol Galceran] has constructed an interesting robotic chess player for his end of school project. It’s called the ChessM8, and is an impressive feat considering [Oriol] is only 17!  He’s using an Arduino Mega that connects to the host PC via a Python script.

The AI can be any chess engine that uses the Universal Chess Interface protocol, which [Oriol] points out that most of them do.  We’ve seen other chess robots here before, along with others that you can play on your wall and uses Nixie Tubes. But [Oriol’s] build is the largest of them all.

He says there’s a network of REED switches under the chess board to detect when a piece is present or not. It would be interesting to know how he dealt with debouncing issues, and if Hall Effect sensors might have been a better choice. Let us know in the comments how you would detect the chess piece.

And be sure to check out the video below to see the chess robot in action.

Continue reading “Lonely? Build Yourself A Chess Robot!”

Psimax CS40 Control Panel for Kerbal Space Program

Rocket Controls Fit For A Kerbal

Kerbal Space Program is a space simulation game. You design spacecraft for a fictional race called Kerbals, then blast those brave Kerbals into space. Sometimes they don’t make it home.

If controlling spacecraft with your WASD keys isn’t immersive enough for you, [marzubus] has created a fully featured KSP control console. It sports a joystick, multiple displays, and an array of buttons and switches for all your flight control needs. The console was built using a modular approach, so different controls can be swapped in and out as needed.

Under the hood, three Arduinos provide the interface between the game and the controls. One Arduino Mega runs HoodLoader2 to provide joystick data over HID. A second Mega uses KSPSerialIO to communicate with the game over a standard COM port interface. Finally, a Due interfaces with the displays, which provide information on the current status of your spacecraft.

All of the parts are housed in an off the shelf enclosure, which has a certain Apollo Mission Control feel to it. All [marzubus] needs now is a white vest with a Kerbal badge on it.

Arduino V Arduino: Part II

Since our last article covering the Arduino v. Arduino case, we’ve received a couple of tips, done some more digging, and learned a lot more about what’s going on. We thought it was time to share the story with you as it develops.

The Players

In short, there are two companies calling themselves “Arduino” at the moment. One, Arduino LLC was founded by [Massimo Banzi], [David Cuartielles], [David Mellis], [Tom Igoe] and [Gianluca Martino] in 2009, runs the website arduino.cc, and has been directing and releasing the code that makes it all work. Most of these folks had been working together on what would become the Arduino project since as early as 2005.

The other “Arduino” used to be called Smart Projects and was the manufacturing arm of the project founded and run by [Gianluca Martino]. Smart Projects changed their name to Arduino SRL in November 2014. (A “Società a responsabilità limitata” is one form of Italian limited-liability company.) They have been a major producer of Arduino boards from the very beginning and recently registered the domain arduino.org.

Around the time of the name change [Martino] sold his shares to a Swiss firm Gheo SA and [Federico Musto] was appointed CEO. Gheo SA is owned and directed by [Musto], who also runs a design consultancy based in the US and Taiwan called dog hunter, LLC.

dog hunter and [Musto] helped develop the Arduino Yun, a mashup of an Arduino with an OpenWRT-compatible WiFi router. dog hunter also runs the Linino.org website to support the Linux distribution that’s running on the router part of the Yun.

In short, on one side is Arduino LLC, run by the original Arduino Five and hosting arduino.cc. On the other is now called Arduino SRL, run by a former co-developer [Federico Musto] who bought out the largest producer of Arduino boards and opened up arduino.org.

Continue reading “Arduino V Arduino: Part II”