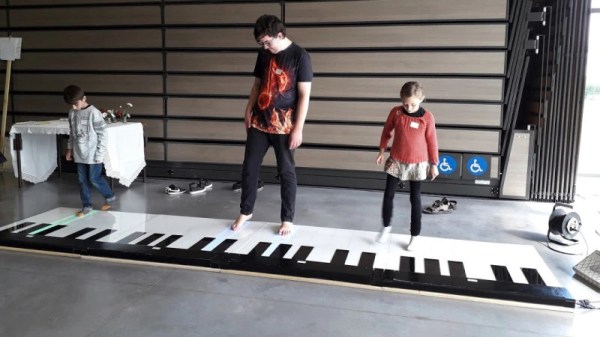
Arduboy Gets Even Smaller With New Nano Edition

One of the selling points of the Arduboy is how slim [Kevin Bates] was able to get the Arduino-compatible game system, which is perhaps less surprising when you realize that it originally started out as a design for an electronic business card. But compared to the recently unveiled Nano version, it might as well be the old school “brick” Game Boy.

Now to be clear, [Kevin] isn’t looking to put these into official production. Though it does sound like the bare PCBs might be going up for sale in the near future. This was simply an experiment to see how far he could shrink the core Arduboy hardware while still keeping it not only playable but also code-compatible with the full-size version. While “playable” might be a tad subjective in this case, the video after the break clearly demonstrates that it’s fully functional.

Inside the 3D printed case is the same ATmega32U4 that powers the Arduboy, a 64×32 0.49″ OLED display, and a tiny 25 mAh pouch battery. There’s even a miniature piezo speaker for the bleeps and bloops. All of the pinouts have remained the same so existing code can be moved right over, though the screen is now connected over I2C. [Kevin] has released the schematics for the board in keeping with the general open nature of the Arduboy project, though for now he’s decided to hold onto the board files until it’s clear whether or not there’s a commercial future for the Nano.

We’ve seen attempts to shrink the Arduboy down before, most notably down to the point it could fit inside of a Dreamcast Visual Memory Unit, but the Nano certainly raises (or is that lowers?) the bar considerably.

Continue reading “Arduboy Gets Even Smaller With New Nano Edition”

Zoom Out Of The Classroom With A Mushroom Button

Considering the state of well, everything, we can’t tell you how glad we are to be out of school. That goes double for not being a teacher these days. [Elena] had some awesome light-up tactile buttons set aside for a killer Kerbal Space Program controller, but it’s funny how a pandemic will change your priorities. Instead, those buttons found a good home in this colorful and enticing Zoom control panel.

[Elena]’s ready pile of Arduinos yielded no Leonardos or Pro Micros, but that’s okay because there’s a handy bootloader out there that allows you to reprogram the USB interface chip of an Uno or a Mega and use it as a keyboard. After setting that up, it was mostly a matter of wiring all those latching and momentary buttons and LEDs to the Mega and making them look fantastic with a set of icons. (We all know the big red mushroom button is for aborting the call; so does it really need an icon?)

[Elena] was inspired by the Zoom call-terminating pull chain we saw a month or so ago as well as the pink control box that launched a thousand or so macro keyboards. Have you made your own sanity-saving solution for our times? Let us know!

Transmit Your Gaze To This Fiber Optic LED Lamp

Call us easily amused, but we think it’s pretty amazing what can be done with a microcontroller, some RGB LEDs, and a little bit of plastic. Case in point is [andrei.erdei]’s beautiful and quite approachable fiber optic LED lamp. It’s a desktop-friendly version of a similar piece [andrei] made that is roughly nine times the size of this one and hangs on the wall. The build may be simple, but the product is intricately lovely.

We really like the visual density of this lamp — it’s just the right amount of tubes and strikes a balance between being too sparse and too chaotic. As you might expect, there’s an Arduino and some RGB LED strips involved. But the key to this build is in the 16 pieces of side-glow plastic fiber optic tubing. Side-glow is designed to let light escape along the length of the tube as opposed to end-glow, which is made to minimize light loss from one end to the other like a data pipe. This allows for all sorts of fun effects, and you can watch [andrei.erdei] go slowly and soothingly through the different colors and modes in the demo video after the break. Make sure you watch long enough to see the tubes move like the old Windows 3D pipes screensaver

Already have too many knickknacks and wall hangings? You’re missing out on prime real estate — the ceiling. Check out this fiber optic ceiling installation that reacts to music.

Continue reading “Transmit Your Gaze To This Fiber Optic LED Lamp”

Upgrading An Old MIG Welder Wire Feeder With Arduino

Older industrial equipment is often a great option if you’re on a budget, and you might even be able to add some premium features yourself. [Brett] from [Theoretically Practical] has done with his old MIG welder, adding premium control features with the help of an Arduino.

The main features [Brett] were after is pre-flow, post-flow, and a spot welding timer. Pre-flow starts the flow of shielding gas a moment before energizing the filler wire, while post-flow keeps the gas going after the weld is complete. This reduces the chances of oxygen contaminating the welds. A spot welding timer automatically limits welding time, enabling consistent and repeatable spot welds.

The Miller S-22A wire feeder can have these features, but it requires an expensive and difficult to find control unit. All it does is time the activation of the relays that control the gas flow, power, and wire feeder, so [Brett] decided to use an Arduino instead. The welders control circuit runs at 24V, so an optoisolator receives the trigger signal, and relays are used for outputs. Potentiometers were added to the original control panel, and all the wiring was neatly fitted behind it. The upgrade worked perfectly and allowed [Brett] to increase the quality of his welds. See the video after the break for the full details.

Inverter welders can be picked up for ridiculously cheap prices, if you’re willing to live with the trade-offs. We’ve also seen some other DIY welder upgrades, on small and large machines.

Electronic Embroidery Birthday Card Is A Celebration Of Skills

Hackers and makers can sometimes feel like they’re getting the short end of the stick when it comes to gift giving. You’re out there making thoughtful, intricate circuit sculptures, helpful software, or face masks for people, and what do you get in return? Okay, yes, usually gift cards or tools or other things that feed your creativity in the first place. But darn it, it would be nice to receive a handmade gift once in a while, right?

So here’s what you do: make friends with enough other makers that you find your birthday twin, or close enough that you both feel the warmth of the personal holiday you share. Then you get them to agree to trade handmade birthday presents with you. That’s more or less what happened between [Becky Stern] and [Estefannie], who seem to have found each other through the magic of sharing projects on YouTube.

[Becky]’s gift to [Estefannie] is a busy intersection of maker elements including graphic design, embroidery, electronics, and 3D printing. [Becky] started with the embroidery, which was made possible thanks to a new open-source library for Processing called PEmbroider. Once that was done, she 3D printed the frame and added the electronics — candle flicker LEDs for the birthday cake, and a handful of songs that are accessible via touch contacts screwed into the side of the frame. [Becky] added a real-time clock module so it plays a few extra songs on [Estefannie]’s actual birthday.

The most thoughtful element here is personalization, and it’s amazing what can happen when you put 100% of yourself into something that is 100% about someone else. Every bit of the art is personal to [Estefannie], and every atom of the build is pure [Becky]. Check out the demo and build video and see what [Estefannie] made for [Becky] after the break.

[Becky]’s varied creativity has graced these pages many times before. See how she bid adieu to 2020, built a daily affirmation mirror, and gave a mask-making masterclass in the early stages of the pandemic.

Continue reading “Electronic Embroidery Birthday Card Is A Celebration Of Skills”

Master Video Call Control Panel Is Made Of PCBs

[memestra] is a teacher whose life has become a series of videoconferences over the last year or so. With all the classes and meetings, they spend the whole day switching between either Zoom, Teams, or Meet. If anyone needs a single piece of hardware to control them all, it’s [memestra]. Well, and every other teacher out there.

The hardware — an Arduino Pro Micro and some buttons — should come as no surprise, except for maybe [memstra]’s use of a resistor network for the LEDs. Still, there’s a lot to like about this little box, starting with the enclosure. That’s not milled or laser-cut metal — each side is a PCB, and they’re all soldered together into a box.

We especially like the top panel, which fits down over the PCB that all the components are soldered to. Each of the non-volume buttons has multiple functions that are accessed by pressing, long pressing, or double pressing. But even the volume buttons do double duty: press them together to mute and un-mute. If [memestra] ever forgets which button does what and how, there’s a handy reference table silkscreened on the bottom panel.

In true teacher fashion, [memestra] has written comprehensive instructions for anyone looking to build a similar device. The heavily-commented code should make it a cinch to drop in keyboard shortcuts for Discord or anything else you might be using, though it’s worth noting that this box is optimized for the desktop apps and not the browser-based versions.

Just looking for a fun way to end video calls? Pull chains are pretty fun.

LED Hourglass Moves Like The Real Thing

If you want to waste time in a meaningful way, get yourself an hourglass. It’s simultaneously mesmerizing and terrifying to sit there and watch the seconds slip through the threshold that separates possibility from missed opportunity.

[Ty and Gig]’s LED hourglass is equally beautiful to watch. It doesn’t actually tell time, but that’s perfectly fine by us. What it does do is animate the LEDs to approximate grains of sand in gravity, no matter how the hourglass is tilted.

In either vertical orientation, the sand falls as long as there is some in the top. When the hourglass is horizontal, the LEDs settle just like real sand does. [Ty and Gig] achieved this with a whole lot of code that breaks the animation frames into structure arrays.

By contrast, the hardware part of this build is fairly simple: all that’s needed to replicate this build is some RGB LEDs a beefy power supply to drive them, an accelerometer, and a microcontroller.

[Ty and Gig] were planning to use an ESP8266, but misplaced it and went with an Arduino Mega instead. (You know what they say — buy a replacement and the one you lost will turn up almost immediately.) The beautiful frame is made from leftover purpleheart, a hardwood that turns purple with exposure to air. Check out the build video after the break.

Too lazy to reset your hourglass every hour? Here’s one that flips itself.

Continue reading “LED Hourglass Moves Like The Real Thing”