Software Shortcut Keyboard Registers Many Macros

[FabroLabs Technologies] is an industrial designer who uses several creative-type software programs in a given day. Unfortunately, they all have slightly different shortcut schemes, and trying to remember all the different modifiers is a waste of time better spent elsewhere.

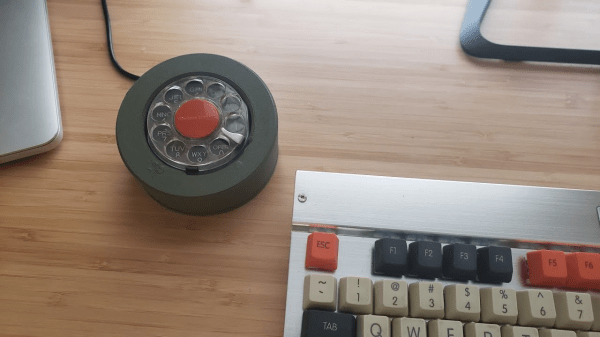
This lovely little macro keyboard is every bit as useful as it is cool looking. Spinning the rotary encoder cycles through a menu of programs on the 16×2 LCD, and the key map just updates automatically for the chosen program. At the heart of this build is an Arduino Pro Micro and 20 of the loudest key switches ever made — Cherry MX blues. We like that it manages to look like toy cash register and a serious peripheral all at once — it probably has something to do with those way-cool circular keycaps that were made on a resin printer.

We’re glad that [FabroLabs] laid down such a comprehensive and open build guide during the process of making this macro keyboard. The average hacker can learn a lot from industrial designers who show their work. Remember the time [Eric Strebel] showed us all how to improve our foam board design game?

Pulse Visualizer Is A Real Work Of Heart

Some projects are all-around simple, such as the lemon battery or the potato clock. Other projects are rooted in simple ideas, but their design and execution elevates them to another level. [Sharathnaik]’s heart visualizer may not be all that electronically complex, but the execution is pulse-pounding.

The closest that most of us will get to seeing our own heartbeat is watching the skin twitch in our neck or wrist. You know that your heart doing the work of keeping you alive, but it’s hard to appreciate how it exerts itself. With just a few components and printed parts, the heart’s pumping action comes to life as your pulse drives single-x scissor mechanisms to push and pull the plastic plates.

This heart visualizer isn’t nearly as complex as the organ it models, and it’s an easy build for anyone just starting out in electronics. Put your finger on the heart rate sensor in the base, and an Arduino Nano actuates a single servo to your own personal beat. We’d love to see it work overtime while someone gets worked up. For now, there’s an even-tempered demo after the break, followed by an assembly video.

Heartbeat sensing can be romantic, too. Here’s a lovely circuit sculpture that runs at the rate of the receiver.

Continue reading “Pulse Visualizer Is A Real Work Of Heart”

Robot Arm Sucks In A Good Way

Building a robot arm is fun, but no longer the challenge it once was. You can find lots of plans and kits, and driving the motors is a solved problem. However, there is always one decision you have to make that can be a challenge: what effector to put on the end of it. If you are [MertArduino] the answer is to put suction at the end. If you need to grab the right things, this could be just the ticket for reliably lifting and letting go. You can see a video of the arm in action, below.

The arm itself is steel with four servo motors and comes in a kit. The video shows the arm making a sandwich under manual control. We suspect he might have put it under Arduino control but there’s no sudo for making sandwiches.

Continue reading “Robot Arm Sucks In A Good Way”

Seven-Segment Single-Steps Through The Time

Have you ever looked at the time, and then had to look again because it just didn’t register? This phenomenon seems more prevalent with phone timepieces, but it’s been known to happen with standard wall clocks, too. This latest offering in a stream of unusual clocks fashioned by [mircemk] solves that problem by forcing the viewer to pay attention as the time flashes by in a series of single digits, separated by a hyphen.

Inside the boxy blue base is an Arduino Nano, a DS3231 real-time clock module, and a perfboard full of transistors for switching the LED strips inside the segments. There’s an LED on the front that blinks the seconds, and honestly, we’re kind of on the fence about this part. It would be nice if it faded in and out, or was otherwise a little less distracting, but it did grow on us as we watched the demo.

We love the way this clock celebrates the seven-segment display, and only wish it were much bigger. The STLs and code are available if you want to make one, though they only cover the 7-segment part — the base is made of foam board. Check out the demo and build video after the break.

Would you rather hear the time go by in gentle chimes? Here’s chime clock that uses old hard drive actuators.

Continue reading “Seven-Segment Single-Steps Through The Time”

Ultrasonic Sensor Helps You Enforce Social Distancing

If you’re going outside (only for essential grocery runs, we hope) and you’re having trouble measuring the whole six feet apart from other people deal by eye, then [Guido Bonelli] has a solution for you. With a standard old HC-SR04 ultrasonic sensor, an audio module and a servo to drive a custom gauge needle he’s made a device which can warn people around you if they’re too close for comfort.

As simple as this project may sound like for anyone who has a bunch of these little Arduino-compatible modules lying around and has probably made something similar to this in their spare time, there’s one key component that gives it an extra bit of polish. [Guido] found out how intermittent the reliability of the ultrasonic sensor was and came up with a clever way to smooth out its output in order to get more accurate readings from it, using a bubble sort algorithm with a twist. Thirteen data points are collected from the sensor, then they are sorted in order to find a temporal middle point, and the three data points at the center of that sort get averaged into the final output. Maybe not necessarily something with scientific accuracy, but exactly the kind of workaround we expect around these parts!

Projects like these to help us enforce measures to slow the spread of the virus are probably a good bet to keep ourselves busy tinkering in our labs, like these sunglasses which help you remember not to touch your face. Make sure to check out this one in action after the break!

Continue reading “Ultrasonic Sensor Helps You Enforce Social Distancing”

From The MacGyver Files: Using A Stepper Motor As An Encoder

It isn’t hard to imagine a scenario where you are stuck at home all day with nothing to do and certain items are in short supply. Sure, bathroom tissue gets all the press, but try buying some flour or a freezer and see how far you get. Plus online shopping has given up on next day delivery for the duration. Not hard to imagine at all. Now suppose your latest self-quarantine project needs a rotary shaft encoder. Not having one, what do you do? If you are [Tech Build] you go all MacGyver on an old printer and pull out a stepper motor.

How does a stepper motor turn into an encoder? Well, that’s the MacGyver part. We are not big fans of the physical circuit diagrams, but it looks like [Tech Build] borrowed (with credit) from an earlier post and that one has a proper schematic.

Continue reading “From The MacGyver Files: Using A Stepper Motor As An Encoder”

Simon Says, But With Servos

How much easier would life be if you could just grab hold of whatever mechanism you wanted to manipulate, move it like you want, and then have it imitate your movements exactly? What if you could give a servo MIDI-like commands that tell it to move to a certain location for a specific duration? Wonder no more, because [peterbiglab] has big-brained the idea into fruition.

With just one wire, an Arduino, and some really neat code, [peter] can get this servo to do whatever he wants. First he tells the Arduino the desired duration in frames per second. Then he grabs the horn and moves it around however he wants — it can even handle different speeds. The servo records and then mimics the movements just as they were made.

The whole operation is way simpler than you might think. As [peterbiglab] demonstrates in the video after the break, the servo knows its position thanks to an internal potentiometer on the motor’s rotor. If you locate the pot output pin on the control board and run a wire from there into an Arduino, you can use that information to calibrate and control the servo’s position pretty easily. There are a ton of possibilities for this kind of control. What would you do with it? Let us know in the comments.

If you want to try this with a bunch of servos at once, might as well build yourself a little testing console.

Continue reading “Simon Says, But With Servos”