Home Safety Monitoring With IoT

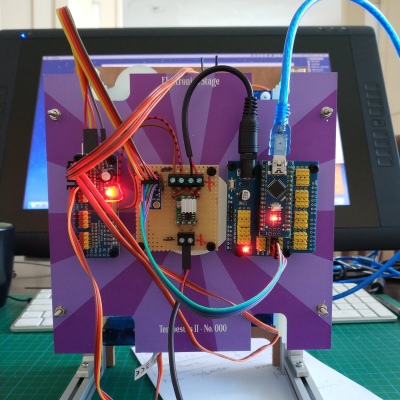
Home automation is a popular project to undertake but its complexity can quickly become daunting, especially if you go further than controlling a few lights (or if you’re a renter). To test the waters you may want to start with something like this home safety monitor, which is an IoT device based on an Arduino. It allows remote monitoring of a home for things such as temperature, toxic gasses, light, and other variables, which is valuable even if you don’t need or want to control anything.

The device is built around an Arduino Nano 33 IOT which has WiFi and Bluetooth capabilities as well as some integrated security features. This build features a number of sensors including pressure/humidity, a gas/smoke detector, and a light sensor. To report all of the information it gathers around the home, an interface with Ubidots is configured to allow easy (and secure) access to the data gathered by the device.

The PCB and code for the project are all provided on the project page, and there are a number of other options available if Ubidots isn’t your preferred method of interfacing with the Internet of Things. You might even give Mozilla’s WebThings a shot if you’re so inclined.

A Simple App Controlled Door Lock

[Adnan.R.Khan] had a sliding door latch plus an Arduino, and hacked together this cool but simple app controlled door lock.

Mechanically the lock consists of a Solarbotics GM3 motor, some Meccano, and a servo arm. A string is tied between two pulleys and looped around the slide of a barrel latch. When the motor moves back and forth it’s enough to slide the lock in and out. Electronically an Arduino and a Bluetooth module provide the electronics. The system runs from a 9V battery, and we’re interested to know whether there were any tricks pulled to make the battery last.

The system’s software is a simple program built in MIT App Inventor. Still, it’s pretty cool that you can get functionally close to a production product with parts that are very much lying around. It also makes us think of maybe keeping our childhood Meccano sets a little closer to the bench!

New Part Day: Arduino Goes Pro With The Portenta H7

The Consumer Electronics Show in Las Vegas is traditionally where the big names in tech show off their upcoming products, and the 2020 show was no different. There were new smartphones, TVs, and home automation devices from all the usual suspects. Even a few electric vehicles snuck in there. But mixed in among flashy presentations from the electronics giants was a considerably more restrained announcement from a company near and dear to the readers of Hackaday: Arduino is going pro.

While Arduino has been focused on the DIY and educational market since their inception, the newly unveiled Portenta H7 is designed for professional users who want to rapidly develop robust hardware suitable for industrial applications. With built-in wireless hardware and the ability to run Python and JavaScript out of the box, the powerful dual-core board comes with a similarly professional price tag; currently for preorder at $99 USD a pop, the Portenta is priced well outside of the company’s traditional DIY and educational markets. With increased competition from other low-cost microcontrollers, it seems that Arduino is looking to expand out of its comfort zone and find new revenue streams.

Continue reading “New Part Day: Arduino Goes Pro With The Portenta H7”

Active Suspension R/C Car Really Rocks

When you’re a kid, remote control cars are totally awesome. Even if you can’t go anywhere by yourself, it’s much easier to imagine a nice getaway from the daily grind of elementary school if you have some wheels. And yeah, R/C cars are still awesome once you’re an adult, but actual car-driving experience will probably make you yearn for more realism.

What could be more realistic and fun than an active suspension? Plenty of adults will never get the chance to hit the switches in real car, but after a year of hard work, [snoopybg] is ready to go front and back, side to side, and even drift in this super scale ’63 Oldsmobile Dynamic 88 wagon. We think you’ll agree that [snoopybg] didn’t miss a detail — this thing makes engine noises, and there are LEDs in the dual exhaust pipes to simulate flames.

An Arduino reads data from a triple-axis accelerometer in real time, and adjusts a servo on each wheel accordingly, also in real time, to mimic a real car throwing its weight around on a real suspension system. If that weren’t cool enough, most of the car is printed, including the tires. [snoopybg] started with a drift car chassis, but even that has been hacked and drilled out as needed.

There are a ton of nice pictures on [snoopybg]’s site if you want to see what’s under the hood. We don’t see the code anywhere, but [snoopybg] seems quite open to publishing more details if there is interest out there. Strap yourself in and hold on tight, because we’re gonna take this baby for a spin after the break.

If this is all seems a bit much for you, but you’ve got that R/C itch again, there’s a lot to be said for upgrading the electronics in a stock R/C car.

Continue reading “Active Suspension R/C Car Really Rocks”

Plucky Kalimba Plays Itself

[Gurpreet] fell in love with the peaceful, floaty theme from the Avatar series and bought a kalimba so he could hear it resonate through his fingertips. He soon realized that although it’s nice to play the kalimba, it would be a lot cooler if it played itself. Then he could relax and enjoy the music without wearing out his thumbs.

After doing a bit of experimentation with printing tine-plucking extensions for the servo horns, [Gurpreet] decided to start the design process by mounting the servos on a printed base. The servos are slotted into place by their mounting tabs and secured with hot glue. We think this was a good choice — it’s functional and it looks cool, like a heat sink.

[Gurpreet]’s future plans include more servos to pluck the rest of the tines, and figuring out how feed it MIDI and play it real time. For the demo after the break, [Gurpreet] says he lapel mic’d the kalimba from the back and cut out the servo noise with Audacity, but ultimately wants to figure out how to quiet them directly. He’s going to try lubing the gears and making a sound-dampening enclosure with foam, but if you have any other ideas, let him know down below.

We don’t see too many kalimba projects around here, but here’s one connected to a Teensy-based looper.

Continue reading “Plucky Kalimba Plays Itself”

An Arduino-Based Flute Playing Machine

It’s one thing to be able to transcribe music from a flute, and it’s another to be able to make a flute play pre-written music. The latter is what [Abhilash Patel] decided to pursue in the flute player machine, an Arduino-based project that uses an air flow mechanism and PVC pipes to control the notes produced by a makeshift flute. It’s currently able to play 17 notes, just over two octaves starting from the lowest frequency of E.

In order to play songs, the tones have to either be directly coded and uploaded to the Arduino, composed with a random note generator, or detected from a microphone. While a real flute can be used for the machine, [Patel] uses a PVC flute, constructed with some knowledge of flute playing.

The resonant frequency is based on the effective length, hole sizes, and pipe diameter, so it is fairly difficult to correctly tune a homemade flute. Nevertheless, calculating the length as c/2f where c is the speed of sound (~345 m/s) and f is the frequency of the note can help with identifying the location of the holes. [Patel] cut the PVC pipe and sealed off one end, drilling a blowing hole at 1.5 x the pipe diameter. After playing the flute, the end of the pipe was filled until the frequency exactly matched the desired note.

The hole covering uses cuttings of pipe attached to a cable connecting to a servo. The motors are isolated inside a box to keep the wires clear and area all able to be powered with 5 V. As for the software, the code is primarily used to control when the fan is blowing and which holes are covered to produce a note.

Listen to the flute play “My Heart Will Go On” from Titanic in the video below. Now the next step might just be making the flute playing machine automatically play sheet music – imagine the possibilities!

Continue reading “An Arduino-Based Flute Playing Machine”

Arduino Pedometer Counts Your Steps

There’s a trend in corporate America that has employees wear a step counter — technically a pedometer — and compete in teams to see who can get the most number of steps. We wonder how many people attach the device to an electric drill and win the competition easily. However if you want to do your own measurements, [Ashish Choudhary] has plans for making a pedometer with an Arduino. The device isn’t tiny, but as you can see in the video below it seems to work.

For the extra size, you do get some features. For one, there is a 16×2 LCD display and an ADXL335 accelerometer, and you can probably imagine some other cool features for such a device.

Continue reading “Arduino Pedometer Counts Your Steps”