Hacking Amazon Echo Show 8 3rd Gen Via UART And EMMC

Even with Amazon’s Echo Show devices running Linux in the form of the Android-derived FireOS, using them for non-Amazon approved purposes can be a chore at best. In the case of the Echo Show 8 even simple workarounds using ADB and the bootloader have been locked-down, requiring more drastic measures. Here [Vowed] over at the XDA forums shows off one such hack, involving directly tapping into the device’s eMMC.

Suffice it to say that this is not a hack for the faint of heart, with even the iFixit teardown guide for this device being rather daunting. Even after you get access to the mainboard, you still have to remove or cut open the metal can that covers the eMMC, so that you can unleash an eMMC programmer on it. It’s best to make sure to make a backup image of the original contents too, just in case you have to restore things.

With the shield out of the way you can solder fine wires to pads that connect to the eMMC to program it. You also have to solder wires to pads for the UART, though if you’re fancy you can also create a custom pogo pin adapter. With a serial connection established to the original firmware you can then enable features like ADB, and courtesy of the connected eMMC adapter it’s possible to directly alter system files to make rooting as easy as possible.

In addition to rooting the system you can also do a straight replacement of the eMMC contents, such as the demonstrated Debian installation. Even if not the most easy of mods, it’s good to see that it’s possible to repurpose these devices.

(Top image: Amazon Echo Show 8 3rd generation mainboard. Credit: iFixit, CC BY-NC-SA 3.0.)
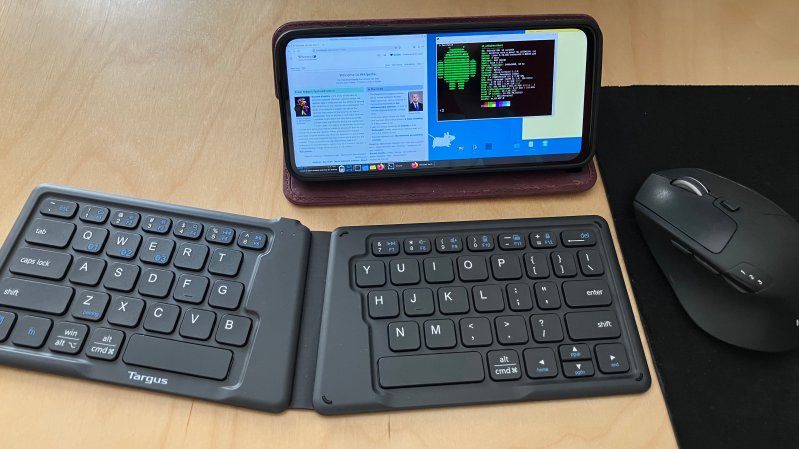
A phone running the XFCE desktop environment is placed on a desk, with a wireless keyboard in front of it.

Linux On Android Provides Inexpensive, Powerful Computing

In some parts of the world it’s common for cell service providers to sell new phones at a price significantly below market value, with the caveat that these phones are locked to that service provider alone. It’s questionable whether this practice is good for consumers, but as [Gabriel Broussard Korr] notes, it’s an opportunity for hackers: since it’s possible to run a Linux environment on these phones, they make an inexpensive source of quite powerful computing hardware.

In this case, [Gabriel] was using the Moto G Power 2024, which has 128 GB of storage, 12 GB of RAM, and costs less than $50 when carrier-locked. Rather than trying to install a mobile-oriented Linux distribution (such as postmarketOS), [Gabriel] installed Termux, a terminal emulator which provides a Linux environment within Android. Before doing this, he set up the phone and configured a number of settings for a better Linux experience. Since automatic updates can interfere with these settings, and since none of the provided settings effectively disable these, he used NetGuard to block Internet access from the updater app and from Google Play services.

The next step was to actually install Termux, as well as an X11 extension and an app which exposes an API for Termux. The desktop environment (XFCE in this case) was installed through Termux, and [Gabriel] wrote a shell script to go through the steps of starting it. XFCE worked well on mobile devices because of its full-desktop zoom capability. Even running Linux indirectly, the experience was smooth; [Gabriel] found that GIMP, Shotcut, and VS Code all performed well.

It’s not quite the same set of software, but we’ve previously featured a guide to setting up a similar Linux environment using Termux and AnLinux. Lindroid provides a similar containerized Linux environment; on the other hand, you can also use postmarketOS to make a server from an old phone.

Ask Hackaday: Do You Need A Tablet?

There’s an old saying that the happiest days of a boat owner’s life are the day they buy the boat, and the day they sell it. For me, the happiest days of an Android tablet owner’s life are the day they buy a new one, and the day they buy a newer one. For some reason, I always buy tablets with great expectations, get them set up, and then promptly lose them in a pile on my desk, not to be seen again. Then a shiny new tablet gets my attention in a year or so, and the cycle repeats.

You might be thinking that I just buy cheap junk tablets. It is true that I have. But I have also bought new Galaxy and Asus tablets with the same result. Admittedly, I have owned several Surface Laptops and Pros, and I do use them. But I can’t remember the last time I have used one without the keyboard. They aren’t really tablets — they are just laptops that can also be heavy, awkward tablets.

Continue reading “Ask Hackaday: Do You Need A Tablet?”

Simulating The AVR8 For A Browser-based Arduino Emulator

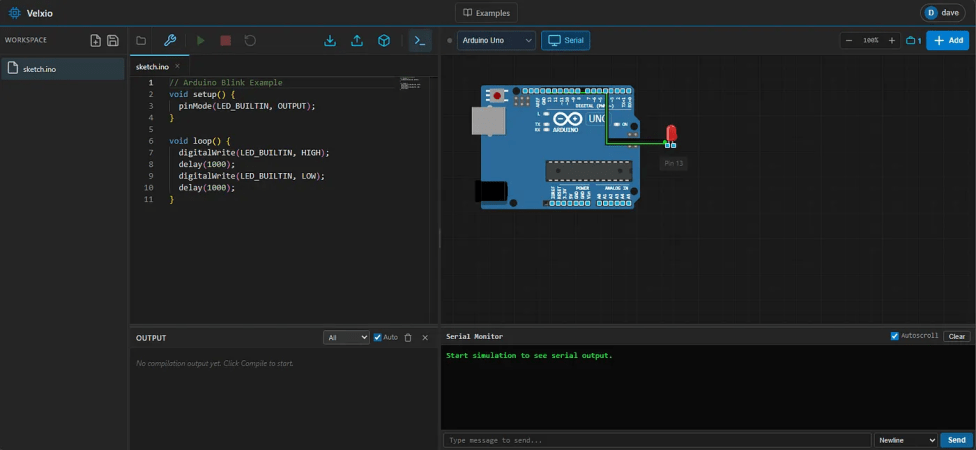
It’s always nice to simulate a project before soldering a board together. Tools like QUCS run locally and work quite well for analog circuits, but can fall short with programmable logic. Tools like Wokwi handle the programmable side quite well but may have license issues or require the cloud. The Velxio project by [David Montero Crespo] is quite an excellent example of an (online) circuit simulator with programmable logic and local execution!

It’s built largely around Wowki’s AVR8JS library for Arduino simulation. All CPU simulation occurs on the local computer, while sketch compilation happens on the backend using official Arduino tools. But this was certainly not the most impressive aspect of the project. Likewise, Velxio features RP2040 execution using the rp2040js library. It also features the execution of some ESP32 derivative boards built around the RISC-V architecture using the RiscVCore.ts library.

Continue reading “Simulating The AVR8 For A Browser-based Arduino Emulator”

Google Unveils New Process For Installing Unverified Android Apps

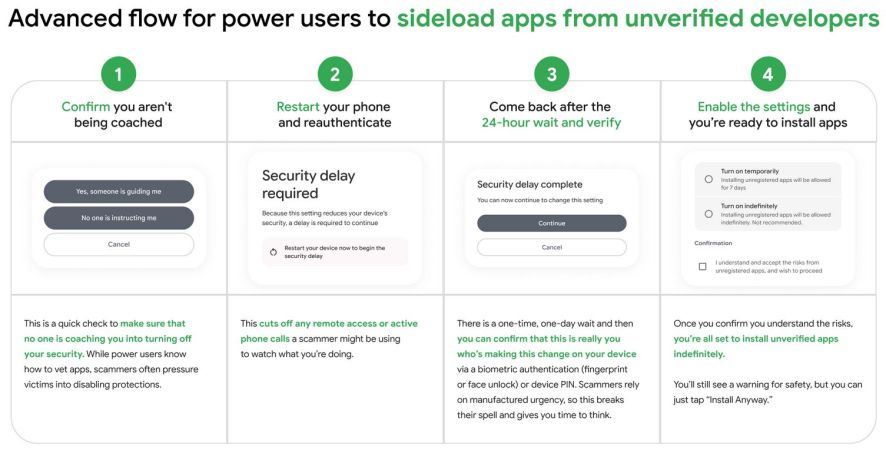
It’s no secret that Google really doesn’t like it that people are installing Android applications from any other source than the Play Store. Last year they proposed locking everyone into their official software repository by requiring all apps to be signed by verified developers, an identity which would be checked against a Google-maintained list. After a lot of pushback a so-called ‘advanced flow’ for installing even unsigned APKs would be implemented, and we now know how this process is supposed to work.

Instead of the old ‘allow installing from unknown sources’ toggle, you are now going to have to dig deep into the Developer Options, to tap the Allow Unverified Packages setting and confirm that nobody is forcing you to do this. This starts a ‘security delay’ of twenty-four hours after you restart the device, following which you can finally enable the setting either temporarily or permanently. It would seem these measures are in place to make it more difficult for a scammer to coerce a user into installing a malicious app — whether or not that’s a realistic concern or not, we’re not sure.

When we last covered this issue this ‘advanced flow’ had just been introduced as an appeasement option. In addition to this a limited free developer account was also pitched, which now turns out to allow for up to only 20 device installations. If you want more than this, you have to pay the $25 fee and provide your government ID.

Although Google’s public pitch is still that this is ‘for user security’, it will also mean that third-party app stores are swept up in these changes, with developers who publish on these stores subject to the same verification rules. This means that Android users will have to learn quickly how to enable this new option as it will be rolled out to more countries over the coming months.

The reality is that scammers will simply work around this issue by buying up already verified developer accounts. At the same time, it’ll cripple third-party app stores and indie developers who had intended to distribute their Android app by simply providing an APK download.

Smart Home? Make It Smart Quarters With This LCARS Dashboard

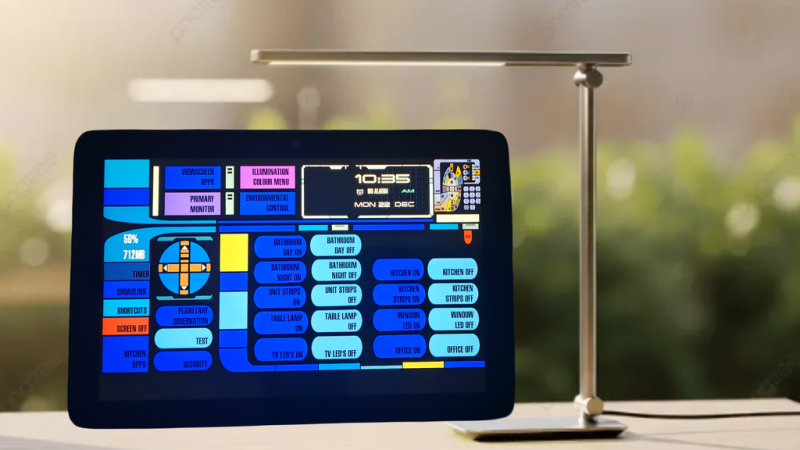
At the risk of starting a controversy: is there anyone who goes to the effort of setting up Home Assistant who wouldn’t really rather be living on the Enterprise-D? If such a person exists, it’s not [steve-gibbs5], who has not only put together a convincing LCARS dashboard on an Android tablet, but has also put together an easy-to-follow Instructable so you can too.

Continue reading “Smart Home? Make It Smart Quarters With This LCARS Dashboard”

Modifying A QingPing Air Quality Monitor For Local MQTT Access

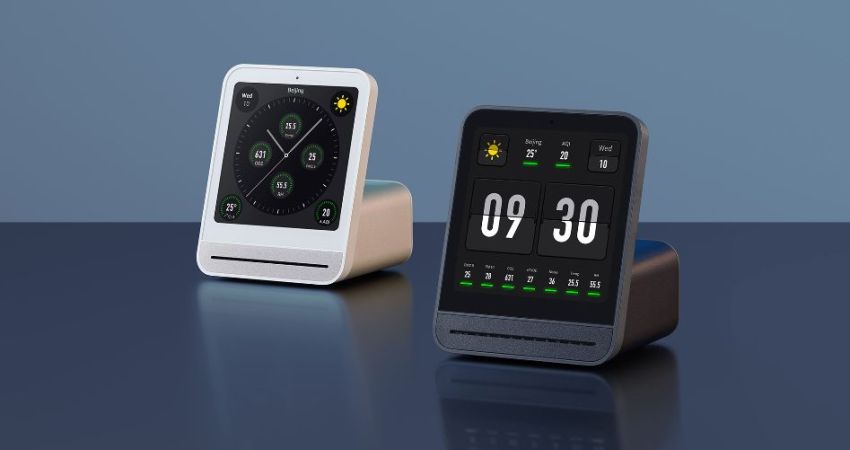
The QingPing Air Quality Monitor 2 is an Android-based device that not only features a touch screen with the current air quality statistics of the room, but also includes an MQTT interface that normally is used in combination with the QingPing mobile app and the Xiaomi IoT ecosystem. Changing it to report to a local MQTT server instead for integration with e.g. Home Assistant can be done in an official way that still requires creating a cloud account, or you can just do it yourself via an ADB shell and some file modifications as [ea] has done.

By default these devices do not enumerate when you connect a computer to their USB-C port, but that’s easily resolved by enabling Android’s developer mode. This involves seven taps on the Device Name line in the About section of settings. After this you can enter Developer Options to toggle on Debug Mode and Adbd Debugging, which creates the option to connect to the device via USB with ADB and open up a shell with adb shell.

From there you can shoot off the QingSnow2 app and the watchdog.sh that’s running in the background, disable IPv6 and edit /etc/host to redirect all the standard cloud server calls to a local server. Apparently there is even SSH access at this point, with root access and password rockchip. The MQTT configuration is found under /data/etc/ in settings.ini, which is used by the QingPing app, so editing redirects all that.

Of course, the device also queries a remote server for weather data for your location, so if you modify this you have to provide a proxy, which [ea] did with a simple MQTT server that’s found along with other files on the GitHub project page.