The Minimum Required For A Film Camera

Film cameras can be complex and exquisitely-crafted masterpieces of analogue technology. But at their very simplest they need be little more than a light-proof box with a piece of film at the back of it, and some kind of lens or pinhole with a shutter. [ChickenCrimpy] adds the most basic of 35 mm cartridge to create what he calls the Minimum Viable Camera. It’s a half-frame 35 mm pinhole film camera with the simplest possible construction.

A grainy B&W picture of a bird perched on a railing
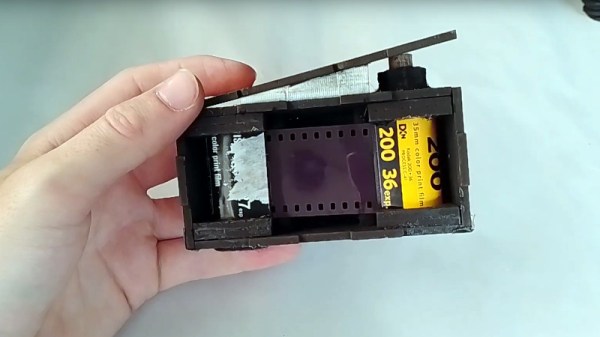
It can be built from almost any flat light-proof 3 mm thick stock, though something that you can run through a laser cutter is probably ideal. Once snapped together to make to box-like structure, tape is added along the joins for light-proofing. The film is reeled from a full 35 mm cartridge to an empty one, and cranked back frame-by-frame by means of a wooden key that engages with the spindle.

There’s no lens, instead this is a pinhole camera, and the shutter is a piece of the stock held on the front of the camera with bolts and butterfly nuts. Taking a photo is as simple as pointing the device at the subject and lifting the shutter away for a few seconds. There’s a video overview for the project which we’ve placed below the break.

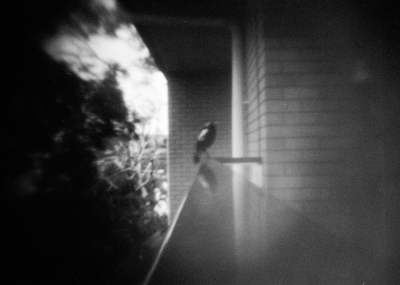
It’s true that this camera needs a moment in the darkroom to load, but we like its extreme simplicity and the ethereal and grainy pictures it produces. If you fancy an introduction to 35 mm photography you could definitely do worse.

Continue reading “The Minimum Required For A Film Camera”

A Tube Guitar Amp For A Modest Budget

There’s a mystique among both audiophiles and musicians about vacuum technology, thus having a tube amp still carries a bit of a cachet. New ones can be bought for eye-watering prices and old ones can be had for the same price with the added frisson of unreliability. Happily it’s surprisingly straightforward to build your own, as [_electroidiot] shows us with a fairly inexpensive build.

The design is inspired by the guitar amps of the 1950s and 1960s so it’s not for audiophiles. The circuit is a pretty conventional single-ended one with a two stage double triode preamp and a single power output tube. The transformers are usually the difficult part of a build like this one, and here instead of resorting to using a mains transformer for audio they come from a defunct 1960s Phillips radio. We especially like the old-school construction technique with a folded aluminium chassis and liberal use of tag strips on which to build the circuits.

The result is something that would have been in no way out of place in the 1960s, and proves that tube circuitry isn’t beyond the constructor in 2023. If it’s whetted your appetite for more, we can help you there.

Recreating The IBM Thinkpad Case

Once upon a time, laptops and other computer hardware often came with a fancy leather case for protection. That’s not really the case anymore, but it was in the golden era of the IBM ThinkPad. [polymatt] found a rare example, but wanted another one, so he decided to try and replicate it from scratch.

Leathercraft was a new discipline for [polymatt], and so the whole build was a learning experience. He started out by measuring the existing design and creating a diagram to guide his own work. He then traced the design on to a large piece of quality leather, carefully rounding the edges and adding a plastic stiffening plates to support the laptop where needed. Additional layers of leather were added to seal these in, and the leather was formed over guides to take the right shape. A slight misstep resulted in the case being too long, but a cut-and-shut job rectified the problem.

The finished result is a clean, impressive thing. Throughout the build, [polymatt] showed a certain mastery of the leatherworking tools that belied his lack of experience, too. The project should serve as a great inspiration to any other aspiring crafters who have contemplated creating their own custom leather goods for protecting their electronics. Video after the break.

Continue reading “Recreating The IBM Thinkpad Case”

Bigfoot Turns Classic Sewing Machine Into A Leather-Eating Monster

If you try to sew leather on a standard consumer-grade machine, more often than not you’ll quickly learn its limits. Most machines are built for speed, and trying to get them to punch through heavy material at the low motor speeds often needed for leather work is a lesson in frustration.

How frustrating? Enough so that [Joseph Eoff] expended considerable effort to create this sewing machine speed controller for his nearly century-old Adler sewing machine. The machine was once powered by a foot treadle, which is probably why the project is dubbed “Bigfoot,” but now uses a 230 V universal motor. Such motors don’t deliver much torque when run at low speeds with the standard foot-pedal rheostat control, so [Joseph] worked up an Arduino-based controller with a tachometer for feedback and a high-power PWM driver for the motor.

There are a ton of details in [Joseph]’s post and even more in the original blog article, which is well worth a read, but a couple really stand out. The first is with the tachometer, which uses an off-the-shelf photointerrupter and slotted disc. [Joseph] was displeased with the sensor’s asymmetrical and unreliable output, so he made some modifications to the onboard comparator to square up the signal. Also interesting is the PID loop auto-tuning function he programmed into Bigfoot; press a button and the controller automatically ramps the motor speed up and down and stores the coefficients in memory. Nice!

The short video below shows Bigfoot in action with varying thicknesses of faux leather; there are also some clips in the original article that show the machine dealing with a triple thickness of leather at slow speed and not even breaking a sweat. Hats off to [Joseph] on a solid build that keeps a classic machine in the game. And if you want to get into the textile arts but don’t know where to start, we’ve got you covered.

Continue reading “Bigfoot Turns Classic Sewing Machine Into A Leather-Eating Monster”

A Low Voltage Tube Makes For A Handy Preamplifier

When most people think of tube circuits, the first thing that comes to mind is often the use of high-voltage power supplies. It wasn’t a given for tube circuits, though, as a range of low-voltage devices were developed for applications such as car radios. It’s one of these, an ECH83 triode-heptode, which [mircemk] has taken as the basis of an audio preamplifier circuit.

The preamp circuit is pretty simple, being a two-stage single-ended design using both halves of the tube. Between the two is a three-band tone control circuit as used in classic guitar amplifiers, making for a serviceable and easily achievable way to chase that elusive “valve sound.”

There is much discussion among audio enthusiasts about the supposed benefits of vacuum technology as opposed to transistors in an amplifier. Much of it centres around the idea that tubes distort in the even harmonics while semiconductors are supposed to do so in the odd harmonics. Still, we’d be inclined to spot a bit of snake oil instead and point to early transistor amplifiers simply being not very good compared to the tube amps of the day. That said, a well-made tube amplifier set-up will sound just as amazing as it always did, and since this one is paired with a matching power amp we wouldn’t say no to it ourselves.

If you fancy messing about with tubes for not a lot, there’s a cheap module for that.

You Can Now Build Your Own Polaroid-style Pack Film Cartridge

Instant photography was one of the twentieth century’s coolest-to-have consumer inventions, but when the digital photography revolution came it had few answers. It survives as a niche format thanks to Fuji’s Instax line and a group of Dutch entrepreneurs who revived a defunct Polaroid works, but what hasn’t made it are the earlier pack and roll film formats for which the picture is revealed by peeling apart a negative and positive side. All isn’t lost though, because a small Austrian company has been producing pack film cartridges as a handmade artisan product. To reduce the cost per print they’re now available as a DIY self-assembly kit, and it’s this which [In an Instant] is taking a look at in their latest video.

The kit has enough components for eight shots, and where the original cartridge would have held multiple exposures this one can only hold one at a time. The cartridge itself is cleverly formed from folded card as opposed to the plastic and metal of the original, and the components are a relatively straightforward assembly task. It’s a fascinating window into how the Polaroid pack film process worked, with the light-sensitive layer behind a pull-away black light screen, in front of the white positive sheet and with a pouch of developer chemicals to one side. It’s in no way cheap at somewhere about 10 dollars a shot, but it’s amazing that pack film can be recreated and for enthusiasts it’s a lifeline that keeps their cameras useful.

This isn’t the first time we’ve looked at revitalising a pack film camera, but it’s a lot easier than hacking a Fuji cartridge to do the job.

Continue reading “You Can Now Build Your Own Polaroid-style Pack Film Cartridge”

The Height Of 1960s Dental Electronic Technology

If you’ve ever been to the dental surgery and found yourself requiring some gum surgery, the chances are you’ll have found your dentist wielding an electronic probe to cauterise the flesh. It’s evidently some form of RF device because you are usually required to hold one of the electrodes while it’s being used, but annoyingly, for an engineer, it’s hardly the time or place to ask how it works. For the curious, then, [Keri Szafir] has the box of tricks behind the probe and is subjecting it to a teardown.

The box on her bench isn’t the one you’ll find in your dentist’s toolkit today, but its distant ancestor from the 1960s that integrates multiple functions into a single box. It’s a very period enclosure with typically 1960s-style vacuum tubes and point-to-point wiring. There’s an HF oscillator using a pair of EL81 power pentodes for that electrode you always wished you could ask your dentist about, and unexpectedly, a thyratron, a type of gas-filled switching tube not dissimilar to a thyristor, in a separate circuit for dental pulp testing. We’re not dental experts here at Hackaday, but [Keri] has done the research and explains the device in the video below the break. At one point, she observes that it’s quite a scary machine to be connected to a living person, and we can concur with that.

Her bench has provided a few projects here in the past, including one of her amplifiers. While it might be fun to tear down a more modern version, you are better off asking for old dental burrs.

Continue reading “The Height Of 1960s Dental Electronic Technology”