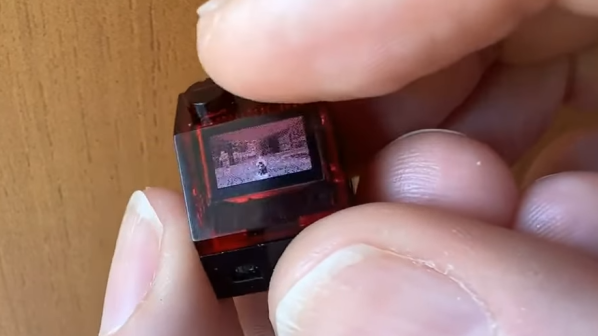
Brick And Motor Table Saw Delivers Paper Cuts On Demand

Twenty Two Motors. Fifty gears. Eighty Two Hundred RPM. Hundreds of individual pieces, and one sheet of glossy paper cut into a disk. This isn’t a nightmare driven Rube Goldberg machine. Instead, it’s a Lego monstrosity created by [GazR] of [GazR’s Extreme Brick Machines!], and all of these parts are flying in formation for one Lego slicing purpose. In the video below the break, you can see what very well may be the worlds most powerful Lego and Paper table saw.

Starting out with a build that had a mere fourteen motors in a platform that looked quite a lot more like a table saw, [GazR] learned that having only fourteen motors turning a Lego based blade was not a good combination. In the next iteration, the same number of motors were used, but the gearing was increased to bring RPM up, and a Lego toy saw blade took care of cutting duties.

Seeing that higher speeds with thinner blades was a winning trend, [GazR] stepped it up to the aforementioned 8200 RPM twenty-two motored paper whirling Lego Death Machine. Yes, [GazR] cut Lego, carrots, carpet, and paper- all with circular sheet of paper.

Do Lego mechanisms turn your gears? You might enjoy this Legopunk Orrery from the Hackaday archives, too. Thanks to [Keith] for the great tip. Be sure to submit your own tips via the Hackaday Tips Line, or the #Submit-A-Tip channel in the Hackaday Discord server.

Continue reading “Brick And Motor Table Saw Delivers Paper Cuts On Demand”

Old School Mechanical Pong Still Amazes

[Tom], of the YouTube channel ThingsTomLike, found a very sweet little mechanical Pong clone at a thrift store. It came in broken, but in only fifteen minutes of your time, [Tom] manages a complete teardown and repair. (Video, embedded below.)

The game works by balancing a lightbulb on the end of a pivot arm that projects a “ball” onto a screen, while players move their paddles up and down to hit the spring that surrounds the light assembly. The ball arm gets periodically kicked by a DC motor and cam assembly, which makes it careen wildly back and forth across the screen.

It’s a marvel of simple, no-IC engineering. Ironically, it might have been cheaper than making it out of silicon at the time, but viewed from today’s economy, just the human labor in adjusting that counterweight so that the “ball” floats would blow the budget.

Why a screen and lightbulb? Because it’s emulating Pong, a video game, the new kid on the block. But even 45 years later, we think it has got a charm all of its own that the cold digital logic of Pong lacks, even if the gameplay suffers.

Continue reading “Old School Mechanical Pong Still Amazes”

Great Computer Hacks Make Hackers Hacker Computers

In the year 1995, computers were, well… boring. The future wasn’t here yet, and computers were drab, chunky beige boxes. Sure, there were some cool-ish computers being sold, but the landscape was still relatively barren. But as you’ll see in the video below the break, it doesn’t have to be that way, and the [Hackers Curator] shows us the way by recreating Johnny Lee Miller’s computer from the 1995 movie Hackers.

Hackers wasn’t popular when it came out, but over the years it has gained quite a following. It portrayed computers and the people who loved them in completely new ways, representing a culture that has never existed. Even so, it inspired so many young hacker types. Among those inspired is the crew over at [Hackers Curator] and they have taken it upon themselves to, uh… curate… the props, costumes, and stories surrounding the movie.

Recreating Dade’s iconic camo “luggable” computer came with quite a lot of difficulty. It turns out that the original movie props were working custom computers that used hacked together customized cases and Mac Powerbook 180c internals. Dade’s (aka Zer0 Cool and Crash Override) was mashup of the a Compaq Portable 486c and the aforementioned Mac. [HackersCurator] have lovingly recreated this prop from two broken computers, but chose to run the internals with a Raspberry Pi.

The techniques used in the creation of this beastly cyberdeck are ones that can be used in building so many other projects, even if you’re not a Hackers hacker. Customizing the plastics and placing a trackball in the most awkward of spots was expertly done, and we’ll be referring to it in the future for guidance when doing similar projects.

Are movie replica hacks your thing? You’re in luck! It turns out that this isn’t [Hackers Curator]’s first build. In 2019 they tackled Lord Nikon’s laptop, and of course, we covered that one too!

Continue reading “Great Computer Hacks Make Hackers Hacker Computers”

An Old Typewriter Speaks To The World

Typewriters are something which was once ubiquitous, yet which abruptly faded away and are now a rare sight. There was a period of a few years in which electric typewriters and computers existed side-by-side though, and it’s one of these which [Jonah Brüchert] has experimented with connecting to a computer for use as a printer or terminal.

The machine in question is a SIGMA SM 8200i typewriter, which is a rebadged version of the East German Erika S3004. It has an intriguing 26-pin connector on its side which provides access to a 1200 baud serial port. It uses its own character encoding dubbed “gdrascii”, for which there is a Python library that he could port to Rust. The result is a terminal in the old style, from the days when access to a computer was through a teletype  rather than a screen. All that’s missing is a punched tape reader at its side!

We’ve featured a lot of typewriters here over the ears, but this isn’t the first that has received a terminal conversion.

Simple Arduino Build Lets You Keep An Eye On Pi

Are you a math aficionado in need of a new desk toy? Then do we have the project for you. With nothing more than an Arduino and a seven-segment LED module, [Cristiano Monteiro] has put together a little gadget that will slowly work its way through the digits of Pi forever…or until you get bored of looking at it and decide to use the parts for something else.

On the hardware side, we really can’t overstate how simple this project is. A common four-digit LED display is connected up to an Arduino Nano, which is then plugged into the computer for power. [Cristiano] is using a breadboard here, but you could just as easily use four female-to-female jumpers to connect the two devices together. We suppose this would be a pretty good project for anyone who’s looking to get some practical experience with PCB design as well.

The real magic is in the software, which [Cristiano] has been kind enough to release under the MIT license. Calculating Pi on such a resource-constrained chip as the ATmega328P is far from ideal, but by porting over a C++ algorithm developed by [Xavier Gourdon] and [Pascal Sebah] for their paper Computation of the n-th Decimal Digit of π with Low Memory he was able to pull it off, albeit slowly.

Now if you’ve got slightly better hardware, say a pair of Xeon processors and 96 GB of RAM, you could calculate Pi out to a few trillion digits for fun, but it wouldn’t look as cool as this little guy blinking away.

Continue reading “Simple Arduino Build Lets You Keep An Eye On Pi”

DOOM Comes To The RP2040

To the point of being a joke, it seems like DOOM is adapted to run on everything these days. So it was only natural that we would see it ported to the RP2040 by [Graham Sanderson], the tiny chip powering the Raspberry Pi Pico.

You might be thinking, what’s different about this port? There have been 55 articles about DOOM here on Hackaday, showing it running on everything from web checkboxes to desk phones. The RP2040 has 256 K of RAM, two decently clocked processor cores, and 2 MB of flash, so it’s not the most constrained platform ever to have DOOM run it. But [Graham] also set some very lofty goals: all nine levels needed to be playable, faithful graphics and music, multiplayer, and it would output to VGA directly. It should play just like the original. DOOM has a demo that is stored as a sequence of input events. They form excellent regression tests as if the character gets stuck or doesn’t make it to the end; then you’re not accurate according to the original code.

There are two big problems right out the gate. First, a single level is larger than the 2 MB storage that the RP2040 has. And to drive the 320×200 display, you either need to spend a lot of your CPU budget racing the beam or allocate a vast amount of RAM to framebuffers, making level decompression much harder.

A default compression scheme wouldn’t cut it because it needed a high compression ratio and random access since decompressing into RAM wasn’t an option. However, carefully optimizing and compressing the different data structures yielded great results. Save game files are given a similar treatment to ensure they fit into the remaining flash after all the levels (34k).

The result is fantastic, and it supports DOOM, Ultimate DOOM, and DOOM II. The write-up goes into far more detail than we could here; enjoy the read. If you decide to make a day trip to the depths of Hell on your own Pi Pico, be sure to let us know in the comments.

Continue reading DOOM Comes To The RP2040″

Split Flap Display Tells Us The Word

LED and LCD displays are a technological marvel. They’ve brought the price of televisions and monitors down to unheard-of levels since the days of CRTs, but this upside arguably comes with an aesthetic cost. When everything is covered in bland computer screens, the world tends to look a lot more monotonous. Not so several decades ago when there were many sharply contrasting ways of displaying information. One example of this different time comes to us by way of this split-flap display that [Erich] has been recreating.

Split-flap displays work by printing letters or numbers on a series of flaps that are attached to a spindle with a stepper motor. Each step of the motor turns the display by one character. They can be noisy and do require a large amount of maintenance compared to modern displays, but have some advantages as well. [Erich]’s version is built out of new acrylic and MDF, and uses an Arduino as the control board. A 3D printer and CNC machine keep the tolerances tight enough for the display to work smoothly and also enable him to expand the display as needed since each character display is fairly modular.

Right now, [Erich]’s display has 20 characters on two different rows and definitely brings us back to the bygone era where displays of this style would have been prominent in airports and train stations. This display uses a lot of the basics from another split flap display that we featured a few years ago but has some improvements. And, if you’d prefer restorations of old displays rather than modern incarnations, we have you covered there as well.

Continue reading “Split Flap Display Tells Us The Word”