Machines That Build Other Machines

When the RepRap project was founded in 2005, it promised something spectacular: a machine that could build copies of itself. RepRaps were supposed to be somewhere between a grey goo and a device that could lift billions of people out of poverty by giving them self-sufficiency and the tools to make their lives better.

While the RepRap project was hugely successful in creating an open source ecosystem around 3D printers, a decade of development hasn’t produced a machine that can truly build itself. Either way, it’s usually easier and cheaper to buy a 3D printer than to build your own.

[castvee8]’s entry into the 2016 Hackaday Prize does just what the RepRap project promised ten years ago. It’s all about building machines with the ability to reproduce, creating an ecosystem of machines to build household goods. The best part? You can 3D print most of the machines. It’s the RepRap project, but for mills, lathes, microscopes, and routers. It’s an entire shop produced entirely in a 3D printer.

The idea of creating a machine shop from the most basic building materials has been around for a while. At the turn of the last century, concrete lathes and mills bootstrapped industrial economies. Decades later, [David J. Gingery] created a series of books on building a machine shop starting with a charcoal foundry. The idea of building a shop using scrap and the most minimal tools is very old, but this idea hasn’t been updated to the era where anyone can buy a 3D printer for a few hundred dollars.

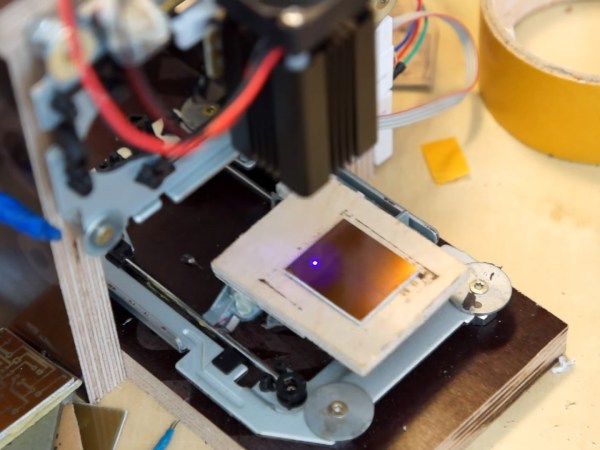
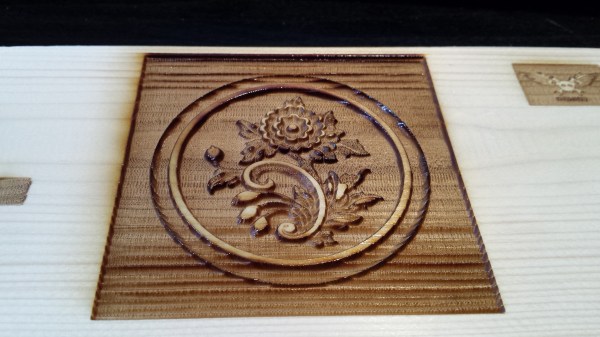
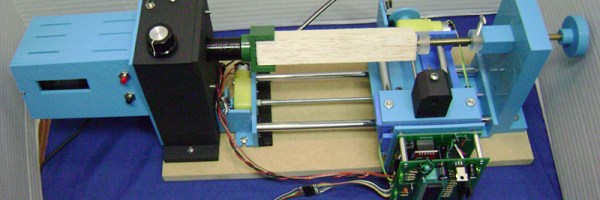
So far, [castvee8] has a few homemade machine tools on the workbench, including a lathe, a tiny mill easily capable of fabricating a few circuit boards, and a little drill press. They’re all machines that can be used to make other useful items, and all allow anyone to create the devices they need.

The HackadayPrize2016 is Sponsored by:

Take The Long Road To A Precise Laser PCB Exposer

According to [diyouware], inside of every HD-DVD player is a gem of laser engineering with the designation of PHR-803T, and it’s just begging to be converted into a PCB exposer. Following along similar hacks which tore the laser diode out of Blu-ray players to expose PCBs, they wanted to use the whole PHR-803T unit without disassembling it, and to try to enable all of its unique features.

They envisioned something simple like a scanner for their machine. Just place the PCB on top of a glass sheet, close the lid, and click print. Unfortunately, moving the laser itself just caused too much vibration. So they switched to an inverted delta robot and named it TwinTeeth. In this design, the laser would stay still and the PCB would move.

What follows next is a seriously impressive journey in reverse engineering and design. The PHR-803T had no data sheet, but a ton of features. For example, it can autofocus, and has three different laser diodes. So many interesting problems were found and solved. For example, the halo from the laser caused the surrounding photoresist to cure. They solved it by adding a glass plate with a UV filtering film on it. Only the most focused point of the laser could punch through.

Another adventure was the autofocus. They wanted to autofocus on all four corners of the board. The PHR-803T was designed to read HD-DVDs so can focus a beam to far below 0.01 mm. They got autofocus working with the UV laser, but couldn’t use it on the PCB without curing the photoresist. So they put a piece of aluminum foil at a known level to start. Then they realized they could use the red or infrared diodes to focus instead. Now they can level the PCB in software, and focus the diode without curing the photoresist.

In the end they have an inverted-delta mini PCB factory. It can produce boards around the size of an Arduino shield with a resolution of 600 DPI. Their machine also has attachments for drilling and solder paste dispensing. Check out the video of it in action.
Continue reading “Take The Long Road To A Precise Laser PCB Exposer”

Two-Sided Laser Etching

[Dan Royer] explains a simple method to engrave/etch on both sides of a material. This could be useful when you are trying to build enclosures or boxes which might need markings on both sides. There are two hurdles to overcome when doing this. The first is obviously registration. When you flip your job, you want it re-aligned at a known datum/reference point.

The other is your flip axis. If the object is too symmetric, it’s easy to make a mistake here, resulting in mirrored or rotated markings on the other side. Quite simply, [Dan]’s method consists of creating an additional cutting edge around your engraving/cutting job. This outline is such that it provides the required registration and helps flip the job along the desired axis.

You begin by taping down your work piece on the laser bed. Draw a symmetrical shape around the job you want to create in your Laser Cutter software of choice. The shape needs to have just one axis of symmetry – this rules out squares, rectangles or circles – all of which have multiple axes of symmetry. Adding a single small notch in any of these shapes does the trick. Engrave the back side. Then cut the “outside” outline. Lift the job out and flip it over. Engrave the front side. Cut the actual outline of your job and you’re done.

Obviously, doing all this requires some preparation in software. You need the back engrave layer, the front engrave layer, the job cut outline and the registration cut outline. Use color coded pen settings in a drawing to create these layers and the horizontal / vertical mirror or flip commands. These procedures aren’t groundbreaking, but they simplify and nearly automate a common procedure. If you have additional tricks for using laser cutters, chime in with your comments here.

White Oak Illuminated Bluetooth Speaker

Besides being common tools available to most hackers and makers out there, 3D printing, CNC machines, and cheap Chinese electronics have one more things in common: they were all used by [Nick] to build a bluetooth speaker system that has some interesting LED effects built into the case.

This is fresh on the heels of another hack that used similar construction methods to build a “magic” wood lamp. [Nick] takes it a step further, though. His case is precisely machined in white oak and stuffed with the latest China has to offer: a bank of lithium-ion batteries, a DC-DC converter to power the amplifier, and a Bluetooth module. After some sanding, the speakers look professional alongside the blue light features hiding behind the polycarbonate rings.

Of course you’ll want to visit the project site for all the details of how [Nick] built his speaker case. He does admit, however, that the electronics are fairly inefficient and need a little work. All in all though, it’s a very refined set of speakers that’ll look great on a bookshelf or on a beach, workshop bench, or anyplace else that you could take them.

Continue reading “White Oak Illuminated Bluetooth Speaker”

Add Fiber-optic Control To Your CNC

CNC machines can be very noisy, and we’re not talking about the kind of noise problem that you can solve with earplugs. With all those stepper motors and drivers, potentially running at high-speed, electrical noise can often get to the point where it interferes with your control signals. This is especially true if your controller is separated from the machine by long cable runs.

But electrical noise won’t interfere with light beams! [Musti] and his fellow hackers at IRNAS decided to use commodity TOSLINK cables and transmitter / receiver gear to make a cheap and hackable fiber-optic setup. The basic idea is just to bridge between the controller board and the motor drivers with optical fiber. To make this happen, a couple of signals need to be transmitted: pulse and direction. They’ve set the system up so that it can be chained as well. Serializing the data, Manchester encoding it for transmission, and decoding it on reception is handled by CPLDs for speed and reliability.

The team has been working on this project for a while now. If you’d like some more background you can check out their original design ideas. Design files from this released version are up on GitHub. A proposed improvement is to incorporate bi-directional communications. Bi-directional comms would allow data like limit-switch status to be communicated back from the machine to the controller over fiber.

This optical interface is in service of an open-source plasma cutter design, which is pretty cool in itself. And if the IRNAS group sounds familiar to you, that may be because we recently ran a story on their ambitious gigabit ethernet-over-lightbeam project.

Laser PCB Exposer Built From CD-ROM Drives

[Neumi] has built a CNC Laser using CD-ROM drives as the X and Y motion platforms. The small 405nm laser can engrave light materials like wood and foam. The coolest use demonstrated in the video is exposing pre-coated photo-resist PCBs.

With $61 US Dollars (55 Euro) for the Arduino, stepper drivers, and a laser in the project, [Nuemi] got a pretty capable machine after adding a few parts from the junk bin. He wanted to avoid using existing software in order to learn the concepts behind a laser engraver. In the end, he has a working software package which can send raster scans to an Arduino mega. The mega then controls the sync between the stepper and laser firings. The code is available on GitHub.

The machine can do a 30x30mm PCB in 10 minutes. It’s not about to set a record, but it’s cool and not at all bad for the price. You can see the failed PCBs lined up in the video from the initial tuning, but the final one produced a board very equivalent to the toner transfer method. Video after the break.

Continue reading “Laser PCB Exposer Built From CD-ROM Drives”

3D Laser Carving With The Smoothieboard

Expensive laser cutters have a 3D engraving mode that varies the laser power as it is etching a design, to create a 3D effect. [Benjamin Alderson] figured this could be replicated on a cheap Chinese laser — so he made his own program called SmoothCarve.

He’s got one of those extra cheap blue-box 40W CO2 lasers you can nab off eBay for around $600-$800, but he’s replaced the control board with a SmoothieBoard as an easy upgrade. He wrote the program in MatLab to analyze a grey scale image and then assign power levels to the different shades of grey. You can see the software and try it yourself over at his GitHub.

The resulting application is pretty handy — watch it carve the Jolly RancherWrencher after the break!

Continue reading “3D Laser Carving With The Smoothieboard”