Despite some companies making strides with ARM, for the most part, the desktop and laptop space is still dominated by x86 machines. For all their advantages, they have a glaring flaw for anyone concerned with privacy or security in the form of a hardware backdoor that can access virtually any part of the computer even with the power off. AMD calls their system the Platform Security Processor (PSP) and Intel’s is known as the Intel Management Engine (IME).
To fully disable these co-processors a computer from before 2008 is required, but if you need more modern hardware than that which still respects your privacy and security concerns you’ll need to either buy an ARM device, or disable the IME like NovaCustom has managed to do with their NS51 series laptop.
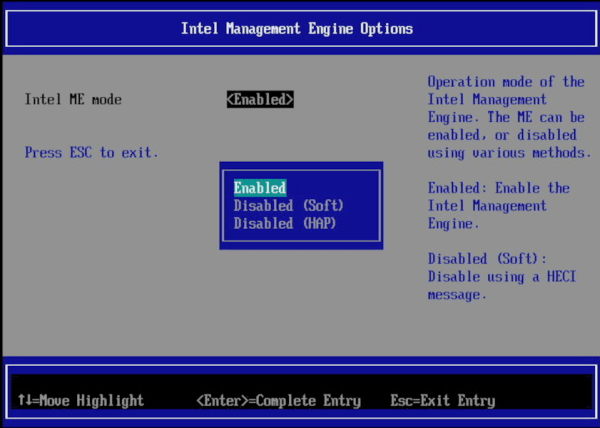
NovaCustom specializes in building custom laptops with customizations for various components and specifications to fit their needs, including options for the CPU, GPU, RAM, storage, keyboard layout, and other considerations. They favor Coreboot as a bootloader which already goes a long way to eliminating proprietary closed-source software at a fundamental level, but not all Coreboot machines have the IME completely disabled. There are two ways to do this, the HECI method which is better than nothing but not fully trusted, and the HAP bit, which completely disables the IME. NovaCustom is using the HAP bit approach to disable the IME, meaning that although it’s not completely eliminated from the computer, it is turned off in a way that’s at least good enough for computers that the NSA uses.
There are a lot of new computer manufacturers building conscientious hardware nowadays, but (with the notable exception of System76) the IME and PSP seem to be largely ignored by most computing companies we’d otherwise expect to care about an option like this. It’s certainly still an area of concern considering how much power the IME and PSP are given over their host computers, and we have seen even mainline manufacturers sometimes offer systems with the IME disabled. The only other options to solve this problem are based around specific motherboards for 8th and 9th generation Intel desktops, or you can go way back to hardware from 2008 and install libreboot to eliminate, rather than disable, the IME.
Thanks to [Maik] for the tip!