Volume Controller Rejects Skeumorphism, Embraces The Physical

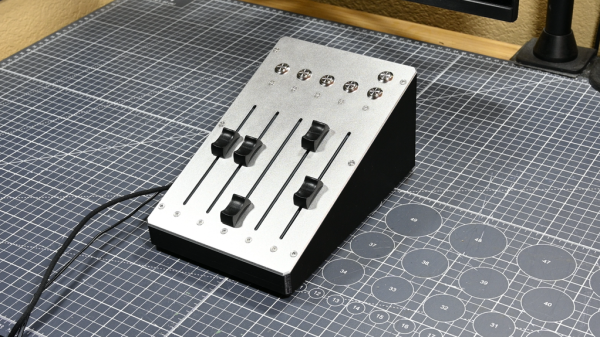
The volume slider on our virtual desktops is a skeuomorphic callback to the volume sliders on professional audio equipment on actual, physical desktops. [Maker Vibe] decided that this skeuomorphism was so last century, and made himself a physical audio control box for his PC.

Since he has three audio outputs he needs to consider, the peripheral he creates could conceivably be called a fader. It certainly has that look, anyway: each output is controlled by a volume slider — connected to a linear potentiometer — and a mute button. Seeing a linear potentiometer used for volume control threw us for a second, until we remembered this was for the computer’s volume control, not an actual volume control circuit. The computer’s volume slider already does the logarithmic conversion. A Seeed Studio Xiao ESP32S3 lives at the heart of this thing, emulating a Bluetooth gamepad using a library by LemmingDev. A trio of LEDs round out the electronics to provide an indicator for which audio channels are muted or active.

Those Bluetooth signals are interpreted by a Python script feeding a software called Voicmeeter Banana, because [Maker Vibe] uses Windows, and Redmond’s finest operating system doesn’t expose audio controls in an easily-accessible way. Voicmeeter Banana (and its attendant Python script) takes care of telling Windows what to do. 

The whole setup lives on [Maker Vibe]’s desk in a handsome 3D printed box. He used a Circuit vinyl cutter to cut out masks so he could airbrush different colours onto the print after sanding down the layer lines. That’s another one for the archive of how to make front panels.

If volume sliders aren’t doing it for you, perhaps you’d prefer to control your audio with a conductor’s baton. 

Continue reading “Volume Controller Rejects Skeumorphism, Embraces The Physical”

Pi Pico Powers Parts-Bin Audio Interface

USB audio is great, but what if you needed to use it and had no budget? Well, depending on the contents of your parts bin, you might be able to use [Veyniac]’s Pico-Audio-Interface as a free (and libre! It’s GPL3.0) sound capture device.

In the project’s Reddit thread, [Veyniac] describes needing audio input for his homemade synth, but having no budget. Necessity being the mother of invention, rather than beg borrow or steal a device with a working sound card, he hacked together this lovely device. It shows up as a USB Audio Class 2.0 device so should work with just about anything, and offers 12-bit resolution and 4x oversampling to try and deal with USB noise with its 2-channel, 44.1 kHz sample rate.

Aside from the Pico, all you need is an LM324 op-amp IC and a handful of resistors and capacitors — [Veyniac] estimates about $10 to purchase the whole BOM. He claims that the captured audio sounds okay in his use, but can’t guarantee it will  be for anyone else, noise being the fickle beast that it is. We figure that sounding “Okay” has got to be pretty good, given that you usually get what you pay for — and again, [Veyniac] did build this in a cave with a box of scraps. Well, except for the cave part. Probably.

While the goal here was not to rival a commercial USB sound card, we have seen projects to do that. We’re quite grateful to [Omadeira] for the tip, because this really is a hack. If you, too, want a share of our undying gratitude (which is still worth its weight in gold, despite fluctuations in the spot price of precious metals), send in a tip of your own.

Hand holding small speaker

Ben Eater Makes Computer Noises

When [Ben Eater] talks, hackers everywhere listen. In his latest video [Ben] shows us how to make computer noises using square waves and a 6502 microprocessor.

[Ben] uses the timer in the W65C22 Versatile Interface Adapter to generate the square waves which generate a tone. He then adds support for a new BEEP command into his MS BASIC interpreter. We covered [Ben Eater]’s MS BASIC here at Hackaday back in April, so definitely check that out if you missed it.

Continue reading “Ben Eater Makes Computer Noises”

A black PCB is shown, with an Arduino Nano mounted in the bottom left corner. The rest of the space on the PCB is used up by ten DIP integrated circuits and a few resistors and diodes. Several black and red wires connect different parts of the PCB.

Meowsic Keyboard MIDI Adapter Aims For Purrfection

Both small children and cats have a certain tendency to make loud noises at inopportune times, but what if there were a way to combine these auditory effects? This seems to have been the reasoning behind the creation of the Meowsic keyboard, a children’s keyboard that renders notes as cats’ meows. [Steve Gilissen], an appreciator of unusual electronic instruments, discovered that while there had been projects that turned the Meowsic keyboard into a MIDI output device, no one had yet added MIDI input to it, which of course spurred the creation of his Meowsic MIDI adapter.

The switches in the keys of the original keyboard form a matrix of rows and columns, so that creating a connection between a particular row and column plays a certain note. [Steve]’s plan was to have a microcontroller read MIDI input, then connect the appropriate row and column to play the desired note. The first step was to use a small length of wire to connect rows and columns, thus manually mapping connections to notes. After this tedious step, he designed a PCB that hosts an Arduino Nano to accept input, two MCP23017 GPIO expanders to give it enough outputs, and CD4066BE CMOS switches to trigger the connections.
Continue reading “Meowsic Keyboard MIDI Adapter Aims For Purrfection”

Two white, cylindrical speakers are shown. The sides and most of the tops of the speakers are covered in holes, and at the center of the top of each, there is a circular LCD display. The top of the speaker is marked “Braun.”

A Modern Take On Iconic Industrial Design

The Functionalist design philosophy that Dieter Rams brought to Braun from the 50s to the 90s still inspires the look of a few devices, including Apple’s iPod, Teenage Engineer’s synthesizers and recorders – and [2dom]’s IR7 streaming radio.

The streaming radio was inspired by Braun’s portable radios, particularly the SK2, TP1, and the T3 pocket radio. [2dom] started with the T3’s circular pattern of holes and experimented with several variations, finally settling on a cylindrical shape with a central display; a prototype with a low-power monochrome rectangular display was eventually rejected in favor of a circular LCD. The housing consists of four 3D-printed components: an upper and lower shell, a resonator for the speaker, and a knob for a rotary encoder.

Electronics-wise, an ESP32 handles the computing requirements, while the LCD and rotary encoder provide a user interface. For audio, it uses a VS1053 MP3 decoder, PAM8403 amplifier, and a wideband speaker, with an audio isolation transformer to clean up the audio. To reduce power consumption, a MOSFET cuts power to the peripheral components whenever the device is in sleep mode. The full design is available on GitHub.

The end result of this effort is a quite authentic-looking 21st-century adaptation of Rams’s original designs. If you’re interested in more Braun designs, check out this replica of one of their desk fans. We’ve also seen a restoration of one of Braun’s larger radios, the TS2.

A Yamaha smart speaker, now with external DAC.

Smart Speaker Gets Brain Surgery, Line-Out

Sometimes you find a commercial product that is almost, but not exactly perfect for your needs. Your choices become: hack together a DIY replacement, or hack the commercial product to do what you need. [Daniel] chose door number two when he realized his Yamaha MusicCast smart speaker was perfect for his particular use case, except for its tragic lack of line out. A little surgery and a Digital-to-Analog Converter (DAC) breakout board solved that problem.

You can’t hear it in this image, but the headphones work.

[Daniel] first went diving into the datasheet of the Yamaha amplifier chip inside of the speaker, before realizing it did too much DSP for his taste. He did learn that the chip was getting i2s signals from the speaker’s wifi module. That’s a lucky break, since i2s is an open, well-known protocol. [Daniel] had an Adafruit DAC; he only needed to get the i2s signals from the smart speaker’s board to his breakout. That proved to be an adventure, but we’ll let [Daniel] tell the tale on his blog.

After a quick bit of OpenSCAD and 3D printing, the DAC was firmly mounted in its new home. Now [Daniel] has the exact audio-streaming-solution he wanted: Yamaha’s MusicCast, with line out to his own hi-fi.

[Daniel] and hackaday go way back: we featured his robot lawnmower in 2013. It’s great to see he’s still hacking. If you’d rather see what’s behind door number one, this roll-your-own smart speaker may whet your appetite.

Can Hackers Bring Jooki Back To Life?

Another day, another Internet-connected gadget that gets abandoned by its creators. This time it’s Jooki — a screen-free audio player that let kids listen to music and stories by placing specific tokens on top of it. Parents would use a smartphone application to program what each token would do, and that way even very young children could independently select what they wanted to hear.

Well, until the company went bankrupt and shutdown their servers down, anyway. Security researcher [nuit] wrote into share the impressive work they’ve done so far to identify flaws in the Jooki’s firmware, in the hopes that it will inspire others in the community to start poking around inside these devices. While there’s unfortunately not enough here to return these devices to a fully-functional state today, there’s several promising leads.

Continue reading “Can Hackers Bring Jooki Back To Life?”