Adding Real Lenses To An Instant Camera

The Instax SQ6 and Fujifilm’s entire range of instant cameras are fun little boxes that produce instant photos. It’s a polaroid that’s not Polaroid, and like most instant cameras, the lenses are just one or two pieces of plastic. A lens transplant is in order, and that’s exactly what [Kevin] did to his Instax camera.

The key to this lens transplant project is to make it not look like a complete hack job. For this, [Kevin] is keeping the number of custom mechanical parts to a minimum, with just two pieces. There’s a lens shroud that screws down to the current flange on the camera’s plastic chassis, and should blend in perfectly with the rest of the camera. This demanded a significant amount of 3D modeling to get perfect. The other mechanical part is just a plastic disc with a hole in it. These parts were ordered from Shapeways and bolted to the camera with only a few problems regarding spacing and clearances. This didn’t prevent the camera from coming back together, which is when the documentation becomes fast and loose. Who could blame him: the idea of putting real lenses on an instant camera is something few can resist, and the pictures that come out of this modified camera look great.

The current state of the project with a single lens leads the camera to have an inaccurate and tunnel-like viewfinder, but a huge modification brings this project into twin-lens reflex territory. There are more modifications than camera here, but all the printed parts are documented, there are part numbers for McMaster-Carr, and the camera has full control over focusing and framing.

Visual Magnetic Fields

If you need help visualizing magnetic fields, these slow-motion video captures should educate or captivate you. Flux lines are difficult to describe in words, because magnet shape and strength play a part. It might thus be difficult to visualize what is happening with a conical magnet, for a person used to a bar magnet. We should advise you before you watch the video below the break, if you are repelled by the sight of magnetite sand clogging a bare magnet then flying on the floor, this is your only warning.

The technique and equipment are simple and shown in the video. A layer of black sand is spread on a piece of tense plastic to make something like a dirty trampoline, and a neodymium magnet is dropped in the middle. The bouncing action launches the sand and magnet simultaneously so they are hanging in the air and the particles can move with little more than air resistance.

These videos were all taken with a single camera and a single magnet. Multiple cameras would yield 3D visuals, and the intertwining fields of multiple magnets can be beautiful. Perhaps a helix of spherical magnets? What do you have lying around the hosue? In a twist, we can use magnets to simulate gas atoms and trick them into performing unusual feats.

Continue reading “Visual Magnetic Fields”

This 3D Printed LED Softbox Really Shines

Generally speaking, objects made on desktop 3D printers are pretty small. This is of course no surprise, as filament based printers are fairly slow and most don’t have very large beds to begin with. Most people don’t want to wait days for their project to complete, so they use 3D printed parts where it makes sense and supplement them with more traditional components such as aluminum extrusion wherever possible. But not always…

This 3D printed photography softbox created by [Nicholas Sherlock] doesn’t take the easy way out for anything. With the exception of the LEDs and the electronics to drive them, everything in the design has been printed on his Prusa i3. It wasn’t the easiest or fastest way to do it, but it’s hard to argue with the end result. Perhaps even more impressive than the final product is what it took to get there: he actually had to develop a completely new style of part infill he’s calling “Scattered Rectilinear” to pull it off.

Overall the design of the light itself isn’t that complex, ultimately it’s just a box with some LEDs mounted at the back and a pretty simple circuit to control their intensity. The critics will say he could have just used a cardboard box, or maybe wood if he wanted something a little bit stronger. But the point of this project was never the box itself, or the LEDs inside it. It’s all about the diffuser.

[Nicholas] forked Prusa’s version of Slic3r to add in his “Scattered Rectilinear” infill pattern, which is specifically designed to avoid the standard “ribs” inside of a 3D printed object. This is accomplished with randomized straight infill passes, rather than the traditionally overlapped ones. The inside of the print looks very reminiscent of fiberglass mat, which is perhaps the best way to conceptualize its construction. In terms of the final part strength, this infill is abysmal. But on the plus side, the light from the LEDs passing through it emerges with a soft pleasing look that completely obscures the individual points of light.

Anyone with a big enough 3D printer can run off their own copy of his light, as [Nicholas] has released not only his forked version of Slic3r but all of the STL files for the individual components. He’s also put together an exceptionally well documented Thingiverse page that has instructions and detailed build photos, something that’s unfortunately very rare for that platform.

If you’re in the market for a DIY softbox and don’t have a 3D printer handy, fear not. We’ve covered a few that you can build with more traditional methods, as well as several tips and tricks which you can use to get the most out of your photos and videos.

Particle Paves Way For LTE Selfies

From cars to refrigerators, it seems as if every new piece of tech is connected to the Internet. For better or for worse, we’re deep into the “Internet of Things”. But what about your camera? No, not the camera in your smartphone; that one’s already connected to the Internet and selling your secrets to the highest bidder. Don’t you think your trusty DSLR could be improved by an infusion of Wide Area Networking?

Regardless of what you’re answer to that question might be, [Thomas Kittredge] decided his life would be improved by making his beloved Canon EOS Rebel T6 an honorary member of the Internet of Things. Truth be told he says that he hasn’t quite figured out an application for this project. But since he was looking to mess around with both the LTE-enabled Particle Boron development board and designing his own PCB for professional production, this seemed a good a way to get his feet wet as any.

The resulting board is a fairly simple “shield” for the Particle Boron that let’s [Thomas] trigger up to two cameras remotely over the Internet or locally with Bluetooth. If LTE isn’t your sort of thing though, don’t worry. Since the Boron follows the Adafruit Feather specification, there’s a whole collection of development boards with various connectivity options that this little add-on can be used with.

In the GitHub repository, [Thomas] has put up the files for the PCB, the STLs for the 3D printed enclosure, and of course the firmware source code to load onto the Particle board. He currently has code to expose the two shutter triggers as functions the the Particle Cloud API, as well as a practical example that fires off the camera when specific words are used in a Slack channel.

Out for a little over a year, the Particle Boron is a fairly new addition to the world of cellular development boards. Historically we haven’t seen a whole lot of cellular capable projects, likely because it’s been such a hassle to get them online, but with new boards like the Boron we might start seeing an uptick in the random pieces of gear that have this form connectivity and an internet-facing IP address. Surely nothing bad could come of this!

Super Simple Sensor Makes DSLR Camera Motion Sensitive

Do you have a need to photographically document the doings of warm-blooded animals? If so, a game camera from the nearest hunting supplier is probably your best bet. But if you don’t need the value-added features such as a weather-resistant housing that can be chained to a tree, this DIY motion trigger for a DSLR is a quick and easy build, and probably loads more fun.

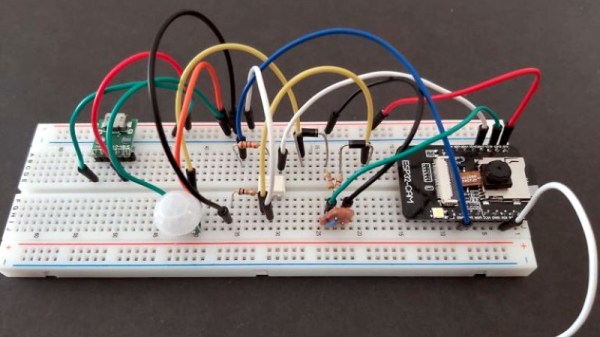
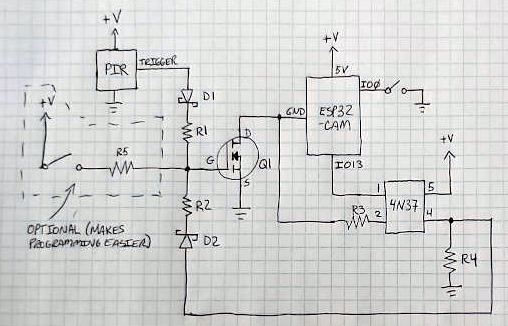
The BOM on [Jeremy S Cook]’s build is extremely short – just a PIR sensor and an optoisolator, with a battery, a plug for the camera’s remote jack, and a 3D-printed bracket. The PIR sensor is housed in a shroud to limit its wide field of view; [Jeremy] added a second shroud when an even narrower field is needed. No microcontroller is needed because all it does is trigger the camera when motion is sensed, but one could be added to support more complicated use cases, like an intervalometer or constraining the motion sensing to certain times of the day. The video below shows the build and some quick tests.

Speaking of intervalometers, we’ve seen quite a few of those over the years. From the tiny to the tinier to the electromechanical, people seem to have a thing for taking snapshots at regular intervals.

Continue reading “Super Simple Sensor Makes DSLR Camera Motion Sensitive”

This Raspberry Pi Is A Stereo Camera And So Much More

Over the years we have featured a huge array of projects featuring the Raspberry Pi, but among them there is something that has been missing in all but a few examples. The Raspberry P Compute Module is the essentials of a Pi on a form factor close to that of a SODIMM module, and it is intended as a way to embed a Pi inside a commercial product. It’s refreshing then to see [Eugene]’s StereoPi project, a PCB that accepts a Compute Module and provides interfaces for two Raspberry Pi cameras.

What makes this board a bit special is that as well as the two camera connectors at the required spacing for stereophotography it also brings out all the interfaces you’d expect on a regular Pi, so there is the familiar 40-pin expansion header as well as USB and Ethernet ports. It has a few extras such as a pin-based power connector, and an on-off switch.

Where are they going with this one? So far we’ve seen demonstrations of the rig used to create depth maps with ROS (Robot Operating System). But even more fun is seeing the 3rd-person-view rig shown in the video below. You strap on a backpack that holds the stereo camera above your head, then watch yourself through VR goggles. Essentially you become the video game. We’ve seen this demonstrated before and now it looks like it will be easy to give it a try yourself as StereoPi has announced they’re preparing to crowdfund.

So aside from the stereophotography why is this special? The answer comes in that it is as close as possible to a fresh interpretation of a Raspberry Pi board without being from the Pi Foundation themselves. The Pi processors are not available to third party manufacturers, so aside from the Odroid W (which was made in very limited numbers) we have never seen a significant alternative take on a compatible Raspberry Pi. The idea that this could be achieved through the Compute Module is one that we hope might be taken up by other designers, potentially opening a fresh avenue in the Raspberry Pi story.

The Raspberry Pi Compute Module has passed through two iterations since its launch in 2014, but probably due to the lower cost of a retail Raspberry Pi we haven’t seen it in many projects save for a few game consoles. If the advent of boards like this means we see more of it, that can be no bad thing.

Continue reading “This Raspberry Pi Is A Stereo Camera And So Much More”

Voice Controlled Camera For Journalist In Need

Before going into the journalism program at Centennial College in Toronto, [Carolyn Pioro] was a trapeze performer. Unfortunately a mishap in 2005 ended her career as an aerialist when she severed her spinal cord,  leaving her paralyzed from the shoulders down. There’s plenty of options in the realm of speech-to-text technology which enables her to write on the computer, but when she tried to find a commercial offering which would let her point and shoot a DSLR camera with her voice, she came up empty.

[Taras Slawnych] heard about [Carolyn’s] need for special camera equipment and figured he had the experience to do something about it. With an Arduino and a couple of servos to drive the pan-tilt mechanism, he came up with a small device which Carolyn can now use to control a Canon camera mounted to an arm on her wheelchair. There’s still some room for improvement (notably, the focus can’t be controlled via voice currently), but even in this early form the gadget has caught the attention of Canon’s Canadian division.

With a lavalier microphone on the operator’s shirt, simple voice commands like “right” and “left” are picked up and interpreted by the Arduino inside the device’s 3D printed case. The Arduino then moves the appropriate servo motor a set number of degrees. This doesn’t allow for particularly fine-tuned positioning, but when combined with movements of the wheelchair itself, gives the user an acceptable level of control. [Taras] says the whole setup is powered off of the electric wheelchair’s 24 VDC batteries, with a step-down converter to get it to a safe voltage for the Arduino and servos.

As we’ve seen over the years, assistive technology is one of those areas where hackers seem to have a knack for making serious contribution’s to the lives of others (and occasionally even themselves). The highly personalized nature of many physical disabilities, with specific issues and needs often unique to the individual, can make it difficult to develop devices like this commercially. But as long as hackers are willing to donate their time and knowledge to creating bespoke assistive hardware, there’s still hope.

Continue reading “Voice Controlled Camera For Journalist In Need”