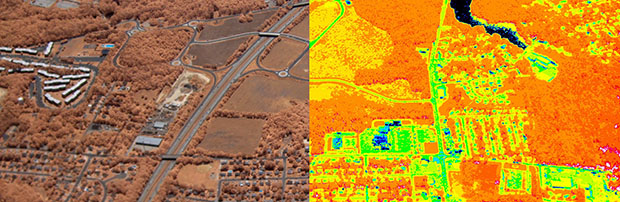
Versatile Motion Dolly For Time Lapse Photography

time-lapse-motion-system

This beautiful build is a motion dolly for making time-lapse videos. It is at a point where you could consider it complete. After all, the segments featured in the video after the break look marvelous. But [Scottpotamas] has a few additions planned and it sounds like it won’t belong before he accomplishes his goals.

The build is a linear rail on which the camera rides. In the image above you can see the stepper motor which moves the camera mounted at the far end of the rig. This is controlled by an Arduino. Currently the camera is responsible for timing the capture of the images, but [Scottpotamas] says the firmware is nearly ready to hand this responsiblity over to the Arduino. The system is modular, with a simple setting for the length of the track. This way he can swap out for a longer or shorter rail which only takes about five minutes. He also included support for a panning mount for the camera. It allows the control box can be programmed to keep the subject centered in the frame as the camera slides along the track.

Continue reading “Versatile Motion Dolly For Time Lapse Photography”

An Absurdly Clever Thermal Imaging Camera

Thermal imaging cameras, cameras able to measure the temperature of an object while taking a picture, are amazingly expensive. For the price of a new car, you can pick up one of these infrared cameras and check out where the drafts are in your house. [Max Justicz] thought he could do better than even professional-level thermal imaging cameras and came up with an absurdly clever DIY infrared camera.

While thermal imaging cameras – even inexpensive homebrew ones – have an infrared sensor that works a lot like a camera CCD, there is a cheaper alternative. Non-contact infrared thermometers can be had for $20, the only downside being they measure a single point and not multiple areas like their more expensive brethren. [Max] had the idea of using one of these thermometers along with a few RGB LEDs to paint different colors of light around a scene in response to the temperature detected by an infrared thermometer sensor.

To turn his idea into a usable tool, [Max] picked up an LED flashlight and saved the existing LED array for another day. After stuffing the guts of the flashlight with a few RGB LEDs, he added the infrared thermometer sensor and an Arduino to change the color of the LED in response to the temperature given by the sensor.

After that, it’s a simple matter of light painting. [Max] took a camera, left the shutter open, and used his RGB thermometer flashlight to paint a scene with multicolor LEDs representing the temperature sensed by the infrared thermometer. It’s an amazingly clever hack, and an implementation so simple we’re surprised we haven’t seen before.

DSLR Trick Lets You Change Focus After Taking The Picture

Here’s two photographic takes on the same subject, each with a different depth of focus. [Chaos Collective] came up with a way to make interactive still images that allow a user to adjust the depth of focus by clicking on different objects in the image.

This was inspired by the Lytro camera which uses an array of lenses to take multiple pictures at once. Each of those images has a slightly different depth of focus. The technique used here doesn’t require that you buy one of those $400+ cameras. But it’s not a cheap hack unless you already own a camera that can shoot video and has manual focus.

The technique used by the [Chaos Collective] is to move the camera’s manual focus setting from the nearest to the furthest target while capturing a video. That file can then be processed using their browser-based tool which turns it into an embedded HTML5 image.

Flash Controller Works With Point And Shoot Cameras

Needless to say, there’s a world of difference between the expensive DSLR cameras professional photographers use and the point-and-shoot models carried by commoners. One such difference is the ability to use slave flashes – a second flash set off to the side of the subject for better illumination. Most of these slave flash units are triggered when they see a bright light, or when the on-camera flash goes off. Point and shoot models usually have a ‘pre-flash’ that cause a slave flash to trigger prematurely. [Kerry] built a really neat slave flash that is able to work with these point-and-shoot cameras, and is pretty easy to build as well.

There are two options when it comes to building a flash that can work with a point-and-shoot: First, measure the time between the pre-flash and real flash, and then simply delay the slave flash. This option has a few problems. Even when [Kerry] tested this technique on the same camera, the delay between the flashes were never consistant.

The second option is to simply ignore the pre flash and synchronize with the main flash. This is a little harder, but if done right this technique is nearly foolproof.

[Kerry] ended up building a small circuit out of a 556 timer chip and an LM339n comparator that turns itself ‘on’ just a little bit after it sees the pre flash. From there, the device looks for the main flash and triggers itself whenever it sees another bright source of light.

The finished product works beautifully, and is simple enough for just about anyone to build on a piece of perf board.

Optimizing Your Electronics Projects With A Camera

What do you do when you have a microcontroller you’re trying to optimize? One method is using a debugger, but for AVRs and such that’s not a very common technique. For lower-level electronics projects, it’s nearly impossible, even. [Cnlohr] built a small Minecraft server that listens to in-game redstone circuits, but the performance of his real-world to block-world bridge wasn’t what he hoped. He came up with a pretty clever way of figuring out what was slowing his server down without any special gear at all.

[cnlohr]’s Minecraft server is just a simple AVR microcontroller, Ethernet adapter, and SD card affixed to a beautiful glass PCB. The performance of his server wasn’t what he expected; downloading a largish file from the server resulted in a download rate of about 55kbps, much slower than he expected. He wasn’t quite sure what the hangup was, so he took a camera and with a long exposure time took a very blurry picture.

The Minecraft server has a blue LED to show when the SD card was being accessed. In the picture above, [cnlohr] saw that SD card access was taking far too long, and if he wanted to optimize the code this would be the place to start.

Not bad for a dead-simple method of seeing where the code on your microcontroller project is slowing down.

Continue reading “Optimizing Your Electronics Projects With A Camera”

Making An Overhead Camera Gantry, Take 2

Last week we saw [Todd]’s solution to getting a tripod out-of-the-way when filming a few DIY videos. It’s an overhead camera gantry that allows him to move a camera around his garage workshop without a tripod getting in the way. This weekend, he’s back with a new and improved version. It’s a vast improvement over his Mk 1 gantry system, and it much simpler to build, to boot.

[Todd]’s new and improved overhead camera gantry builds is a vast improvement on his previous build. In the original build, [Todd] used only one cross piece between the overhead garage door tracks, and the carriage suspending the tripod overhead was extremely clunky.

Version 2 of [Todd]’s camera gantry again makes use of unused garage door tracks to suspend a tripod above his workshop. This time, though, he’s using two rails between these garage door tracks making pushing the tripod around his workshop much easier – even when not pushing it from the middle.

To move the camera across the workspace, [Todd] did away with the square tube between the garage door tracks and used another set of garage door tracks. It’s a beautiful system that moves very, very smoothly between his workbench and welding station, perfect for making a few high-quality DIY videos.

You can check out [Todd]’s build video after the break.

Continue reading “Making An Overhead Camera Gantry, Take 2”

Nikon WU-1a WiFi Dongle Hacking

Here’s a pretty tricky piece of consumer electronics reverse engineering. [Joe Fitz] came across the Nikon WU-1a. It’s a dongle that plugs into a Nikon D3200 camera, producing a WiFi connection which can be picked up and controlled from a smart phone. The app shows you the current image from the viewfinder, allows you to snap the picture, then pulls down the picture afterwards. The problem is that the same functionality for his D800 camera will cost him $1200, when this dongle can be had for $60. That’s a powerful incentive to find a way to use the WU-1a with his camera model. This is more than just rerouting some wires. It involves sniffing the USB traffic and drilling down in the datasheets for the chips used in the hardware. We’re not certain, but he may have even rolled new firmware for the dongle.

Details are a bit scarce right now. Your best bet is to watch the video embedded after the break. There is also a set of slides which [Joe] put together for a talk at this weekend’s BsidesPDX. It will give you a general overview of the process he went through. But he also started a forum thread and we hope to learn much more from that as the conversation gets going.

Continue reading “Nikon WU-1a WiFi Dongle Hacking”