Signal Generator Uses FPGA

Although there are a few exceptions, FPGAs are predominantly digital devices. However, many FPGA applications process analog data, so you often see an FPGA surrounded by analog and digital converters. This is so common that Opal Kelly — a producer of FPGA tools — launched the SYZYGY open standard for interconnecting devices like that. [Armeen] — a summer intern at Opal Kelly — did a very interesting open source FPGA-based signal generator using a Xilinx FPGA, and a SYZYGY-compliant digital to analog converter.

As you might expect, [Armeen] used a lot of Opal Kelly hardware and software in the project. But the Verilog code (available on GitHub) shows a lot of interesting things including some very practical example code for using Xilinx CORDIC IP,  which is a great way to do high-order math using digital logic.

Continue reading “Signal Generator Uses FPGA”

Learn FPGA Fast With Hackaday’s FPGA Boot Camp

FPGAs have gone from being a niche product for people with big budgets to something that every electronics experimenter ought to have in their toolbox. I am always surprised at how many people I meet who tell me they are interested in using FPGAs but they haven’t started. If you’ve been looking for an easy way to get started with FPGAs, Hackaday’s FPGA boot camp is for you. There’s even a Hackaday.io chat in the group specifically for FPGA talk for questions and general discussion!

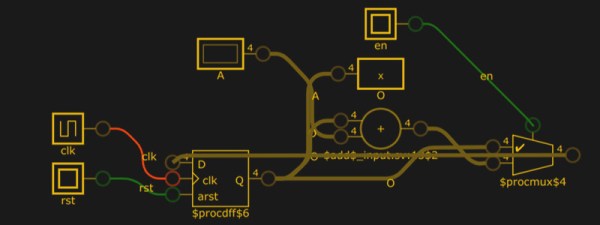
While it is true FPGAs aren’t for everything, when you need them you really need them. Using FPGAs you can build logic circuits — not software simulations, but real circuits — and reap major performance benefits compared to a CPU. For digital signal processing, neural networks, or computer vision applications, being able to do everything essentially in parallel is a great benefit. Sometimes you just need the raw speed of a few logic gates compared to a CPU plodding methodically through code. We expect to see a lot more FPGA activity now that Arduino is in the game.

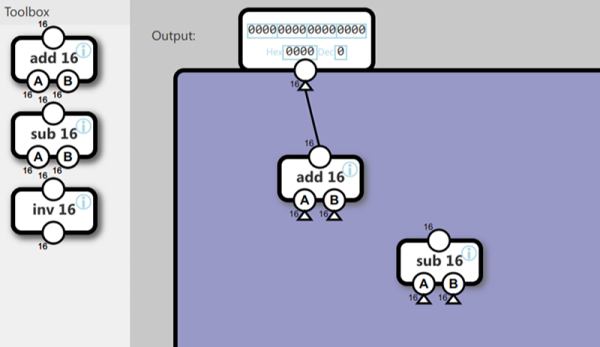
These boot camps gather together some of the material you seen spread over many articles here before, plus new material to flesh it out. It’s designed for you to work through more like a training class than just some text to read. There’s plenty of screenshots and even animations to help you see what you are supposed to be doing. You’ll be able to work with simulations to see how the circuits we talk about work, make changes, and see the results. We’ll focus on Verilog — at least for now — as it is close to C and easier for people who know C to pick up. Still not convinced? Let’s run though the gist of the boot camp series.

Continue reading “Learn FPGA Fast With Hackaday’s FPGA Boot Camp”

Gameduino + Mystorm = Oscilloscope!

There has to be more than one of us who over the years since the launch of systems like the original Game Boy have eyed up these handheld platforms and thought “You could make a really neat little oscilloscope with that!” But the commercial systems are closed-source, locked down, and proprietary, so in many cases there’s little easy prospect of such a device being created.

Fortunately though, there are now very accessible handheld gaming platforms, and [James Bowman], the creator of the Gameduino series of boards, writes in to tell us about an oscilloscope project for the Gameduino 3 created by [Lawrie Griffiths]. It uses a Mystorm FPGA board with an AN108 analogue board, and while the heavy lifting of acquisition is handled by the FPGA it is left to the Mystorm’s STM32 to talk to the Gameduino. There are a few teething troubles such as the Gameduino complaining when it is fed data too quickly, but the result is an effective 8 MHz bandwidth instrument with a touchscreen interface. He does however admit that the interface is a little fiddly at the moment. All the code is available via GitHub, so should you wish to pursue this particular avenue yourself, you can.

The Mystorm has made more than one appearance here over the years, and we’re sure we’ll see more. We saw it emulating a small OLED display to put Arduboy graphics on the big screen, for example, and implementing a complete Acorn BBC Micro home computer.

Hands-On With New Arduino FPGA Board: MKR Vidor 4000

Hackaday brought you a first look the Arduino MKR Vidor 4000 when it announced. Arduino sent over one of the first boards so now we finally have our hands on one! It’s early and the documentation is still a bit sparse, but we did get it up and running to take the board through some hello world exercises. This article will go over what we’ve been able to figure out about the FPGA system so far to help get you up and running with the new hardware.

Continue reading “Hands-On With New Arduino FPGA Board: MKR Vidor 4000”

Interactive Mandelbrot Set Viewer Runs On FPGAs

The Mandelbrot Set is a mathematical oddity where a simple function creates an infinitely complex landscape that you can literally zoom into forever. Like most people, I’ve downloaded Mandelbrot set viewers and marveled at the infinite whorls and spirals, and then waited while each frame took minutes or hours to render as I zoomed in. [Michael Henning], [Max Rademacher] and [Jonathan Plattner] decided to throw some modern computational muscle at this problem by building an interactive Mandelbrot set viewer using a laptop and two FPGA boards.

Continue reading “Interactive Mandelbrot Set Viewer Runs On FPGAs”

An Amiga 600 With An FPGA Inside

The Amiga is the platform that refuses to die. It must be more than two decades since the debacle surrounding the demise of the original hardware, yet the operating system is still receiving periodic updates, you can still buy Amiga hardware now sporting considerably more powerful silicon than the originals, and its worldwide community is as active as ever.

One of those community projects is the MiSTer FPGA Amiga-on-an-FPGA, and it was this that caught the attention of [Mattsoft]. Impressed with the quality of its recreation of an Amiga, he decided to turn his into a “real” Amiga, so found an Amiga 600 case and keyboard, and set to work. Into the mix went the Terasic DE10-Nano FPGA board, I/O and RAM boards, a Tynemouth Software keyboard interface, a USB hub, and some well-designed 3D-printed parts allow the original Amiga case to be used without modifications.

The Amiga 600 was the base model in the final Amiga range from the early 1990s, and at the time despite its HDD interface and PCMCIA slot it languished in the shadow of its Amiga 1200 sibling. The styling has aged well though, and this upgrade certainly breathes a little life back into the case if not strictly the machine itself. If you want to learn a bit more about MiSTer then a look at the project’s wiki is in order. Perhaps you don’t have an Amiga though and would like to wallow in a bit of nostalgia without splashing out for hardware, in that case, give AROS a look.

Thanks [intric8] for the tip.

Exostiv FPGA Debugging Might Be A Bargain

Got $4,000 to spend? Even if you don’t, keep reading — especially if you develop with FPGAs. Exostiv’s FPGA debugging setup costs around $4K although if you are in need of debugging a complex FPGA design and your time has any value, that might not be very expensive. Then again, most of us have a lot of trouble justifying a $4,000 piece of test gear. But we wanted to think about what Exostiv is doing and why we don’t see more of it. Traditionally, debugging FPGAs meant using JTAG and possibly some custom blocks that act like a logic analyzer and chew up real estate on your device. Exostiv also uses some of your device, but instead of building a JTAG-communicating logic analyzer it… well, here’s what their website says:

EXOSTIV IP uses the MGTs (Multi-Gigabit Transceivers) to flow captured data out of the FPGA to an external memory. EXOSTIV IP supports repeating captures of up to 32,768 internal nodes simultaneously at the FPGA’s speed of operation (16 data sets x 2,048 bits).

EXOSTIV IP provides dynamic multiplexer controls to capture even more data sets without the need to recompile. Dynamic ON/OFF controls of data sets let you select the data set and preserve the MGT’s bandwidth for when deeper captures of a reduced set of data is required.

In a nutshell, this means they use high-speed communications to send raw data to a box that has memory and connects back to a PC. That means they can store more data, have more data come out of the chip over a certain time frame, and do sophisticated processing. You can see a video about the device below, and there are more detailed videos on their channel, as well.

Continue reading “Exostiv FPGA Debugging Might Be A Bargain”