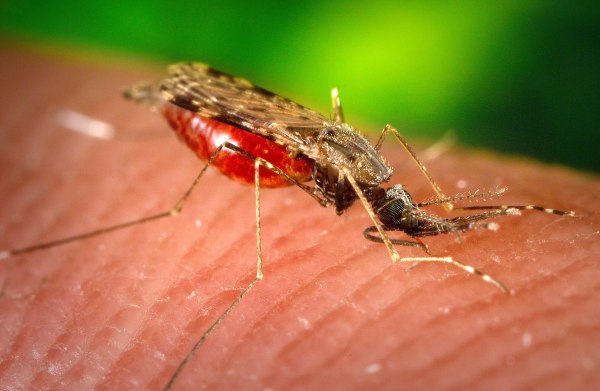
Avocado Harvester Is A Cut Above

For a farmer or gardener, fruit trees offer a way to make food (and sometimes money) with a minimum of effort, especially when compared to growing annual vegetables. Mature trees can be fairly self-sufficient, and may only need to be pruned once a year if at all. But getting the fruit down from these heights can be a challenge, even if it is on average less work than managing vegetable crops. [Kladrie] created this avocado snipper to help with the harvest of this crop.

Compounding the problem for avocados, even compared to other types of fruit, is their inscrutable ripeness schedule. Some have suggested that cutting the avocados out of the trees rather than pulling them is a way to help solve this issue as well, so [Kladrie] modified a pair of standard garden shears to mount on top of a long pole. A string is passed through the handle so that the user can operate them from the ground, and a small basket catches the fruit before it can plummet to the Earth. A 3D-printed guide helps ensure that the operator can reliable snip the avocados off of the tree on the first try without having to flail about with the pole and hope for the best, and the part holds the basket to the pole as well.

For those living in more northern climates, this design is similar to many tools made for harvesting apples, but the addition of the guide solves a lot of the problems these tools can have which is largely that it’s easy to miss the stems on the first try. Another problem with pulling the fruits off the tree, regardless of species, is that they can sometimes fling off of their branches in unpredictable ways which the snipping tool solves as well. Although it might not work well for avocados, if you end up using this tool for apples we also have a suggestion for what to do with them next.

Converting A Sprinkler System To DC

Famously, Nikola Tesla won the War of the Currents in the early days of electrification because his AC system could use transformers to minimize losses for long distance circuits. That was well before the invention of the transistor, though, and there are a lot of systems that still use AC now as a result of electricity’s history that we might otherwise want to run on DC in our modern world. Sprinkler systems are one of these things, commonly using a 24V AC system, but [Vinthewrench] has done some work to convert over to a more flexible 24 VDC system instead.

The main components of these systems that are set up for AC are solenoids which activate various sets of sprinklers. But these solenoids can take DC and still work, so no major hardware changes are needed. It’s not quite as simple as changing power supplies, though. The solenoids will overheat if they’re fully powered on a DC circuit, so [Vinthewrench] did a significant amount of testing to figure out exactly how much power they need to stay engaged. Once the math was done, he uses a DRV103 to send PWM signals to the solenoids, which is set up to allow more current to pull in the solenoids and then a lower holding current once they are activated.

With a DC power supply like this, it makes it much easier to have his sprinkler system run on a solar powered system as well as use a battery backup without needing something like an inverter. And thanks to the DRV103 the conversion is not physically difficult; ensuring that the solenoids don’t overheat is the major concern here. Another great reason to convert to a DIY sprinkler controller is removing your lawn care routine from an unnecessary cloud-based service.

A photo of a large warehouse with many skylights and windows near the roof. In the middle of the image extending out into the distance are hundreds of grey refractory bricks stacked on top of a smaller set of brown bricks stacked on top of pallets. There appear to be rails on the floor of the warehouse and small dollies underneath the pallets.

Thermal Batteries For Lower Carbon Industrial Processes

Heating things up is one of the biggest sources of cost and emissions for many industrial processes we take for granted. Most of these factories are running around the clock so they don’t have to waste energy cooling off and heating things back up, so how can you match this 24/7 cycle to the intermittent energy provided by renewables? This MIT spin-off thinks one solution is thermal storage refractory bricks.

Electrified Thermal Solutions takes the relatively simple technology of refractory brick to the next level. For the uninitiated, refractory bricks are typically ceramics with a huge amount of porosity to give them a combination of high thermal tolerance and very good insulating properties. A number of materials processes use them to maximize the use of the available heat energy.

While the exact composition is likely proprietary, the founder’s Ph.D. thesis tells us the bricks are likely a doped chromia (chrome oxide) composition that creates heat in the brick when electrical energy is applied. Stacked bricks can conduct enough current for the whole stack to heat up without need for additional connections. Since these bricks are thermally insulating, they can time shift the energy from solar or wind energy and even out the load. This will reduce emissions and cost as well. If factories need to pipe additional grid power, it would happen at off-peak hours instead of relying on the fluctuating and increasing costs associated with fossil fuels.

If you want to implement thermal storage on a smaller scale, we’ve seen sand batteries and storing heat from wind with water or other fluids.

A fisheye lens picture over the Junma Solar Power station in the Mongolian desert. There is a large image of a horse made out of solar panels in the image. A sunset is visible in the upper right of the image, but most the picture is brown sand where there aren't dark blue solar panels.

China’s Great Solar Wall Is A Big Deal

Data centers and the electrification of devices that previously ran on fossil fuels is driving increased demand for electricity around the world. China is addressing this with a megaproject that is a new spin on their most famous piece of infrastructure.

At 250 miles long and 3 miles wide with a generating capacity of 100 GW, the Great Solar Wall will be able to provide enough energy to power Beijing, although the energy will more likely be used to power industrial operations also present in the Kubuqi Desert. NASA states, “The Kubuqi’s sunny weather, flat terrain, and proximity to industrial centers make it a desirable location for solar power generation.” As an added bonus, previous solar installations in China have shown that they can help combat further desertification by locking dunes in place and providing shade for plants to grow.

Engineers must be having fun with the project as they also designed the Guinness World Record holder for the largest image made of solar panels with the Junma Solar Power Station (it’s the horse in the image above). The Great Solar Wall is expected to be completed by 2030 with 5.4 GW already installed in 2024.

Want to try solar yourself on a slightly smaller scale? How about this solar thermal array inspired by the James Webb Telescope or building a solar-powered plane?

Practical Guide To Pedal-Powered Electrical Generators

An adult human can produce about 100 Wh of mechanical power whilst cycling, which is a not inconsiderable amount if you can convert that to electricity with reasonable efficiency. In a recent article on EDN [T. K. Hareendran] goes over a few ways that you can turn the rotary motion of pedaling into usable electrical power.

Suggested voltage regulator for pedal-powered generator. (Credit: T. K. Hareendran, EDN)

A basic form of this is already widely deployed, in the form of a bicycle dynamo that is used to supply power to the front and rear lights. These typically put out something like 3 watts at 6 VAC, so with a simple bridge rectifier and some smoothing this can power a pretty bright LED or two. To get more out of it, you need to use a more capable generator, which can also be a brushed or brushless DC motor in a pinch, with ideally a flywheel in the whole contraption to balance out variations in the human power input.

As for the potential here, a commercial solution like the K-Tor Power Box 50 is specified for ‘greater than’ 50 Watt, with a nominal 12 VDC output. Its target market is emergency generators, with enough capability to keep phones, radios and flashlights charged. Considering the $435 asking price, there is probably quite a lot of DIY potential well within that price bracket, especially if you already have many of the requisite parts lying around.

Fortunately this is not a new idea, with us having covered using bicycles as well as gym equipment to generate electricity in the past.

Three stages of the dam construction

How To Convert A Drain Into A Hydropower Facility

Over on his YouTube channel [Construction General] shows us how to convert a drain into a hydropower facility. This type of hydroelectric facility is known as a gravitation water vortex power plant. The central structure is a round basin which includes a central drain. The water feeds into the basin through a series of pipes which help to create the vortex which drives the water turbine before flowing out the drain.

To make the facility [Construction General] starts by laying some slabs as the foundation. One of the slabs has a hole to which the central drain pipe is attached. Bricks and mortar are then used to build the basin around the drain. A temporary central pipe is used for scaffolding along with some strings with hooks attached to hold the bricks and mortar in place for the basin. Integrated into the top half of the basin are fifteen inlet pipes which feed in water at an angle.

The next step is to build the dam wall. This is a bricks and mortar affair which includes the drain in the bottom of the wall and two spillways at the top. The spillways are for letting water flow out of the dam if it gets too full. Around the drainage in the dam wall a valve is installed. This valve is called the low-level outlet or the bottom outlet, and in this case it is a sluice, also known as a slide gate, which can be raised or lowered to control the rate of flow through the turbine.

Once the basin is complete and the low-level outlet is in place the scaffolding is removed. The basin is then painted, pink on the inside and white around the top. A turbine is constructed from various metal pieces and installed into the basin. The turbine is attached to a generator which is fixed atop the basin. The apparatus for operating the low-level outlet is installed and the dam is left to fill.

Hydropower is a topic we’ve covered here at Hackaday before, if you’re interested in the topic you might like to check out A Modest But Well-Assembled Home Hydropower Setup, Hydropower From A Washing Mashine, or Bicycle Hub Hydropower.

Continue reading “How To Convert A Drain Into A Hydropower Facility”

DIY Wind Turbine Gets A 3-Phase Rectifier

[Electronoobs] is using some brushless motors to make a DIY wind turbine. His recent video isn’t about the turbine itself, but a crucial electronic part: the three-phase rectifier. The reason it is so important is due to the use of brushless motors. Normal motors are not ideal for generating power for several reasons, as explained in the video below.

The brushless motors have three windings and generate three outputs, each out of phase with the others. You can’t just join them together because they are 120 degrees out of phase. But a special rectifier can merge the inputs efficiently and output a low-ripple DC voltage.

Continue reading “DIY Wind Turbine Gets A 3-Phase Rectifier”