Playing Music On A Custom Flyback Transformer

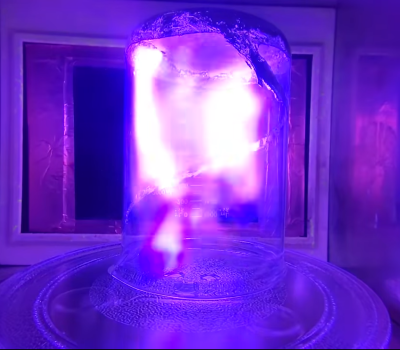
We’ve seen a number of people create plasma speakers over the years here at Hackaday, so at first blush, the latest Plasma Channel video from [Jay Bowles] might seem like more of the same. Even his overview of the assembly of the 555 timer circuit at the heart of the setup, as detailed as it may be, is something we’ve seen before.

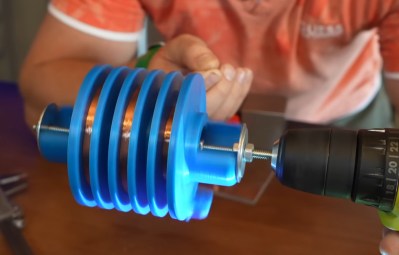
But the back half of the video, where [Jay] talks about the flyback transformer used in this plasma speaker, really got our attention. You see, frustrated by the limited options on the market for AC flybacks, he set out to put together a custom transformer utilizing a 3D printed secondary former of his own design.

Winding an early version of the secondary with a drill.

Armed with a spare core, [Jay] spent some time in CAD coming up with his secondary. Despite never having built a flyback before, his first attempt managed to produce some impressive sparks — that is, until it arced through the printed plastic and released the critical Magic Smoke. Inspired by this early success, he went back to the digital drawing board and cranked his way through several different iterations until he came up with one that didn’t self-destruct.

Continue reading “Playing Music On A Custom Flyback Transformer”

Domesticating Plasma With A Gorgeous Live Edge Table

If you’ve been reading Hackaday for any length of time, you’ll know we don’t often cover woodworking projects here. It’s not because we aren’t impressed with the skill and effort that folks put into them, and truth be told, we occasionally we even feel a pang of envy when looking at the final result. It’s just that, you know…they’re made of wood.

But when [Jay Bowles] of Plasma Channel sent in this live edge wooden table that features not only a pair of custom-made neon tubes but the burned out transistors and ICs from his previous high-voltage exploits — we knew this wasn’t exactly your grandpa’s idea of woodworking. In fact, he wisely offloaded a lot of the dead tree cutting and shaping to the burly gentlemen at the local sawmill so he could better focus his efforts on the sparky bits.

At its core, he’s created what’s generally known as a “river table” — a surface made of two or more pieces of live edge wood (that is, a piece of lumber that features at least one uncut edge) that are linked via a band of colored epoxy which looks like flowing water. It’s not uncommon to embed stones or even fake fish in the epoxy to really sell the underwater effect, but this is Plasma Channel we’re talking about, so [Jay] had other ideas.

The first step was hitting up a local neon supplier who could fabricate a pair of neon tubes which roughly followed the shape of his epoxy river. While he was waiting for them to be finished, [Jay] played around with a clever experimental rig that let him determine how thick he could pour the epoxy over the tubes before he lost the capacitive coupling effect he was going for. By embedding a short length of neon tube off-center in a block of epoxy, he could see how the thickness impacted his ability to manipulate the plasma with a wave of his hand just by flipping it over.

With the tube placed on clear standoffs, he was able to position it at the ideal depth for the final epoxy pours. It was around this time that he scattered the remains of his previous projects on the “bottom” of the river, so they can spend the rest of their days looking up at his latest technical triumph. We’re not sure if this is to punish the fallen silicon for giving up early or to honor their sacrifice in the name of progress, but in either event, we respect anyone who keeps a jar of blown components laying around for ritualistic applications.

Once the table was assembled, all that was left was to power the thing. Given his previous projects, [Jay] had no shortage of existing HV supplies to try out. But not being satisfied with anything in the back catalog, he ended up building a new supply that manages to pump out the required amount of juice while remaining silent (to human ears, at least). The unit is powered by a battery pack cleverly embedded into the legs of the table, and is easy to fiddle with thanks to a pulse-width modulation (PWM) module wired hooked to the input. All the components were then held in place with a wide array of custom brackets courtesy of his newly arrived 3D printer.

There’s a lot to love about this project, and more than a few lessons learned. Whether you’re interested in recreating the Tron-like effect of the neon tubes, or have been contemplating your own epoxy-pour worktable and want to see how a first-timer tackles it, this video is a great resource.

Continue reading “Domesticating Plasma With A Gorgeous Live Edge Table”

Another Magnetron Teardown

[Electronoobs] has a healthy respect for the voltages and ceramics inside a microwave oven. But he still found the courage to tear one apart and show us the insides and characterize some of the components. You can see the video of the teardown below.

The danger of the voltage is obvious. However, there is also a ceramic insulator inside. Some of them are made from aluminum oxide, but others are made with beryllium oxide. You probably don’t want to inhale either one, but beryllium oxide, if powdered, can cause serious health problems. Obviously, you need to be careful if you decide to rip your oven open.  Of course, the other danger is if you put the oven back together and try to use it. You need to ensure all the shielding is back in the proper place.

The video shows the operation of several of the components using test equipment and, in some cases, some surrogate components. The animation of an LC oscillator is very easy to understand. However, when he actually cuts into the magnetron with a rotary tool, you can really see how the device works. Some animations make it even clearer.

We haven’t seen a magnetron teardown for a few years. You can do many things with a magnetron from radar to vacuum deposition of films.

Continue reading “Another Magnetron Teardown”

Restarting The Grid When The Grid Is Off The Grid

If you watch YouTube long enough, it seems like going “off the grid” is all the rage these days. But what if the thing that goes off the grid is the grid itself? In the video below the break, [Grady] with Practical Engineering explores the question: How do you restart an entire power grid after it’s gone offline? It’s a brilliantly simple deep dive into what it takes to restore power to large amounts of customers without causing major damage to not just the grid, but the power generators themselves.

What’s A Power Grid Operators Favorite Band?

The hackers among us who’ve dealt with automotive alternators know it must be excited in order to generate electricity. What does that even mean, and how does it affect the grid? Simply put, it takes power to make power. For example, old heavy equipment had what they called pony motors — a small easy to start engine that’s sole purpose was to start a much larger engine. Aircraft have auxiliary power units (APUs) for the same purpose. What do power grids have? You’ll have to watch the video to find out.

Once at least two power generators are online, grid operators can just flip the switch and start feeding power to customers, right? Not quite. [Grady] once again uses a clever test jig and an oscilloscope to show the damage that can occur if things aren’t done just right. It’s a fascinating video well worth watching.

Learn how grid operators use a Power Grid Emulator called LEGOS to help them with keeping the electrons flowing in the right direction.

Continue reading “Restarting The Grid When The Grid Is Off The Grid”

Plasma Channel Shows Off A Remarkably Stylish Fusor

We’ve seen our fair share of Farnsworth–Hirsch fusors over the years — these high-voltage devices can get ions cooking to the point of achieving nuclear fusion even on a hobbyist’s budget, and even though they won’t solve the world’s energy problems, they certainly make for an impressive light show. While “simple” to build in the relative sense, the examples we’ve seen in the past have still been bulky contraptions supported by a cart full of complex gear befitting a nuclear reactor.

Which is why the fusor [Jay Bowles] recently completed is so impressive. As you can see in the latest Plasma Channel video which we’ve placed below the break, this desktop “star in a jar” not only features an incredibly low part count, but looks more like a movie prop than anything you’d expect to find in a physics lab. If you ever considered building a fusor of your own but were put off by the size and complexity of existing designs, you’ll definitely want to check this out.
Continue reading Plasma Channel Shows Off A Remarkably Stylish Fusor”

Electric Guitar Shocks You For Missing A Note

Rocksmith is a popular video game that works like Guitar Hero, but with a real guitar. You have to play well and hit the right notes, or the game penalizes your score. [Lightwing] took the stakes up a notch, though, adding a system that shocks the player every time they fail.

To achieve this, it was necessary to detect when the player missed a note. Initial attempts involved using Tensor Flow AI to detect the game state from the screen, but it was unreliable. Instead, the game’s memory was read to achieve detection. When the player misses a note, a certain section of memory changes, and a script reads the change in game state. It then sends a signal to an Arduino which triggers the stun gun’s fire button, which shocks the player holding the guitar.

As you might expect, the documentation for this project includes a video which involves plenty of gratuitous electric shocks when [Lightwing] makes mistakes. Fair warning — there’s plenty of colorful language when the stun gun fires. Generally, a powerful shock ends with screams a dropped guitar, and too much fear to continue.

It’s painful enough that it’s probably not a useful teaching tool for learning the guitar. We’ve seen similar shocking builds before, too, like this simple wire game.

Continue reading “Electric Guitar Shocks You For Missing A Note”

This Scratch-Built X-Ray Tube Really Shines

On no planet is making your own X-ray tube a good idea. But that doesn’t mean we’re not going to talk about it, because it’s pretty darn cool.

And when we say making an X-ray tube, we mean it — [atominik] worked from raw materials, like glass test tubes, tungsten welding electrodes, and bits of scrap metal, to make this dangerously delightful tube. His tool setup was minimalistic as well– where we might expect to see a glassblower’s lathe like the ones used by [Dalibor Farny] to make his custom Nixie tubes, [atominik] only had a small oxy-propane hand torch to work with. The only other specialized tools, besides the obvious vacuum pump, was a homebrew spot welder, which was used to bond metal components to the tungsten wires used for the glass-to-metal seals.

Although [atominik] made several versions, the best tube is a hot cathode design, with a thoriated tungsten cathode inside a copper focusing cup. Across from that is the anode, a copper slug target with an angled face to direct the X-rays perpendicular to the long axis of the tube. He also included a titanium electrode to create a getter to scavenge oxygen and nitrogen and improve the vacuum inside the tube. All in all, it looks pretty similar to a commercial dental X-ray tube.

The demonstration in the video below is both convincing and terrifying. He doesn’t mention the voltage he’s using across the anode, but from the cracking sound we’d guess somewhere around 25- to 30 kilovolts. The tube really gets his Geiger counter clicking.

Here’s hoping [atominik] is taking the proper precautions during these experiments, and that you do too if you decide to replicate this. You’ll also probably want to check out our look at the engineering inside commercial medical X-ray tubes.

Continue reading “This Scratch-Built X-Ray Tube Really Shines”