[eta] found herself in a flat with several LKV373 HDMI extenders. Find the corresponding transmitter, plug it into your device, and you’ve got a connection to the TV/sound system, no fussing with wires behind the TV. However, [eta] wanted to get rid of the need to plug in a laptop and start sending packets directly to play music. As her flatmate [dan] had already reverse-engineered the receiver, she tested her prototype against their virtualized receiver, de-ip-hmdi.
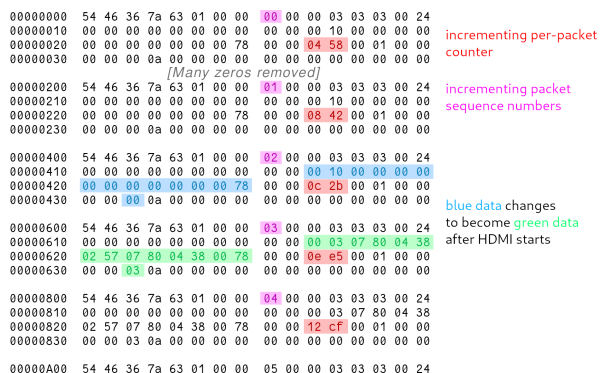
The actual sending of images was surprisingly straightforward — just a JPEG sliced into 1024 bytes chunks and sent over. However, early testing showed nothing on the receiver. The end of a frame needed marking by setting the most-significant bit of the chunk number to one. Now de-ip-hdmi showed the image, but the actual hardware would not. With something missing, [eta] returned to Wireshark to scan packets. Noticing some strange packets on port 2067, she analyzed the pattern to reveal it sent another packet just before a new frame and included the frame number. With this tweak, it was still not enough. Ultimately, heartbeat packets sent every second synchronize things, but compared to the noise of the video packets, they were easy to miss. Now [eta] had some functioning video streaming rust code.
In theory, audio for the LKV373 followed the same thought process as video. Two channels of 32-bit big Endian integers at 44,100 hz chunked into 992-byte sections and sent as a packet formed the audio stream. With only 992 bytes, two streams, and 4 bytes per sample, each packet only held 2.812 milliseconds of sound. The first tests resulted in no audio output or distorted crunchy sound. Of course, this was every audio engineer’s worst nightmare: jitter. With a spin loop and an efficient ring buffer, the audio packets were soon slinging across the network reliably.
The code is available on a hosted version of GitLab. It’s a beautiful journey through reverse engineering some obscure but relatively cheap hardware. Along the way, there is nicely annotated Rust code, which makes it all the better.