Sawblade Turned Beyblade Looks Painful To Tangle With

Beyblades were a huge craze quite some years back. Children battled with spinning tops in small plastic arenas, or, if their local toy stores were poorly merchandised, in salad bowls and old pie dishes. The toys were safe enough, despite their destructive ethos, by virtue of being relatively small and lightweight. This “Beyblade” from [i did a thing] is anything but, however. 

The build begins with a circular saw blade over 1 foot in diameter, replete with many angry cutting teeth that alone portend danger for any individual unlucky enough to cross its path. Saw blades tend to cut slowly and surely however, so to allow the illicit Bey to deal more traumatic blows, a pair of steel scraps are welded on to deliver striking blows as well. This has the added benefit of adding more mass to the outside of the ‘blade, increasing the energy stored as it spins.

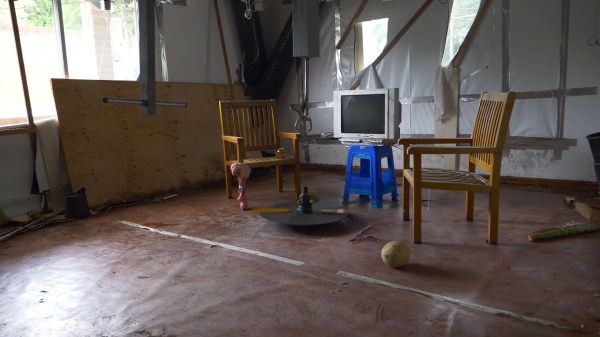
With the terrifying contraption spun up to great RPM by a chainsaw reeling in string, it’s able to demolish cheap wood and bone with little resistance. Shrapnel is thrown in many directions as the spinner attacks various objects, from a melon to an old CRT TV. We’d love to see the concept taken further, with an even deadlier design spun up to even higher speeds, ideally with a different tip that creates a more aggressive motion across the floor.

As aggressive as this saw blade looks in action, not all are so scary. Even paper can do the job under the right conditions. Video after the break.

Continue reading “Sawblade Turned Beyblade Looks Painful To Tangle With”

Wires Vs Words — PCB Routing In Python

Preferring to spend hours typing code instead of graphically pushing traces around in a PCB layout tool, [James Bowman] over at ExCamera Labs has developed CuFlow, a method for routing PCBs in Python. Whether or not you’re on-board with the concept, you have to admit the results look pretty good.

GD3X Dazzler PCB routed using CuFlow

Key to this project is a concept [James] calls rivers — the Dazzler board shown above contains only eight of them. Connections get to their destination by taking one or more of these rivers which can be split, joined, and merged along the way as needed in a very Pythonic manner. River navigation is performed using Turtle graphics-like commands such as left(90) and the appropriately named shimmy(d)that aligns two displaced rivers. He also makes extensive use of pin / gate swapping to make the routing smoother, and there’s a nifty shuffler feature which arbitrarily reorders signals in a crossbar manner. Routing to complex packages, like the BGA shown, is made easier by embedding signal escapes for each part’s library definition.

We completely agree with [James]’s frustration with so many schematics these days being nothing more than a visual net lists, not representing the logical flow and function of the design at all. However, CuFlow further obfuscates the interconnections by burying them deep inside the wire connection details. Perhaps, if CuFlow were melded with something like the SKiDL Python schematic description language, the concept would gain more traction?

That said, we like the concept and routing methodologies he has implemented in CuFlow. Check it out yourself by visiting the GitHub repository, where he writes in more detail about his motivation and various techniques. You may remember [James] two of his embedded systems development tools that we covered back in 2018 — the SPI Driver and the I2C driver.

Custom Built 12-Port A/V Switch Keeps CRT Well Fed

Classic gaming aficionados who prefer to play on real hardware know the struggle of getting their decades-old consoles connected to a modern TV. Which is why many gamers chose to keep a contemporary CRT TV around for when they want to take a walk down memory lane. Unfortunately those old TVs usually didn’t offer more than a few A/V ports on the back, so you’ll probably need to invest in a A/V switch to keep them all hooked up at once.

That’s the situation [Thomas Sowell] found himself in, except he couldn’t find one with enough ports. Rather than chain switches together, he decided to build his own custom 12-port console selector. With an integrated amplifier to keep everything looking sharp, a handsome walnut and metal enclosure, and a slick graphical interface that shows the logo of the currently selected console on a Vacuum Fluorescent Display (VFD), the final product is a classic gamer’s dream come true.

A peek under the hood.

To switch the audio [Thomas] is using a pair of ADG1606 16-channel analog multiplexers, while video is shuffled around with four MAX4315 8-channel video multiplexer-amplifiers. The math might seem a bit off at first, but he’s using one ADG1606 for each stereo channel and since the switch is for S-Video, each device has a luminance and color signal that needs to be handled separately. The multiplexers are flipped with a ATmega2561 microcontroller, which is also responsible for reading user input from a rotary encoder on the front of the case and displaying the appropriate console logo on the 140×32 Noritake VFD.

You may be surprised to find that [Thomas] considered himself an electronics beginner when he started this project, and that this is only the second PCB he’s ever designed. Was this a bold second project? Sure. But it also speaks to how far DIY electronics has come over the last years. Powerful open source tools, modular components, and of course a community of creative folks willing to share their knowledge and designs, has gone a long way towards redefining whats possible for the individual hacker and maker.

Continue reading “Custom Built 12-Port A/V Switch Keeps CRT Well Fed”

Pneumatic Actuator Made Out Of Lasercut Plastic

Pneumatics are a great solution for all kinds of actuators, and can even be used for logic operations if you’re so inclined. Typically, such actuators rely on nicely machined metal components with airtight rubber seals. But what if you did away with all that? [Richard Sewell] decided to investigate.

The result is a pneumatic actuator built out of lasercut acetal parts. The mechanism consists of of two outer layers of plastic acting as the enclosure, and a cut-out middle layer which creates the air chamber and houses the actuating arm itself. It’s a single-acting design, meaning the air can push the actuator one way, with a spring for return to the neutral position. The action is quite fast and snappy, too.

[Richard] aims to tweak the design further by improving the registration between the features of each layer and reduce the rubbing of the actuator’s rotor on the surrounding parts. If you’ve got the know-how, sound off in the comments. Alternatively, consider looking into soft pneumatics as well. Video after the break.

Continue reading “Pneumatic Actuator Made Out Of Lasercut Plastic”

A Floppy Controller For The Raspberry Pi

The Raspberry Pi is the darling single board computer that is everything to everyone. It even has lit up the eyes of the older set with the Pi 400 mimicking the all-in-one keyboard computer design so popular in the 1980s. Another project that harkens back to that golden era is this Raspberry Pi floppy controller board from [Dr. Scott M. Baker].

[Scott] is no stranger to floppy controllers, having worked with the popular WD37C65 floppy controller IC before with the RC2014 homebrew Z80 computer. Thus, it was his part of choice when looking to implement a floppy interface on the Raspberry Pi. The job was straightforward, and done with just the IC itself. Despite the Pi running at 3.3 V and the controller at 5 V, [Scott] has found no problems thus far, implementing just a resistor pack to try and limit damage from the controller sending higher voltage signals back to the Pi. With that said, he plans to implement a proper level shifter down the road to ensure trouble-free operation long term.

The project is rounded out with a bunch of Python tools used to interface with the controller, available on Github. Performance is limited by the non-realtime nature of the Raspberry Pi’s user mode operation, which [Scott] notes could be fixed with a kernel module. With that said, if you’re looking for performance, floppies aren’t it anyway.

We do love the Pi put to use in retro tasks; it can even be a SCSI Swiss Army Knife if you need one. Video after the break.

Continue reading “A Floppy Controller For The Raspberry Pi”

Hershey Fonts: Not Chocolate, The Origin Of Vector Lettering

Over the past few years, I kept bumping into something called Hershey fonts. After digging around, I found a 1967 government report by a fellow named Dr. Allen Vincent Hershey. Back in the 1960s, he worked as a physicist for the Naval Weapons Laboratory in Dahlgren, Virginia, studying the interaction between ship hulls and water. His research was aided by the Naval Ordnance Research Calculator (NORC), which was built by IBM and was one of the fastest computers in the world when it was first installed in 1954.

The NORC’s I/O facilities, such as punched cards, magnetic tape, and line printers, were typical of the era. But the NORC also had an ultra-high-speed optical printer. This device had originally been developed by the telecommunications firm Stromberg-Carlson for the Social Security Administration in order to quickly print massive amounts of data directly upon microfilm.

Continue reading “Hershey Fonts: Not Chocolate, The Origin Of Vector Lettering”

The Word Clock You Can Feel

By this point, pretty much everyone has come across a word clock project, if not built one themselves. There’s just an appeal to looking at a clock and seeing the time in a more human form than mere digits on a face. But there are senses beyond sight. Have you ever heard a word clock? Have you ever felt a word clock? These are questions to which Hackaday’s own [Moritz Sivers] can now answer yes, because he’s gone through the extreme learning process involved in designing and building a haptic word clock driven with the power of magnets.

Individual letters of the display are actuated by a matrix of magnetic coils on custom PCBs. These work in a vaguely similar fashion to LED matrices, except they generate magnetic fields that can push or pull on a magnet instead of generating light. As such, there are a variety of different challenges to be tackled: from coil design, to driving the increased power consumption, to even considering how coils interact with their neighbors. Inspired by research on other haptic displays, [Moritz] used ferrous foil to make the magnets latch into place. This way, each letter will stay in its forward or back position without powering the coil to hold it there. Plus the letter remains more stable while nearby coils are activated.

Part of the fun of “ubiquitous” projects like word clocks is seeing how creative hackers can get to make their own creations stand out. Whether it’s a miniaturized version of classic designs or something simple and clean, we  love to see them all. Unsurprisingly, [Moritz] himself has impressed us with his unique take on word clocks in the past. (Editor’s note: that’s nothing compared to his cloud chambers!)

Check out the video below to see this display’s actuation in action. We’re absolutely in love with the satisfying *click* the magnets make as they latch into place.

Continue reading “The Word Clock You Can Feel”