arduino_bootloader_burner

A Beginner’s Guide To Burning Arduino Bootloaders

When it comes to learning about microcontrollers, everyone has to start somewhere. [Lady Ada] recently posted a tutorial on burning the Arduino bootloader to standalone chips for those just getting started with the micro.

The tutorial cites a common situation, where someone is working on a project using an Arduino chip but they don’t want to sacrifice their dev board when just the micro and a few other components would do just fine. A short list of supplies is required, including an Arduino, a proto shield kit, a ZIF socket, and a blank ATmega chip.

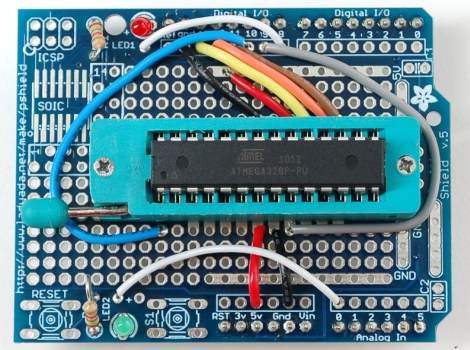
The process is probably pretty straightforward and likely familiar to many of you out there. The ZIF socket is soldered to the board and handful of wires are added for powering and programming the new chip. The protoboard is installed on top of the Arduino like any other shield, and using a sketch that [Lady Ada] has made available, the bootloader burning process is a cinch.

It’s a useful tip for newcomers, and definitely a skill that seasoned Arduino users should have under their belts as well.

High Voltage Hacks: All About Electroluminescence

Although many might not know it, electroluminescent materials use high voltage, and thus qualify for our featured topic. Many may assume that these sheets work in the same way as LED lights, using low-voltage DC power.  This, however, is not the case, as they need around 100 volts of AC current to allow them to light up.

For a battery-powered solution, this means converting the battery’s DC power to AC. Adafruit has a good tutorial about working with EL wire and powering it up using a portable inverter. One should obviously be careful to properly insulate any clothing using this material as being shocked is generally not fun.

The video after the break is pretty long, but is well produced and will give you a good background of EL use. If you don’t have 30 minutes to dedicate to this, be sure to at least skip to 2:43 to see one of the coolest EL shirts we’ve seen. Continue reading “High Voltage Hacks: All About Electroluminescence”

High Voltage: Lightning Simulator Can’t Send You Back To The Future

Continuing on with our high-voltage theme, today we have a page describing Marx generators by [Grenadier]. Marx generators are devices that produce pulses of very high voltage with fast rise times. For most of us, that means that they can make neat sparks. For the more serious types out there, that also means that they are great for driving some high-powered lasers, simulating lightning strikes, and even igniting the conventional explosives surrounding the core of a nuclear weapon! His page includes a video of his Marx generator producing some pretty sparks for those of us who aren’t so serious.

We have featured several of [Grenadier’s] projects in the past. This one doesn’t deviate from his normal style of taking a subject and clearly describing it with lots of well-taken pictures.

Recently, he has been working on improving one of his projects that deviates from what he normally does. He is calling it “The Junkbox”. The Junkbox is something like a free online swap meet where you can sell your electronic parts.

Video: Shocking [Jack] Into Submission With High Voltage

Hackaday headquarters has recently been overrun by techno-groupies hanging around outside so we decided to take some measures to discourage that. A word of warning though, if last week’s video ruffled your feathers then you probably shouldn’t watch this one. In this video [Jack] shows you how to create a stun glove using a disposable camera and some leather spikes. To prove that it really works, he intentionally takes a jolt from it courtesy of Hackaday’s security chief [Vlad].

Check out the video after the break.
Continue reading “Video: Shocking [Jack] Into Submission With High Voltage”

Basic Animatronics Continued: Servo Actuated Mouth

[Chris] is at it again and this time he has put together a tutorial rounding off his animatronic face by actuating the mouth. His tutorial covers two different styles of robot mouth: an LCD mouth which dims to imply actuation and a servo articulated flap.

[Chris] covers all the aspects of each mouth type, from the basics of human mouth actuation to servo motor control. In this case the LCD mouth is not quite as impressive so it gets installed on a face mock up while the servo mouth goes on the face previously featured in his other tutorials. The entire setup is still controlled using a single PIC 18F452. The circuit diagrams and code for both types of mouth are all available on the site including videos of the actuated mouth and a gif of the LCD mouth in action.

Check out a video of the articulated mouth below throwing down some classic season 6 Jean-Luc. If you are interested in the other parts of the face we have covered [Chris]’s other tutorials on the eyebrows and the eyeballs. These are a great jumping point for your own animatronic face project and do a great  job of setting up all the know how you’d need to build your own emotional puppet.

Continue reading “Basic Animatronics Continued: Servo Actuated Mouth”

MilliOhm Measurement Made Easy

When [Kerry] wanted to measure some very small resistances very accurately he did not want to fork out the big bucks for a high end multimeter or a mico-ohmmeter, so he decided to build one himself. Measuring resistance is a simple enough concept, it directly implements Ohms law (V=IR). The problem with very small resistances is that when you apply a sensibly sized constant current to the load, the voltage to be measured is too small for conventional multimeter.

To overcome the problem [Kerry] designed a constant current source of very high accuracy using the AD8276 unity gain difference amplifier and the AD8603 high precision opamp. Then to boost the voltage across the load he used the LMP8358 programmable gain precision opamp, this allowed him to easily change the gain for different magnitude resistance, the circuit diagrams are all available on his site. Finally he used four point probes to eliminate probe wire resistance errors, ending up with the ability to measure small resistances with very high accuracy.

Eye See You.

So you want to add animated eyes to your next robot? Now you can.. Using ping-pong balls, some scrap plastic and 6 servo motors [Chris] has created these animatronic eyes along with some nifty animated eyebrows. To get motion emulating realism [Chris] created a 2 axis gimbal using plastic rings and some nuts and bolts. The eyes (ping-pong balls) are held in the gimbal and actuated using two servos each. The eyebrows use another pair of servos and some tubing covered in electrical tape as the actual eyebrow.

[Chris] Kindly goes through the entire build process including information for beginners such as servo motor control. The whole thing is controlled using a PIC 18F452 and circuit diagrams and code are all available on the site. Check out the video after the break to see the eyes in action, you will also find more videos describing the build process if you follow through the tutorial.

Continue reading “Eye See You.”