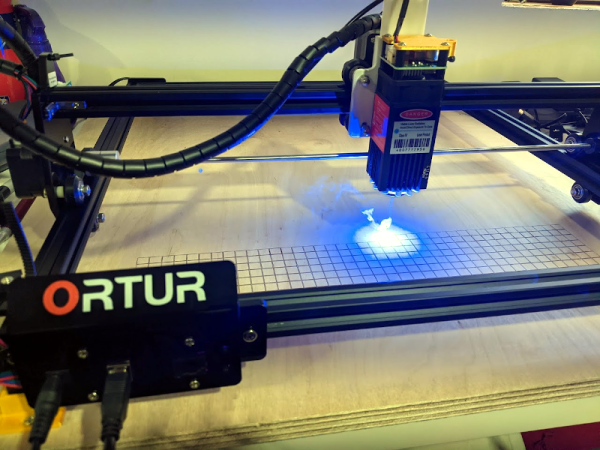
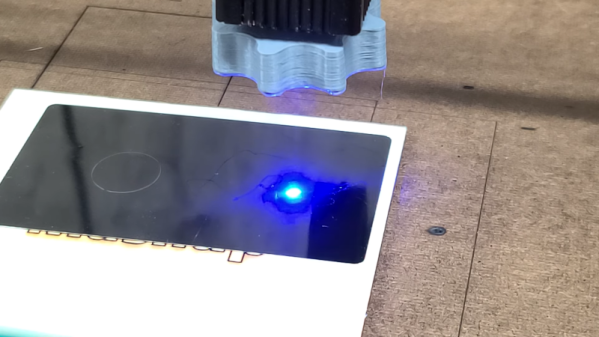
Star Wars Themed Laser Badge: All That Is Missing Is The Pew Pew Sound Effect

In the quest to advance the art of the electronic badge, the boundaries of what is possible to manufacture in small quantities are continually tested. Full-colour PCBs, injection moulding, custom keyboards, and other wow factor techniques have all been tried, leading to some extremely impressive creations. With all this innovation then it’s sometimes easy to forget that clever design and a really good idea can produce an exceptional badge with far more mundane materials.

The 10th InCTF cybersecurity contest held at Amrita, Kerala, India, had a Star Wars themed badge designed by Team bi0s for the event. It takes the form of a Millennium Falcon-shaped PCB, with a NodeMCU ESP8266 board mounted on it, a shift register, small OLED display, and the usual array of buttons and LEDs. The fun doesn’t stop there though, because it also packs a light-dependent resistor and a laser pointer diode that forms part of one of its games. Power for this ensemble comes courtesy of a set of AA cells on its underside.

They took a novel approach to the badge’s firmware, with a range of different firmwares for different functions instead of all functions contained in one. These could be loaded through means of a web-based OTA updater. Aside from a firmware for serial exploits there was an Asteroids game, a Conway’s Game Of Life, and for us the star of the show: a Millennium Cannon laser-tag game using that laser. With this, attendees could “shoot” others’ LDRs, with three “hits” putting their opponent’s badge out of action for a couple of minutes.

Unusually this badge is a through-hole design as a soldering teaching aid, but its aesthetics do not suffer for that. We like its design and we especially like the laser game, we look forward to whatever next Team bi0s produce in the way of badges.

This isn’t the first badge packing a laser we’ve seen, at last year’s Def Con there was a laser synth badge. No laser tag battles though.

A Laser Drawing Machine For Flashes Of Creativity

Ahh, midterms. Some students blow off steam between study sessions by playing video games or just zoning out. While those kids were all distracted, [Justinwong777] and his buddy [Brett] found a bunch of scrap wood and built this laser drawing machine in their school’s makerspace. You operate it as you might an Etch-a-Sketch, except your drawings are as fleeting as sparkler art on the 4th of July, if they made Tron-colored sparklers.

Though you work it like an Etch-a-Sketch, the business end operates like a laser cutter. Inside that plywood enclosure is an Arduino Uno and a pair of motors. These motors turn a series of custom gears, which move a small mirror angled at 45° in the xy-plane.  There’s a 30mW laser mounted parallel with the base, pointed at the mirror, and it reflects the beam toward a canvas panel coated with phosphorescent paint. We dig the printed ergonomic case for the joystick, which gives control of both x and y. Put on some eye protection and check it out after the break.

If you want to draw with lasers, but aren’t much of an artist, do something unexpected: build a laser turret not to kill, but to draw the weather on the wall.

Continue reading “A Laser Drawing Machine For Flashes Of Creativity”

Node-RED Laser Shooting Gallery Goes Anywhere

When you think of a shooting gallery, you might envision a line of tin cans set up along a split-rail fence, or a few rows of ducks or bottles lined up at a carnival. But what do these have in common? You, standing in one spot, and shooting in the same general direction. You’re exposed! If those targets could shoot back, you’d be dead within seconds. Wouldn’t it be more fun if the targets were all around you in 360°? We think so, too.

So how could you possibly set up a shooting gallery this way? [Another Maker] already solved that problem for you with ESP32s and Node-RED (YouTube). Each target has an ESP32, a laser sensor, and an LED that lights up when the target is ready, and turns off once it’s been hit. They all make an enticing ‘shoot me’ sound that goes with their graphics, and a second mp3 plays upon direct hit.

The PVC gun houses an ESP8266, a laser module at the end of the barrel, and runs on a cylindrical USB battery slipped down in the secondary grip. [Another Maker] can spread the targets out far and wide, as long as they all stay in range of the localized WiFi access point.

The best part is that the Node-RED system is target-agnostic — it doesn’t care how many you have or how they’re made, and it can juggle up to 250 of them. Because of the way the target objects are programmed, it would be quite easy to add actuators that make them drop down or fall backward when hit. You could also implement [Another Maker]’s fantastic suggestion of hitting arcade buttons with NERF darts instead. Charge those lasers and fire at the break button to see the demo and walk-through video.

If you plan to knock the targets down or over in your implementation, you’ll want an easy way to reset them. Here’s a scrap-built shooting gallery that uses a windshield wiper motor to set ’em back up.

Subterranean Uses For LIDAR: Cave Surveys

LIDAR has gained much popularity as a means for self-driving cars to survey the space around them. At their most basic, LIDAR is a surveying method that uses lasers to paints the space around the sensors and assembles the distances measured from reflected light into a digital three-dimensional representation. That’s something that has quite a number of other applications, from surveying ancient ruins and rainforests from a bird’s eye view to developing 3D models of indoor spaces.

One fascinating use of LIDAR technology is to map out the routes inside caves, subterranean spaces that are seldom accessed by humans apart from those with specialized equipment and knowledge of how to safely traverse the underground terrain. [caver.adam] has been working on his Open LIDAR project for a few years using an SF30-B High Speed Rangefinder and laser device for a dual-system atop a gimbal with stepper motors for cave scanning.

Originally an entry in the 2016 Hackaday Prize, [Adam] has continued to work on the project. The result shown in the video below is a cheaper 3D LIDAR setup that works by rotating the laser distance module on 2 axes with a sensor centered at the center of rotation. It works for volumetric calculations, detects change over time, and identifies various water patterns and rocks on a surface map. Compared to notebooks, tape measures, and compasses, it’s certainly a step up in cave surveying technology.

Check out some other past underground surveying projects, such as Iowa City’s beer caves scanning projects and National Geographic’s 2014 expedition of the Titan Chamber in southern Guizhou Province in China.

Continue reading “Subterranean Uses For LIDAR: Cave Surveys”

Use Blueprint Process To Print On Fabric With Lasers

[Shih Wei Chieh] has built a laser cyanotype printer for fabrics. You know, for art!

How do you get an inkjet head on a shoe or a couch? Most printing processes require a flat surface to print. But hearkening back to the days when a blueprint was a blueprint, a mixture of an iron salt and an acid are mixed and applied to a surface an interesting reaction occurs when the surface is exposed to UV light. The chemicals react to form, of all things, prussian blue. After the reaction occurs simply washing away the remaining chemicals leaves a stable print behind.

[Shih Wei Chieh] uses two galvanometers and a laser to cure the fabric. He uses a slightly newer process which reduces the exposure time required. This lets him print very large pictures, but also on uneven surfaces. As you can see in the video, viewable after the break, the effect is very pretty. There’s a new way to have the coolest pen plotter on the block.

Continue reading “Use Blueprint Process To Print On Fabric With Lasers”

Fun With A 200-kW Fiber Laser

We’ve all heard the “Do not stare into laser with remaining eye” joke. It’s funny because it’s true, as pretty much any laser a hobbyist can easily come by can cause permanent damage to eyes unless the proper precautions are taken. But a fiber laser with 200kW peak power is in another hazard class entirely.

Granted, outsized power ratings like this are a bit misleading, based as they are on femtosecond-long pulses. And to be sure, the fiber laser that [Marco Reps] tears down in the video below was as harmless as a kitten when he got it, thanks to its output optics having been unceremoniously shorn from the amplifier by its former owner. Reattaching the output and splicing the fiber would be necessary to get the laser lasing again, but [Marco] had other priorities in mind. He wanted to understand the operation of a fiber laser, but the tangle of fibers on two separate levels inside the chassis was somewhat inscrutable. The coils of fiber wrapped around the aluminum drums inside the chassis turned out to be the amplifier; fed by a semiconductor seed laser, the light pulse travels through the ytterbium-doped fiber of the two-stage amplifier, which is the active gain medium where stimulated emission, and therefore amplification, occurs.

With a little reverse engineering and the help of an online manual, he was able to understand the laser’s operation. A laser company helped him splice the optics back together – seeing the splicing rig in action is worth the price of admission alone – and the unit seems to be in more or less working order at this point. Normally the most powerful laser we see around here are the CO2 lasers in those cheap Chinese laser cutters, so we’re looking forward to learning more about fiber lasers.

Continue reading “Fun With A 200-kW Fiber Laser”

Making Models With Lasers

Good design starts with a good idea, and being able to flesh that idea out with a model. In the electronics world, we would build a model on a breadboard before soldering everything together. In much the same way that the industrial designer [Eric Strebel] makes models of his creations before creating the final version. In his latest video, he demonstrates the use of a CO2 laser for model making.

While this video could be considered a primer for using a laser cutter, watching some of the fine detail work that [Eric] employs is interesting in the way that watching any master craftsman is. He builds several cubes out of various materials, demonstrating the operation of the laser cutter and showing how best to assemble the “models”. [Eric] starts with acrylic before moving to wood, cardboard, and finally his preferred material: foam core. The final model has beveled edges and an interior cylinder, demonstrating many “tricks of the trade” of model building.

Of course, you may wish to build models of more complex objects than cubes. If you have never had the opportunity to use a laser cutter, you will quickly realize how much simpler the design process is with high-quality tools like this one. It doesn’t hurt to have [Eric]’s experience and mastery of industrial design to help out, either.

Continue reading “Making Models With Lasers”