Experience Other Planets With The Gravity Simulator

As Earthlings, most of us don’t spend a lot of extra time thinking about the gravity on our home planet. Instead, we go about our days only occasionally dropping things or tripping over furniture but largely attending to other matters of more consequence. When humans visit other worlds, though, there’s a lot more consideration of the gravity and its effects on how humans live and many different ways of training for going to places like the Moon or Mars. This gravity simulator, for example, lets anyone experience what it would be like to balance an object anywhere with different gravity from Earth’s.

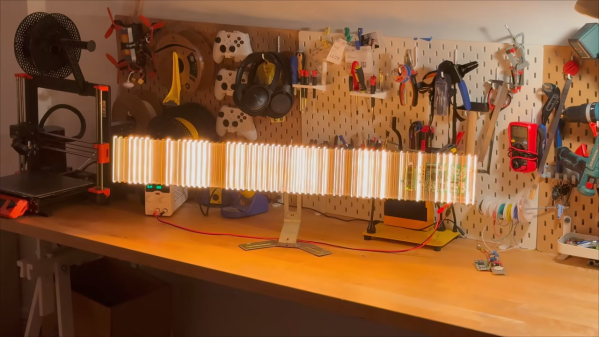
The simulator itself largely consists of a row of about 60 NeoPixels, spread out in a line along a length of lightweight PVC pipe. They’re controlled by an Arduino Nano which has a built-in inertial measurement unit, allowing it to sense the angle the pipe is being held at as well as making determinations about its movement. A set of LEDs on the NeoPixel strip is illuminated, which simulates a ball being balanced on this pipe, and motion one way or the other will allow the ball to travel back and forth along its length. With the Earth gravity setting this is fairly intuitive but when the gravity simulation is turned up for heavier planets or turned down for lighter ones the experience changes dramatically. Most of the video explains the math behind determining the effects of a rolling ball in each of these environments, which is worth taking a look at on its own.

While the device obviously can’t change the mass or the force of gravity by pressing a button, it’s a unique way to experience and feel what a small part of existence on another world might be like. With enough budget available there are certainly other ways of providing training for other amounts of gravity like parabolic flights or buoyancy tanks, although one of the other more affordable ways of doing this for laypeople is this low-gravity acrobatic device.

Continue reading “Experience Other Planets With The Gravity Simulator”

Diffuse glow of red, green, and blue LEDs embedded in silicone

Embedded LEDs For Soft Robots Made From Silicone

Over on their YouTube channel [Science Buddies] shows us how to embed LEDs in soft robots. Soft robots can be made entirely or partially from silicone. In the video you see an example of a claw-like gripper made entirely from silicone. You can also use silicone to make “skin”. The skin can stretch, and the degree of stretch can be measured by means of an embedded sensor made from stretchy conductive fabric.

As silicone is translucent if you embed LEDs within it when illuminated they will emit diffuse light. Stranded wire is best for flexibility and the video demonstrates how to loop the wires back and forth into a spring-like shape for expansion and contraction along the axis which will stretch. Or you can wire in the LEDs without bending the wires if you run them along an axis which won’t stretch.

The video shows how to make silicone skin by layering two-part mixture into a mold. A base layer of silicone is followed by a strip of conductive fabric and the LED with its wires. Then another layer of silicone is applied to completely cover and seal the fabric and LED in place. Tape is used to hold the fabric and LED in place while the final layer of silicone is applied.

When the LEDs are embedded in silicone there will be reduced airflow to facilitate cooling so be sure to use a large series resistor to limit the current through the LED as much as possible to prevent overheating. A 1K series resistor would be a good value to try first. If you need the LED to be brighter you will need to decrease the resistance, but make sure you’re not generating too much heat when you do so.

If you’re interested in stretchy circuits you might also like to read about flexible circuits built on polyimide film.

Continue reading “Embedded LEDs For Soft Robots Made From Silicone”

Researching Glow-Powder Left A Few Scars

Content warning: Human alteration and scalpels.
General warning: We are not speaking as doctors. Or lawyers.

If you watch sci-fi, you probably do not have to think hard to conjure a scene in a trendy bar where the patrons have glowing make-up or tattoos. That bit of futuristic flair was possible years ago with UV-reactive tattoo ink, but it has the unfortunate tendency to permanently fade faster than traditional ink. [Miana], a biohacker, wanted something that could last forever and glow on its own. After months of research and testing, she presents a technique with a silica-coated powder and scarification. Reddit post with graphic content.

Continue reading “Researching Glow-Powder Left A Few Scars”

DIY Book Lamp Is A Different Take On The Illuminated Manuscript

People have been coming up with clever ways to bring light to the darkness since we lived in caves, so it’s no surprise we still love finding interesting ways to illuminate our world. [Michael] designed a simple, but beautiful, book lamp that’s easy to assemble yourself.

This build really outshines its origins as an assembly of conductive tape, paper, resistors, LEDs, button cells, and a binder clip. With a printable template for the circuit, this project seems perfect for a makerspace workshop or school science project kids could take home with them. [Michael] walks us through assembling the project in a quick video and even has additional information available for working with conductive tape which makes it super approachable for the beginner.

The slider switch is particularly interesting as it allows you to only turn on the light when the book is open using just conductive tape and paper. We can think of a few other ways you could control this, but they quickly start increasing the part count which makes this particularly elegant. By changing the paper used for the shade or the cover material for the book, you can put a fun spin on the project to match any aesthetic.

If you want to build something a little more complex to light your world, how about a 3D printed Shoji lamp, a color-accurate therapy lamp, or a lamp that can tell you to get back to work.

Continue reading “DIY Book Lamp Is A Different Take On The Illuminated Manuscript”

A Close Look At The Mitxela Precision Clock Mk IV

Over on his secondary YouTube channel, [Jeff Geerling] recently demoed the new Mitxela Precision Clock Mk IV.

This clock uses GPS to get the current time, but also your location so it can figure out what time zone you’re in and which daylight savings time might apply. On the back a blinking diode announces the arrival of each second. A temperature-compensated crystal oscillator (TCXO) is employed for accurate time-keeping.

The clock can be folded in half, thereby doubling as a clapperboard for movie makers. The dimming system is analog, not pulse width modulation (PWM), which means no visible flashing artifacts when recording. It is highly configurable and has USB connectivity. And it has not one but two ARM microcontrollers, an ARM STM32L476, and an ARM STM32L010. If you’re interested, you can pick one up for yourself from [Mitxela]’s shop.

Toward the end of his video [Jeff] does some navel gazing, thinking about what might be required if future versions of the clock wanted to get down into precision at the nanosecond level. Do you arrange it so the light arrives at the viewer’s eyeball at the right time? Or do you update it on the clock at the right time and let the viewer know about it after a minuscule delay? Philosophical preponderances for another day!

We should add that we’ve seen plenty of cool stuff from [Mitxela] before, including the Euroknob and these soldering tweezers.

Continue reading “A Close Look At The Mitxela Precision Clock Mk IV”

A Network Status Panel The Way It Should Be

Sometimes a project forms itself around a component rather than an idea, and thus it was that [Maximilien] found himself building a data rate monitor for the connection between two data centers. Some MD0657C2-R LED dot matrix displays for not a lot needed a project.

The displays are mounted in groups of four on small PCBs, driven by a MAX6952, which are then controlled by a Pi Pico. There are several display panels in the project, each of which is a pained and laser-etched acrylic sheet with a pair of the LED boards mounted behind it. These in turn go on the front of a wooden enclosure, with a set of LED ring lights behind to illuminate the etched parts of the panels. Each display panel has its own Pico, daisy chained together and driven by a Pico W that supplies network connectivity.

As you might expect, this isn’t the first status panel we’ve brought you over the years.

Tidy LED Matrix Displays GIFs On Demand

When it comes to LED matrixes, building one is just the first step. Then you have to decide what to display on it. [panjanek] came up with a relatively flexible answer to this question, building an RGB LED matrix that can display the GIFs of your choice.

The web interface accepts GIFs for display.

[panjanek] grabbed WS2812B addressable LEDs for this project, assembling them into a 32 x 32 matrix that fits perfectly inside an off-the-shelf Ikea picture frame. The matrix is hooked up to an ESP8266 microcontroller, which acts as the brains of the operation. The WiFi-enabled microcontroller hosts its own web interface, with which the project can be controlled. Upon opening the page, it’s possible to upload a GIF file that will be displayed as an animation on the matrix itself. It’s also possible to stream UDP packets of bitmap data to the device to send real-time animations over a network.

It’s a neat build, and one that answers any questions of what you might display on your LED matrix when you’re finished assembling it. Code is on Github if you fancy implementing the GIF features in your own work. We’ve featured some unexpected LED matrix builds of late, like this innovative device for the M.2 slot. Meanwhile, if you’re cooking up your own creative LED builds, don’t hesitate to let us know on the tipsline!