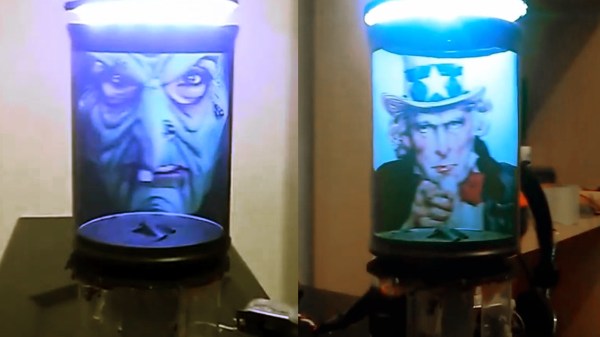
Back in 2018, [Salah] created a prototype display that seems to defy logic using little more than a Pringles can and a fast motor. While not volumetric, this hack does show the same 2D image from any vantage point in 360 degrees around it.
How can cardboard create this effect? Somewhat like a zoetrope uses slits to create a shutter effect, this display uses a thin slit to limit the view of the image within to one narrow vertical slice at a time. When moving fast enough, Persistence of Vision kicks in to assemble these slices into a complete image. What we think is so cool about this hack is that the effect is the same from any angle and by multiple viewers simultaneously.
The project page and video demonstration after the break are light on details, though the idea is so simple as to not require additional explanation. We assume the bright LED seen in the video below was added to overcome the relatively dim appearance of the image when viewed through the narrow slit and isn’t strictly required.
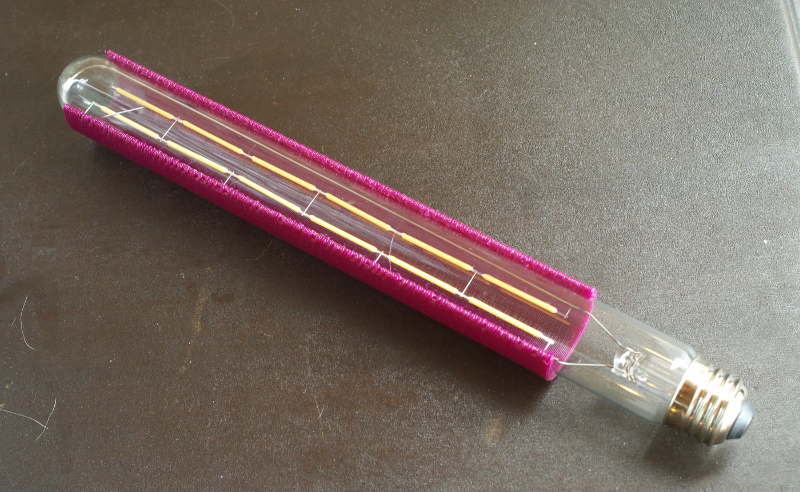
In lamp design, bulbs are usually given generous clearances because they get hot during use. LED bulbs however give off comparatively little heat, which opens a few new doors. [Mark Rehorst] created this huge 3D printed lamp, made with his custom 3D printer and a hefty 1 mm diameter nozzle, and the resulting device not only looks great, but shows off a few neat design features.
The LED filament bulb doesn’t give off much heat, so a PETG partial shade mounted directly to the bulb works fine.
[Mark] printed a partial shade in PETG that is made to sit directly on the bulb itself. The back of the shade is open, allowing light to spill out from behind while the front of the bulb is shielded, making it easier on the eyes. The result is pretty nifty, as you can see here. It sits in the center of the 600 mm tall lamp, which takes up most of the build volume of his self-made CoreXY-based printer, the UMMD.
The LED filament strands in this style of bulb are pretty neat in their own way, and some of you may remember that when they first became available as separate components, no time was lost in finding out what made them tick.
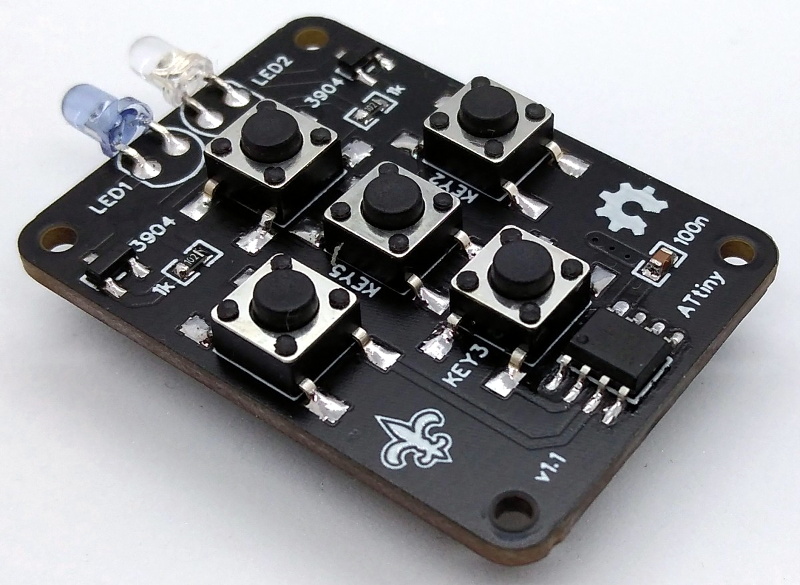
The new hotness in consumer electronics might be RF remotes based on protocols like Bluetooth Low Energy, but there’s still plenty of life left in the classic infrared remote. Especially with projects like TinyRemoteXL from [Stefan Wagner], which let you build and program an IR “clicker” of your own. Whether you want to spin up your own custom universal remote or create a beefed up version of the TV-B-Gone, this open source effort is a great place to start.
The original TinyRemote.
As you might have guessed from the name, this project is actually a larger version of the TinyRemote that [Stefan] put together previously. The documentation for that project goes a bit more into the nuts and bolts of talking IR, and is definitely worth a read if you’re into the low level stuff. For the original five button TinyRemote, the hardware consists of little more than a ATtiny13A microcontroller, a pair of IR LEDs, and the transistors to drive them.
But on the XL, things are a bit trickier as there are now twelve buttons for the ATtiny13A to read. Obviously there aren’t enough pins to read so many buttons directly, but with a combination of BAS16TW diode arrays and resistors, [Stefan] is able to detect what button was pressed using the chip’s interrupt pin and ADC. Certainly a handy trick to have in the back of your mind, and the open source nature of this project gives you a great chance to see how it’s implemented.
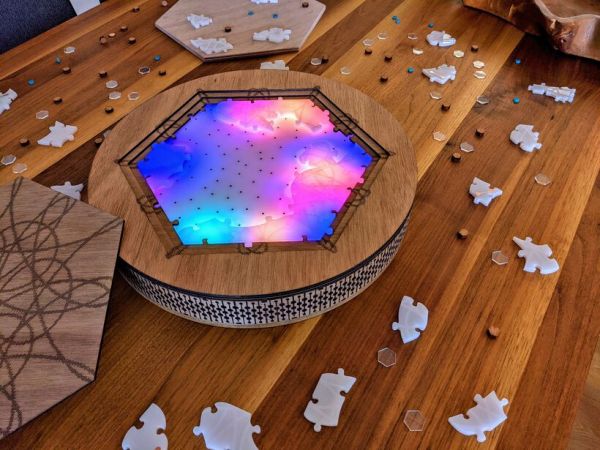
Putting the last piece of a project together and finally finishing it up is a satisfying feeling. When the last piece of a puzzle like that is a literal puzzle, though, it’s even better. [Nadieh] has been working on this jigsaw puzzle that displays a fireworks-like effect whenever a piece is placed correctly, using a lot of familiar electronics and some unique, well-polished design.
The puzzle is a hexagonal shape and based on a hexagonally symmetric spirograph, with the puzzle board placed into an enclosure which houses all of the electronics. Each puzzle piece has a piece of copper embedded in a unique location so when it is placed on the board, the device can tell if it was placed properly or not. If it was, an array of color LEDs mounted beneath a translucent diffuser creates a lighting effect that branches across the entire board like an explosion. The large number of pieces requires a multiplexer for the microcontroller, an ATtiny3216.
This project came out of a FabAcademy, so the documentation is incredibly thorough. In fact, everything on this project is open sourced and available on the project page from the code to the files required for cutting out the puzzle pieces and the enclosure. It’s an impressive build with a polish we would expect from a commercial product, and reminds us of an electrified jigsaw puzzle we saw in a previous build.
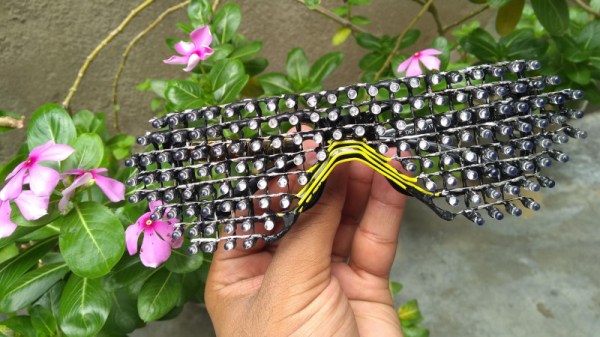
These days, there’s all manner of addressable LEDs out there that can be easily used to produce blinky, flashy projects. However, there’s nothing stopping makers from doing things the old fashioned way, and hacking together an matrix out of raw LEDs. [Deepak Khatri] did just that with his own custom build.
Rather than rely on a PCB or other substrate to hold the matrix together, [Deepak] elected to freeform the design instead. A matrix of holes was cut in a cardboard template with the aid of graph paper. LEDs were then inserted into the holes in the requisite pattern, and their own leads soldered together to create the frame for the glasses. Additional wires that were needed were then installed, doubling as a bridge to allow the glasses to rest comfortably on the nose. Black epoxy was then used on the back side to block the light from blinding the wearer. The matrix is controlled by a pair of shift registers addressed by a microcontroller, and the display animates impressively smoothly.
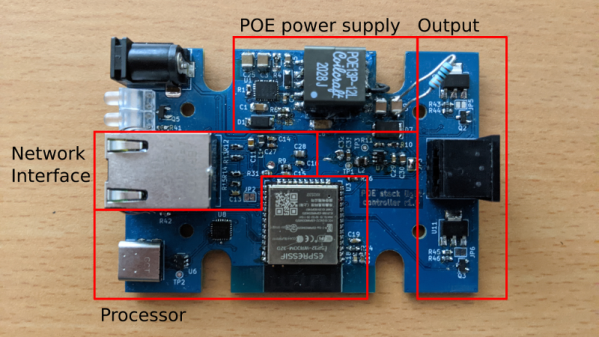
A common sight on factory floors, stack lights are used to indicate the status of machinery to anyone within visual range. But hackers have found out you can pick them up fairly cheap online, so we’ve started to see them used as indicators in slightly more mundane situations than they were originally intended for. [Tyler Ward] recently decided he wanted his build own network controlled stack light, and thought it would double as a great opportunity to dive into the world of Power Over Ethernet (PoE).
Now the easy way to do this would be to take the Raspberry Pi, attach the official PoE Hat to it, and toss it into a nice enclosure. Write some code that toggles the GPIO pins attached to the LEDs in the stack light, and call it a day. Would be done in an afternoon and you could be showing it off on Reddit by dinner time. But that’s not exactly what [Tyler] had in mind.
On the software side [Tyler] has developed a firmware for the ESP32 that supports both Art-Net and RDM protocols, which are subsets of the larger DMX protocol. That means the controller should be compatible with existing software designed for controlling theatrical lighting systems. If you’d rather take a more direct approach, the firmware also sports a web interface and simple HTTP API to provide some additional flexibility.
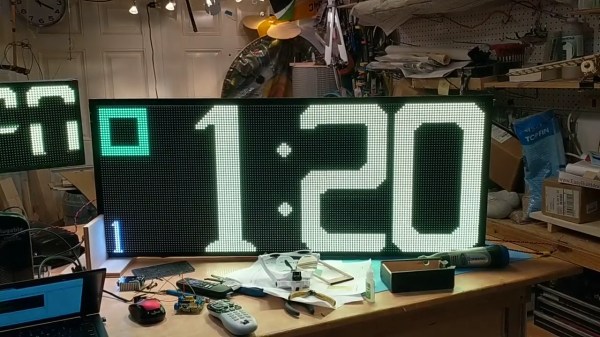
Glider events run outdoors in full sunlight, so the system uses big bright LED matrix displays to show its timing information. The system, built around the STM32 Discovery platform, uses several of the microcontroller boards to drive several displays as well as the main controller which handles timing. It also packs in an audio system for issuing instructions to competitors. It can also display pilot names as well as instructions such as when competitors should land at the end of a heat.